How do I print this stuff with a resin printer (the basics)
As resin printers are a bit more complicated and potentially hazardous to operate, you should already know the basics of how one works before coming to this site to print any of our designs. Step ZERO should always be to fire up YouTube and watch a bunch of instructional videos before you even open your first bottle of resin. But assuming you have already set up your printer area and wash/cure station, are familiar with the basic safety precautions, and just want to know how to get the files off this website and into your printer...
- Step 1 - Download the STL or OBJ files you want to print from the link handily provided on the My Designs, Guest Designs, or Remixes page. These will typically be grouped together in a convenient zip file if the figure comes in more than one piece.
- Step 2 - Read the instructions, as some designs may ONLY be intended for use on filament printers or come with alternate versions of files depending on whether you're printing out of filament or resin. If you see a file that has snap-together joints that look like the ones pictured below, keep in mind that these are intended for filament printing and will not work in a SLA resin printer... even if you use flexible resin. This is because flexible resin is designed to make smaller parts bend, but it does not compress in the same way that PLA does. If you try to compress a resin part it will either not move, break, or you're simply going to end up scraping off the sides until it finally fits in the hole... and immediately falls out again.
You can still usually print these figures, but you will end up having to sand down all the snap in parts and glue it together as a solid statue.
Many of my figures call for the use of a flexible resin like 3DMaterials SuperFlex or SirayaTech Tenacious. Further print instructions for individual pieces will be listed in the Print Recommendations section below the file link.
- Step 3 - Once you open the zip file, separate out only the STL files that you need to use (files for SLA printing will usually be clearly marked as such) and import them into your slicer program. If your printer doesn't come with it's own slicing software, I recommend checking out Chitubox, which is completely free and compatible with most major brands of printer.
The first time you use the slicer it will usually ask you to select your manufacturer and model from a pull-down list (you can add multiple machine profiles to Chitubox if you own more than one printer) This will automatically set all of the X, Y, Z axis print area settings, and save the sliced files in a format that your printer will be able to read. If you're using something other than Chitubox, or a brand of printer they don't yet support, you may need to enter these settings manually based on whatever came in your setup manual.
You will also need to set up at least one print profile
that contains adjustable settings like layer height and exposure time, which may need to be changed occasionally depending on the type of resin you're using. Important note: some brands of printer like Creality and Phrozen have their own resin profiles configured on the printer itself. While this is supposed to be a convenience that allows you to use the same files to print objects in different colored resins, it's actually more of an annoyance, because it means you need to set these variables in *both* locations and if they don't match, your print can turn out wrong because the settings on the printer always take precedence. Fortunately, there should be very little need to switch resin profiles, assuming you always intend to print at the best possible resolution every time.
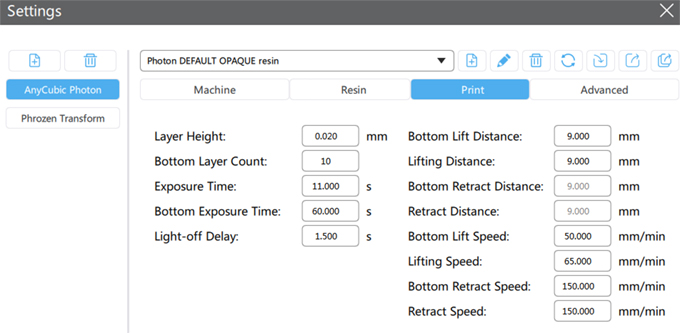
While things like lift distance and retract speed are best configured to whatever the recommended settings are for your specific machine, the most important variable you're going to want to adjust right away is Layer Height.
This may be set to 0.1 or 0.05 by default, and the instructions that came with your printer may not give you instructions for putting anything else in there, but for the best-looking print, you're going to want to set this to 0.02.
This is typically the maximum printing resolution on most printers. Some fancier ones can go down as low as 0.01 or even 0.005, but 0.02 is usually the sweet spot for printing action figures and props. Lower than that, you may squeeze out a tiny bit more fine surface detail, but that detail will be lost the moment you apply any paint to the object. Layer heights greater than 0.02 will print slightly faster, but will start losing surface detail that you're going to want to retain as much of as possible, especially as paint will end up obscuring some of it.
If all you intend to do is print Daleks, Quarks, TARDISes, or other blocky angular objects, layer detail might not matter quite so much, and printing at 0.05 could shave a few hours off your total print time. But for the most part, 0.02 is where you're going to want to print at. And one of the advantages of printing at this layer height is that the individual layers are so thin that exposure time is universal for almost any color or brand of resin you use.
I personally have two default profiles I switch between for opaque resins (anything from white to black that isn't transparent) and clear. The only difference between the two is that for clear resin, I drop the exposure time from 11 to 8 seconds, and bottom exposure time from 60 to 30 seconds, since transparent resin lets more light through and requires less time to cure. (And too much UV exposure may turn it yellow).
Your printer settings might vary slightly, but at 0.02mm I've found these settings to be pretty universal on the three different sized printers I've used.
- Step 4 - Change the orientation of your models.
This is one of those things where the more you print, the better you'll get at instinctively making small adjustments to improve your overall print quality. The most important things to remember when orienting your prints is that the underside of the model (that is, the side closest to the build plate) will come out looking the roughest and will also be where the majority of the support structures will connect. These will leave small circular bumps or indentation that will need to be carefully snipped away and sanded down if they're in a place that's visible. In contrast, the top of the model will look the nicest and shouldn't have any visible supports, so it's always best to orient your prints so that the side that's facing down is the side people are least likely to see.
Additionally, because your objects are built up one layer on top of the previous, you'll get the nicest looking results with fewer supports, and also fewer print failures if all objects are angled about 30° to 45° so you have a slow gradual build-up with a smaller footprint. This also helps eliminate potential pocket areas that can trap liquid resin.
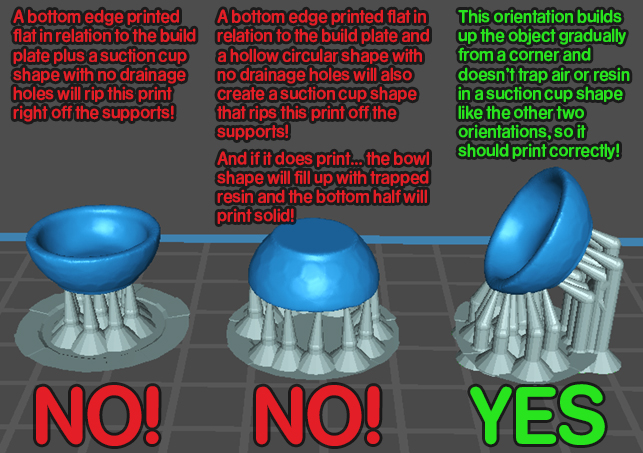
You always want your bottom layer of the object to start printing from a single corner/edge that can be given a heavy build-up of supports, and gradually expand outwards, rather trying to print an entire large flat surface all in one go. The more surface area you have on your first few print layers, the more likely it is that suction force will rip the object off the very thin support structures and ruin your print. (And if it doesn't self-destruct, it will often look uneven and ugly.)
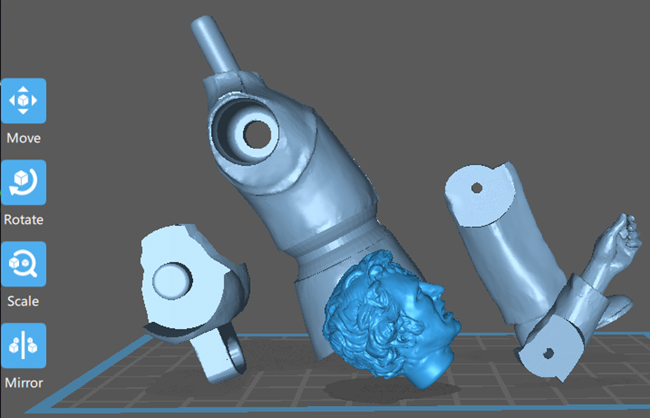
You also need to be conscious that you are printing with a liquid and that perfectly flat surfaces and bowl shapes are the worst objects to print when it comes to creating suction force that can potentially damage or rip your prints off of their supports. If you've ever done dishes in a sink or dropped something flat into a tub of water, you know that it takes a huge amount of force to lift it up off the bottom, but as soon as you can tilt it so that the liquid has a chance to flow around it, it becomes much easier to lift. This is what happens every time your build plates lifts off the FEP liner, except unlike the dinner plates in your sink, it doesn't have the option of tilting sideways to reduce the suction force.
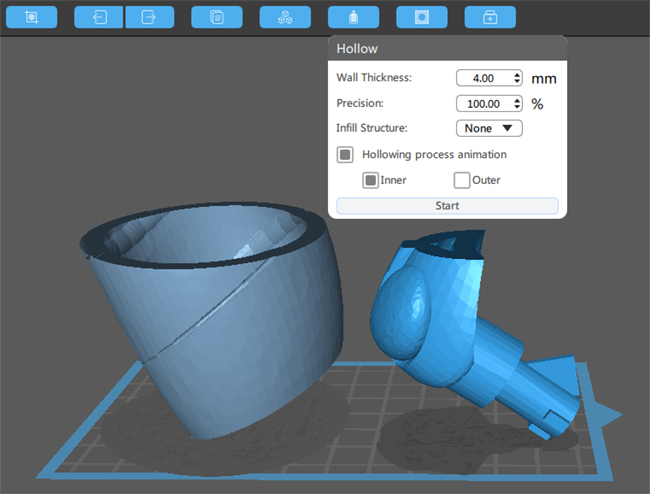
- Step 5 - Hollow the models as needed.
Most of my models come pre-hollowed, but if you download a model that has a large solid torso, head, or other body part, you can use the Hollow tool in Chitubox to automatically make sure your model isn't printing any thicker than it absolutely needs to be. While you can usually get away with 3mm wall thickness, 4mm is safer and less likely to crack if dropped.
If you are hollowing a large model, you will also need to use the Add Hole tool to add some drainage holes
to the underside of the model. so that both liquid resin and air can escape. Just like using a bottle opener on a tin of tomato sauce, you're going to want to add at least two holes at different levels so that liquid can pour out one while air enters through the other. Otherwise, you're just creating a vacuum that will trap resin and create additional suction force rather than helping to eliminate it.
- Step 6 - Add supports.
This is one of the steepest learning curves on resin printing. While a lot of slicer programs like Chitubox come with an auto-support feature, these are usually pretty dumb and will just place supports randomly a set distances apart instead of spreading them out radially from the lowest points on the object.
In most cases, I recommend ignoring auto-supports and adding your own supports by hand. It's more time consuming, but the best way to ensure your prints don't self-destruct, and that no supports get placed so close to the model that they fuse to the side, leaving you with a big ugly bar than has to be chipped away and smoothed.
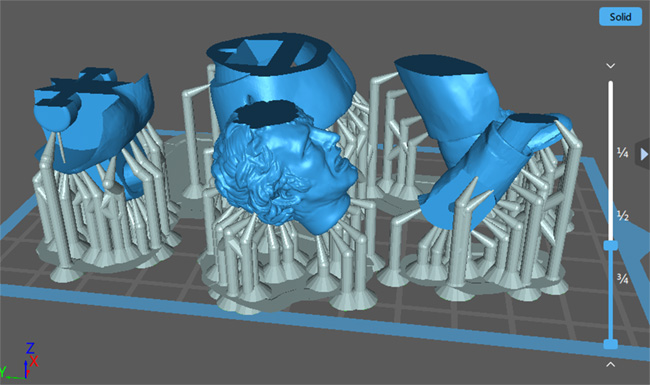
The best way to add supports in Chitubox is to use the slider bar on the right side of the screen to start at the lowest layer of your print and slowly drag up, manually adding in supports wherever you start to see "islands" appearing.
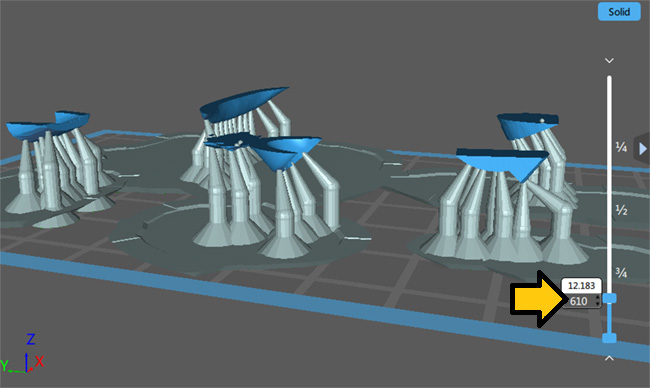
The bottom of any "island" you come across should have at least one support at the lowest point and then a few more supports close by to this point to provide a secure and well-supported base for the first areas of your model that will be printed.
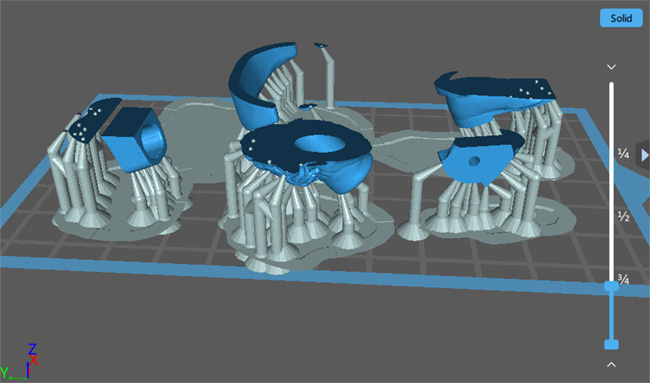
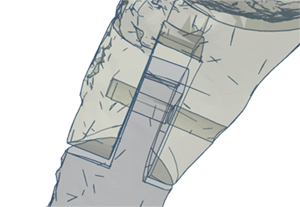
The higher up you go, the further apart you can spread your supports, since the ones on the bottom will be doing the majority of the heavy lifting. However, if you have a part that sticks out in mid-air unsupported (like the T-shaped leg joint on the far left of the picture below) you will need to make sure you are adding a new base support to the lowest point of this part, and then additional supports radiating outward.
Note that if you miss one of these floating island pieces and fail to add proper supports, that part of your model may end up misshapen, missing, or it could float off and end up stuck to the FEP liner, meaning nothing else above it will print because it's blocking all the light.
Adding supports and orienting your prints is a bit of balancing act between making sure your model is stable enough that it doesn't move or ger ripped loose during printing and not adding so many supports that the underside of your prints look like a plucked chicken once you finally manage to trim away all the supports.
Until you get really good at it, I recommend using the "Save Project" feature in Chitubox to save a copy of all your pieces with the supports included into a project file that you can reimport back into Chitubox later if you need to fix or reprint a part. As long as you don't attempt to rotate or resize the object, it will retain all the existing supports, and you can add, delete, or edit them as needed if that piece failed to print or overlapped with something it shouldn't have.
How do I set up my dedicated print area and wash/cure station?
Unless you have a spare room you never need to enter where you can set up the printer and then leave it running undisturbed for days at a time... you're going to have to spend some time and money setting up a dedicated space to operate your printer and perform the wash and cure steps that follow printing in a safe and effective way that won't damage your health. There are several factors to consider when setting up your printer for the first time and you should have a plan for how you're going to do this before you take it out of the box and attempt your first print.
If you're unfamiliar with the wash/cure stage of resin printing; once your prints come off the printer they are not fully hardened and will be covered in residual liquid resin and whatever support structures you printed. These will need to be removed prior to final curing so that only the finished model remains.
While wearing gloves, you will need to remove the object(s) off the build plate and then rinse them off in a container filled with 90 to 99% isopropyl alcohol (usually called "IPA" for short) unless you are using fancy water washable resin. Once washed, you will need to carefully snip off all the supports, and then usually give the parts a quick secondary IPA bath to get any areas you couldn't reach previously, then pat them dry with a paper towel and expose the parts you want to keep to a 405nm UV cure light for a few minutes to cure to full hardness.
Picking the right spot for your printer: Keep in mind that resin is sensitive to temperature (both heat and cold), moisture/humidity, dust, pet hair, and other particulates, and external UV light sources. The best place to set up your printer is in a temperature-controlled room/closet/cabinet that doesn't get much natural light where you can hook up (or into) an external ventilation source.
If you are planning on printing in your garage, tool shed, or uninsulated basement or attic, but you live in an area where it routinely drops below 20°C or gets hotter than 32°C, you may find yourself only being able to print during spring and early autumn. Temperature affects the resin’s viscosity, and it will grow thicker (and have trouble with layer adhesion) as it cools down and runnier as it heats up, both of which will influence cure time.
If you're printing in a temperature-controlled environment, you can compensate for minor seasonal shifts by adjusting your layer exposure time (usually by not more than a second.) But if your printer is operating in an uncontrolled environment, your printer may experience a full 10° to 20° temperature shift between the warmest and coldest parts of the day.
Freezing resin or exposing it to extreme heat will cause the chemical chains to break down and may leave you with resin that no longer cures properly or has already started to solidify before you get it out of the bottle.
Likewise, moisture and humidity can damage both your prints and your printer. I advise against running your printer in the same room as a washer and dryer unless you can place it inside of a fully enclosed and ventilated cabinet that can protect it from moisture. If you're printing in an old garden shed or open car port that's routinely exposed to damp temperatures, you may need a fully enclosed cabinet plus a dehumidifier to deal with condensation.
Dust, pet hair, and other particulates can also damage your prints or printer. Most printers have fans that blow air over the circuit boards and light array, and these often build up a static charge while in use that that can pluck particulates out of the air like magnets.
As someone who owns several cats, it is almost impossible to keep my office cat hair free and I'm constantly picking stray hairs out of the resin vat (or discovering one sticking out of one of my printed models) but keeping your printer inside a cabinet or other enclosure will eliminate the worse of it and help protect the equipment.
DO NOT operate your 3D printer in the same room that you cook, smoke, airbrush or spray paint in. The static caused by the UV light and LCD screen will suck up those ultra fine particles, and before you know it your prints will become blurry indistinct blobs because the inside of your printer looks like somebody took a can of greasy stringy spray paint to it.
Finally, it is always best to set up your printer in a room or closet that isn't exposed to direct sunlight, and ideally, can remain completely dark for most of the time. While most printers come with UV tinted windows, a dark environment will preserve your resin, and means that you can safely leave uncured resin sitting in the FEP vat for months at a time without any ill effects, as long as you stir it up again before your next print job.
Adding Exhaust Ventilation - Resin printers produce very pungent fumes while they are printing, and you want to avoid inhaling them as much as possible, so one of the first things you'll want to do is hook up an exhaust system.
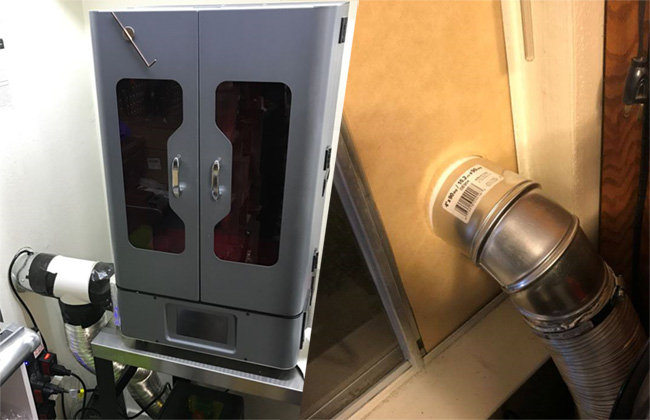
Best case scenario; you've got a house with a hall closet that has a dryer hookup and exhaust fan all ready to go that isn't being used for laundry, and all you need to do is build or buy an adaptor that will connect your printer's exhaust fan up to a standard length of 4" dryer tubing, which can then be hooked up to the dryer vent to vent the fumes outdoors.
Most of us aren't that lucky,
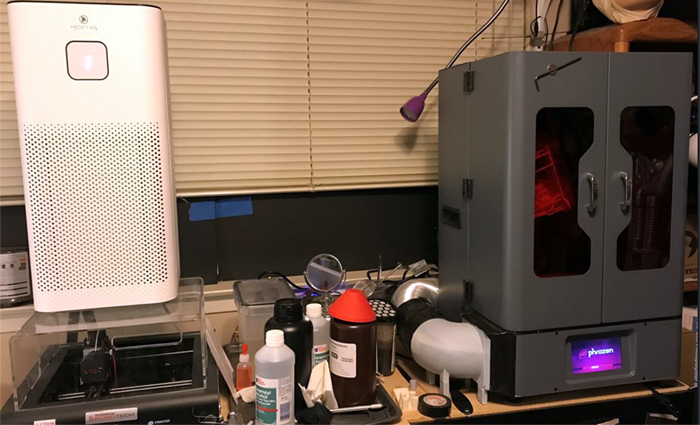
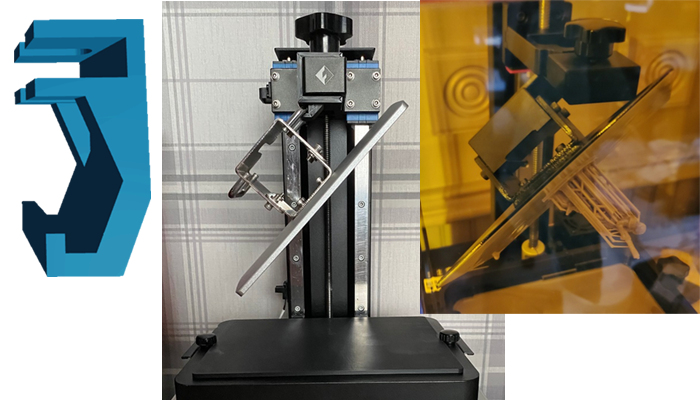
and you're going to need to build something yourself. If you own your own home and are allowed to punch a hole through the wall, you can buy a standard 4" inline duct fan, a 4" exhaust hood, and a length of 4" aluminum dryer tubing, (plus a 4" hole saw) and simply install a new exhaust vent wherever it's convenient. I have mine set up this way in the closet of the spare bedroom I use as an office (see first photo above), and this eliminates roughly 95% of the fumes related to the printing process.
If you're renting or not comfortable with punching holes in the wall, plan B is nearly the same except instead of the wall, you buy a sheet of plywood, and cut a 4" hole in that, and then vent the fumes out through an open window. It's a good idea to seal the edges with aluminum tape and you might want to add some extra insulation, especially if you live in a colder climate.
Plan C is simply to print in a closet or large free-standing cabinet, and just don't open the door until it's finished printing. However, this is the least desirable option because the exhaust air that the printer is spewing out is being recirculated in a confined space, and then being pulled in again by the ventilation fans that pull fresh air in across the circuit boards and light emitter. Since the exhaust contains fine particulates of uncured resin, this will gradually build up a layer of greasy half-cured resin between the light emitter and the underside of the LCD screen, shortening the lifespan of both.
If you are going to go this route, I would at least recommend putting a box with an active carbon filter over the exhaust fan to try to filter out the worst of the resin particulates, though this will need to be changed out every few months.
When assembling your exhaust system, if you go on
Thingiverse and type in "[Printer Name] exhaust" or "[Printer Name]" vent adaptor", you can usually find a ready to print adaptor that simply slots over your existing exhaust port and ends in a standard 4" tube attachment. Some will also provide an extra slot to insert a carbon filter in the middle which will help soak up extra fumes. Since these are DIY models you have to print before you can use, you may need to create a temporary adaptor out of cardboard and duct tape in order to print the adaptor itself.
If your setup isn't perfectly airtight you may still get some fume leakage, so I advise wrapping all the joins with aluminum tape to help create an extra tight air seal (that is quite easy and cheap to replace if you have to take it apart to service your printer or replace the carbon filter.)
Important note: Many printers, especially the larger models, have more than one fan, and they're all the same size. Usually only one of these is resin exhaust, and the others are for passing clean air over the motherboard, so make sure you read a manual or go on reddit to make sure you're attaching the exhaust up to the correct fan.
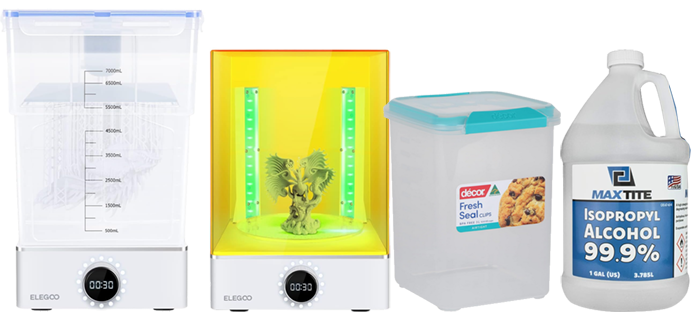
Set up your post-printing wash station - Depending on how much money and counterspace you have, you can purchase a premade all-in-1 wash and cure station that may cost more than your printer itself... Or you can just purchase a large airtight and leak resistant tupperware container for £7 and swish your parts around yourself with a pair of long-handled tweezers while wearing gloves.
I've been going the tupperware contain route myself, and it's by far the easiest method, especially if you're printing a whole bunch of smaller pieces.
You can purchase a stand-alone ultrasonic cleaner if you want to be extra certain that your parts are squeaky clean of all liquid resin, but unless you have a particularly intricate hollow piece, usually submerging them in a container of 99% Isopropyl Alcohol (if you're printing out of standard ABS-like SLA instead of the water-washable stuff), swishing around a bit, then patting them dry with soft paper towels gets the job done.
After several months of use, your £7 tupperware container will get scudgy and gross with uncured resin and little bits of broken supports, at which point, simply strain the resin into a large ziplock bag, wipe down the inside and reuse, or if you can't stand the sight of dirty container that looks like Morbius' brain tank, set the container outside and allow the alcohol to evaporate. Then when you've got a slimy grey mess down at the bottom, stick the entire thing under your UV cure light to solidify it, and throw it away and replace with another £7 tupperware container.
Note that even if you have an exhaust system hooked up to your printer, this wash and cure process will produce a lot of very pungent fumes on its own. If possible, perform these steps in a room where you can prop up a box fan in the window to vent the fumes outside, or
failing that, you can purchase a fancy HEPA filtered air purifier, or just rubber band a few sheets of active carbon filter to an old oscillating tower fan.
Set up your post-printing cure station - Again, this can be as fancy or as cheap as you want it to be.
You can buy specially designed cure stations
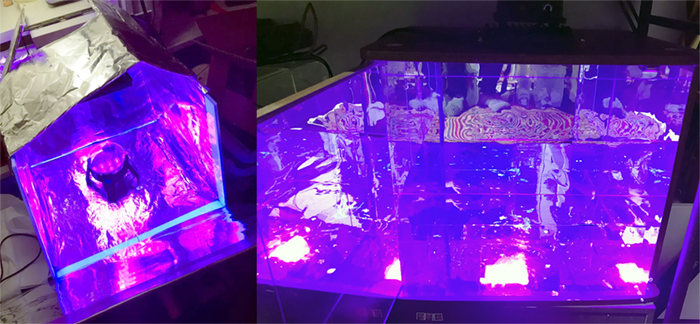
with built-in turntables for anywhere between £30 to £200, or you can purchase a 405nm UV lamp and a solar powered display stand, and simply stick them in a cardboard box lined with aluminum foil. Or if you want to get extra fancy with your homebrew cure cabinet, find an old end table or just build a box out of plywood and line the inside with flexible mirror panels, and then mount your 405nm UV lamp in the top for maximum coverage from all angles. (With the mirror cabinet, I don't even bother with the turntable anymore, since the coverage is close to 100% except for the underside and darkest of shadow areas.) I also use shiny mirror-finish toaster oven trays to keep all my parts organized, which you can simply pop directly into the cure cabinet while making sure that you don't lose any of the tiny pieces while you're waiting to paint them.
Note: not all UV lights are the same, and for proper curing, you need to make sure that you're getting something that produces UV light in the 405nm band, which is the part of the spectrum used for curing 3D printing resin. Other UV lights designed for growing plants or curing nails may not work as well... or at all.
Depending on the strength of your UV light, your final cure time will vary. Using a high powered lamp, you can usually cure a part in 5 to 10 minutes (flipping it over half-way.) You don't want to over-cure your pieces as this will turn white colored parts yellow and also make your prints extremely brittle. If you are printing using flexible resin, I recommend cutting your cure time to only a minute or two. It's better to leave it slightly "uncooked" and retain the flexibility (at least until the figure is fully assembled) than overcook it, and end up with a part that's just as fragile as if you'd printed it out of standard ABS-like resin that costs half the price.
Adding external UV protection - As mentioned earlier, it is always best to set up your printer in a room or closet that isn't exposed to direct sunlight, and that can ideally be cut off from all external light sources. This will allow you to leave the resin sitting in the machine for months at a time without it solidifying or degrading.
If you don't have a closet or cabinet available and the room has windows, try purchasing some UV-blocking window film and some black-out curtains, or simply cover over them with cardboard or foamcore... remembering that it is nice to be able to open them to get some extra ventilation into the room when you're taking parts off the printer and refilling the resin vat. Be aware that standard overhead lights don't produce anywhere near as much UV as natural light, but they still produce some. So, leaving the lights on as you're removing prints from the machine won't hurt anything as long as you aren't shining a full spectrum ott light directly into the resin vat, but remember to shut them off and replace the cover as soon as you're done.
Safety gear and spill protection - Bare minimum, this should consist of wearing Nitrile gloves whenever you are handling liquid resin and uncured prints. Depending on how sensitive your lungs are, and what sort of ventilation you've set up for your print area, a N95 mask or P100 respirator. A pair of safety goggles is also recommended if you don't already wear glasses. You'll also want plenty of paper towels and a cannister of isopropyl alcohol wipes. Chances are, if you regularly use model paints, you have all these items already.
Getting resin on your skin won't kill you. Some people are extra sensitive to the stuff, and may break out, but usually you can just wipe if off. The real danger is in getting it in your eyes, or having some on your clothes or skin and not noticing until you walk outside or put your hand under the UV cure light. Curing resin produces a considerable amount of heat, and you can get some nasty chemical burns if you do something stupid.
Mostly, it's just really sticky and will stain anything it touches worse than engine oil. So, make sure you're wearing old clothes you don't care about too much when you take prints off the printer or empty out the FEP vat. And if you're printing indoors, especially on carpet, it's a good idea to put down some
cheap vinyl chair mats or similar surface that can be easily wiped clean with alcohol wipes if you happen to dribble a little (which is going to happen sooner or later no matter how careful you are).
Ensuring safe storage of resin-tainted trash and tools - Anything that resin touches is going to get sticky and disgusting, even if you wipe them down with isopropyl alcohol wipes afterwards. They are also going to smell strongly of resin. I recommend having a separate set of tools for taking prints off the build plate and removing supports that you don't use for anything else. Having a small metal storage locker that you can put your tools and bottles of resin in when not in use is a very good idea and will cut down on the resin smell if you intend to work in the same area when the printer is not in use.
Similarly, used paper towels, discarded support structures, and empty resin bottles will also have a strong smell to them, so having a large trashcan with a sealed lid is helpful for keeping unpleasant odors to a minimum. Since uncured resin is dangerous to local wildlife, if you want to be ecologically conscious, try putting empty resin bottles, soaked paper towels, and printing remnants under the UV cure light for a few minutes to solidify the remaining liquid before you chuck them in the trash. DON'T shine a UV light into the garbage bin itself, as the heat caused by curing resin is enough to melt your bin liner.
What tools or add-ons do I need to improve my printing experience?
Resin printing requires a lot of kit besides the printer itself, so I covered most of the basics in the previous section. We'll just assume
you already have a 405nm UV cure light or cure station, some sort of ventilation system, a container for your IPA wash,
cheap vinyl chair mats or similar spill protection, plus gloves, alcohol wipes, paper towels, a P100 respirator, and eye protection. A cabinet to store your resin bottles and tools when not is use is also recommended.
Here are some other optional items that may not be essential but will certainly make your resin printing experience easier. Since there are a lot of them, I've broken them down by different parts of the printing process:
Printing add-ons:
Print a build plate drip hanger/hook for your model of printer (if applicable) - This tends to be more useful for larger sized printers, especially if you've got a build plate with drainage holes in the base. The hanger typically hooks onto the Z-rail lifter arm and allows you to suspend the build plate at an angle so that your prints can drip dry easier and resin that is in hard-to-reach places is a little more likely to end up back in the FEP vat. Check Thingiverse to see if one already exists for your model of printer. If not, it's usually pretty simple to make one yourself in TinkerCAD.
Be careful when using these, as
the easiest way to destroy a resin printer in under 5 seconds is to drop a heavy metal build plate corner-first through the fragile glass screen while the FEP vat is still full of resin. You also want to make sure that no part of your print is hanging over the side of the FEP vat where it's going to drip resin outside of the container, where it could potentially get on the screen or into the interior workings.
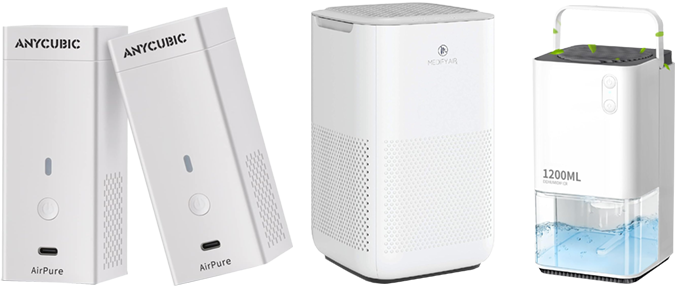
Active Carbon Filter Mini Purifiers - Anycubic makes some tiny rechargeable air purifiers that you can place inside your printer (usually in the back corners near the Z-Axis lifter) to help combat the smell of resin during printing. The charge typically lasts for about 24 hours, which is about the time it takes to print a normal sized print job. These aren't a substitute for adding exhaust ventilation to your printer, but they are a nice add-on if you're concerned about resin smell, and they're universally compatible with most models of printer.
Note that Elegoo makes a very similar looking item for the Mars 3, Saturn 2, and Jupiter resin printer, but these plug directly into a slot in the printer itself and are powered by the onboard USB. This eliminates the chore of having to recharge them between print jobs, but they are ONLY compatible with those specific models of printer.
H13 HEPA Filter Room Air Purifier - If printing inside the home or a office where you need to work, one of these will help with scrubbing resin fumes during both the printing and wash/cure process. Again, this is not a substitute for an exhaust system, and even my ultra high-powered MA-50 model struggles to remove the Isopropyl Alcohol smell while I'm actively rinsing off parts. But once you're done, if you crank the filter up to maximum and leave the room for a few hours, by the time you come back, it'll be crisp and clean with no trace of resin smell.
Alternatively, a cheaper route is to just rubber band a few sheets of active carbon filter to the front and back of an oscillating tower fan. This won't trap fine particulates like a HEPA filter, but will help eliminate odors from the air.
Dehumidifier - If you're printing in a garage or other location that isn't temperature controlled, it can be useful to have one of these right next to the printer... Ideally, with both machines operating inside an enclosed cabinet. This won't do anything about the resin smell or protect your resin from damage caused by temperature changes, but it might prevent your printer and prints from getting damaged by condensation forming on the circuit boards and on the underside of the LCD screen.
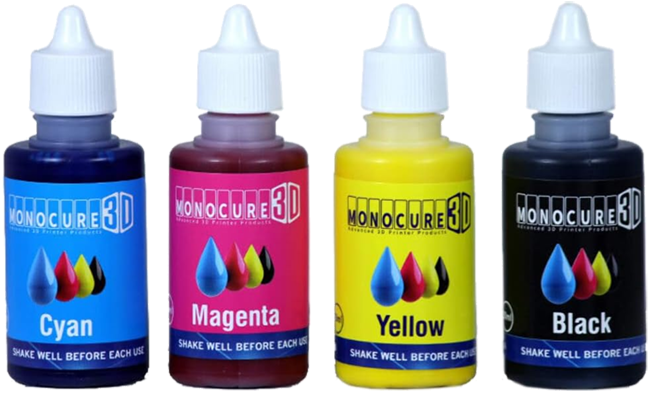
Resin Pigment - I'm having trouble finding this stuff on the UK version of Amazon, but the US version has it.
If you search for resin pigment online, you will usually find opaque colors designed to work with UV craft resin, which is slightly different. Monocure 3D is the only resin pigment I've found that is specifically formulated to work with 3D printers.
If you do try some other brand, make sure that the pigment is a transparent liquid rather than opaque or a powder. Note that you have to squirt quite a bit of this stuff into the vat to get a color that will actually show up the way you want it. You may want to find a sacrificial white plastic teaspoon so you can scoop up about 3 mm worth to do a color check before you start printing, since the black screen on the bottom of the FEP vat will make the contents look much darker than they really are.
Of course, if you're mixing pigments, it is going to be nearly impossible to match colors exactly between print jobs, but on the plus side, as long as you have a few bottles of these pigments around you will never need to spend £30 again for a 500ml bottle of some color you're never going to use again, just to print a single part that only requires a tablespoon's worth of resin.
You can also add this stuff to UV craft resin for post-printing color needs. (Like adding the transparent green eyes for the Mandrel figure or creating different colored console lights on the 8th Doctor Console.)
Support removal and wash:
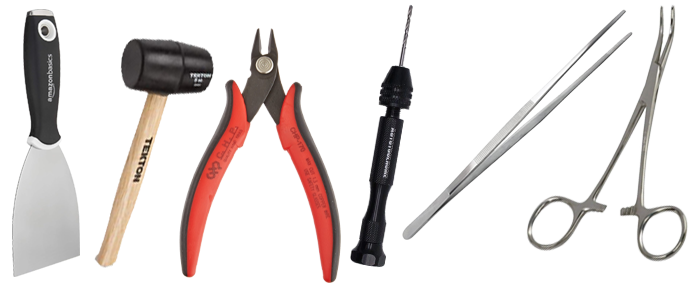
Putty Knife and a Rubber Mallet - This is going to be different from the soft flexible plastic putty knife you use for scraping residue off the FEP liner. Try to get the non-stick titanium kind of putty knife with rounded corners and a hammer end if you can find one. Your prints are usually going to be stuck fast to your build-plate, and you'll need to use a strong but thin metal blade to separate them.
You want to be extra careful
doing this so that you don't end up scratching or gouging the metal of the build plate itself. Always try to guide the putty knife in flat, parallel to the build plate, and avoid leading with the sharp corners. Tap lightly with the rubber mallet on the hammer end until you get an edge under the print and then try wiggling side to side once you get purchase to pry up nearby areas. Avoid lifting straight up as this could bend the putty knife or shatter the print. Go around the entire outer perimeter with the putty knife and it'll usually pop free without too much fuss.
CHP-170 Micro Wire Cutters - There is no better tool for trimming supports off your prints. In fact, I highly recommend purchasing at least two of these because the pair you use for trimming supports is going to end up getting completely sticky and disgusting with resin, so you won't want to use it for anything else. (And it's nice to have a clean pair you can use later during painting and assembly.)
When trimming supports, always try to snip off the ones on the most thin and fragile pieces first. Slide the cutters in close and try to trim as close to the model as possible. If you have a support in a very visible area that you are concerned about damaging by leaving a pock mark, you may want to cut it a few mm further out, and then carefully go back and sand it down with a precision file once the rest of the model has been cut loose.
Pin Vise Hand Drill (with multiple sized bits) - This is another item you'll want to have multiples of, since the one you use on your uncured prints is going to get disgusting. Before you place your prints in the cure box, it is absolutely essential that you clean out all articulation holes with a hand drill (you'll normally want to use the 2mm size bit for this). DO NOT use an electric drill! Even though your print will be softer at this stage than when fully cured, the force of an electric drill can still crack or shatter your print.
Elbow and knee joints in particular might have holes that have filled in almost completely with semi-cured resin. For these joints, you're going to want to make sure that the hole goes all the way through the inside of the arm/leg, but only about half-way through the far side.
Long Handled Tweezers or Locking Forceps - For dipping and swirling parts in your IPA bath, and also sometimes for reaching into holes and removing internal supports in tight spaces. You'll probably want to buy multiples of these again, so you can have one set for pre-curing and one set for holding onto parts while painting.

Ultrasonic Cleaner - If you really want to make sure you separate every last drop of liquid resin from a print, or have a hollow part that is proving especially difficult to clean, an ultrasonic cleaner can help you get your pieces squeaky clean. This should always be used after you have rinsed and dried the part normally using the IPA bath. You should fill it with regular water rather than IPA, as there's a slim but not unheard-of chance that static caused by the agitation or a poorly grounded plug could ignite the alcohol vapors resulting in a fireball. Your ultrasonic cleaner will get greasy and disgusting after a few uses, but wipe down the interior with an isopropyl alcohol wipe and it should be good enough to continue cleaning resin parts (just don't put your silverware in it). As the water will be resin tainted, it is best to just pour it out into an old pie tin or other open container and allow it to evaporate.
Changing/cleaning your resin:
At some point during your printing adventures, you're going to need to switch out to a different color resin, clean chunks of a failed print out of the resin vat, or check to see if you have a hole in your FEP liner. At this point, the liquid resin in the vat needs to go someplace and these items will help you with that:
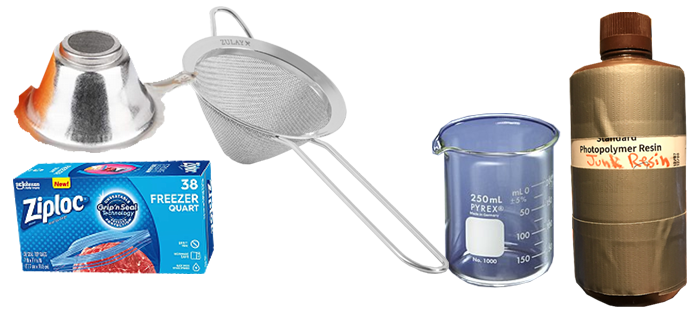
Resin Funnel or Fine Mesh Cocktail Strainer - Resin funnels are designed to fit in the neck of most standard size resin bottles, but because the aperture is so small and the mesh is so fine, this blocks airflow almost immediately and they have an annoying habit of getting backed up and spilling over the top causing a huge mess.
My preferred method of
draining the resin tank and making sure you filter out *ALL* the hard-to-see floaty bits is to use a fine mesh cocktail strainer (the kind with a metal loop on one end and a short handle on the other) and Stand & Fill Plastic Freezer Bags (The kind with the flat bottom) to strain the resin into the bag while it sits in a large weighted pyrex beaker/measuring jug or an oversized coffee mug you never intend to drink from again.
This is much easier than trying to pour directly into the bottle, and if you've got a large sized resin printer, you're going to need both hands to hold the vat while pouring. Depending on your vat size, you may want to use quart or gallon size bags, but simply pour the resin out through the strainer to catch all the chunky bits, then scrape the residue and remaining liquid off the FEP liner with the soft plastic putty knife that came with your printer. (Don't use the hard metal one you use for removing prints off the base plate, or you might cut or tear the FEP liner.)
Once you're done, you can now inspect the FEP liner for holes and replace as needed. When done, simply pour the resin straight from the bag back into the vat. Or if you need to change to a different color, pour the resin back into it's original bottle or an old bottle that you've clearly marked as "Junk Resin" if it's a mix of colors or resins you want to keep separate from the fresh stuff.
Unless you suspect the resin itself got damaged by extreme heat, cold, or unwanted UV exposure, there is no excuse for throwing away perfectly good resin. Even if it's an odd color, save it for the next time you need to print something where color doesn't matter. As long as you store it in a cool dry place away from UV light, it should last almost indefinitely. And since liquid resin is both expensive and terrible for the environment, you want to avoid throwing it away if at all possible.
With the plastic freezer bags, you should be able to squeeze almost every last drop back into the bottle, but for the trace amounts left clinging to the plastic bag... the best way to dispose of it safely is to place the bag outdoors after the sun has gone down, ideally clipped to a clothes line with one corner of the bag left unzipped, and then let the gradual light of the rising sun slowly cure the resin into a solid.
Avoid putting the resin-tainted bag under your UV cure light, since the intense heat of the curing resin may be enough to melt the bag and fuse it to whatever you've set it on.
Changing the FEP liner:
As for changing out the FEP liner itself, what tools you need will depend on your particular model of printer, but in general, it's useful to have:
Replacement FEP liners (sized to your printer) - As you never know when the liner is going to get a hole in it, always make sure you have a couple on standby. Your printer is useless without them, so why take the risk?
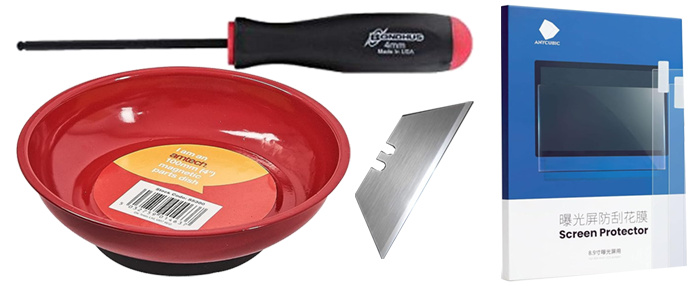
Magnetic Parts Tray - Most FEP trays have at least a dozen very tiny screws that are easily lost. Place the screws in one of these until the time comes to replace them.
Ball Tip Metric Hex Screwdrivers (magnetic preferred) - Your printer should come with a screwdriver for unscrewing the bottom plate of the FEP vat. Typically this will be a 1.5mm or 2.0mm hex bit, but different machines may use different screws. Assuming this is what your printer uses, I prefer using the ball tip style, since if your hand slips while you're stretching the FEP liner taught you're slightly less likely to poke a hole straight through it if the bit has a rounded edge. A magnetic one also means you're less likely to drop and lose one of the screws, though I had a hard time finding a 2.0mm magnetic hex bit in the U.K.
Heavy Duty Utility Knife Blades - If you are not using a screen protector, and you need to remove cured resin from a FEP leak that has become stuck to the the top of the glass plate, the best way to do this is with a fresh new utility knife blade that you haven't used for anything else. You want to be very careful not to scratch the glass, so the best way is to pour out a tiny puddle of isopropyl alcohol on top of the spill and then very gently slide the blade along the glass at a slight angle while wet in order to try to pry up the thin layers of cured resin. These will usually flake off in sheets or as a thin powder. Wipe down with isopropyl alcohol wipes and a soft lens cloth inbetween passes to pick up resin remnants without scratching the glass. This process may have to be repeated several times until the blade slides smooth across the screen without any resistance. Avoid paper towels as repeated use will scuff the glass. If you notice the slightest hint of a nick in the blade, discard it immediately and grab a fresh one.
Screen Proctectors (sized to your printer) -Alternatively, before you have a spill, you can just buy some screen protectors sized to your printer's LCD screen. Just like for your iPhone or tablet, these thin sheets of static-cling plastic act as a protective barrier for the screen protecting it from scratches and spills. In the event of a resin leak, simply peel up from one end and replace. These can cost up to £15 each, so they aren't cheap. It all depends on which sounds like the least painful option: having to replace an expensive plastic liner (in addition to the already expensive FEP liner) every time you have a resin spill, or having to be extremely careful while scraping residue off the the unprotected glass screen, and maybe having to replace it a bit sooner than you would have if you'd used a screen protector.
Curing and Post-Cure:
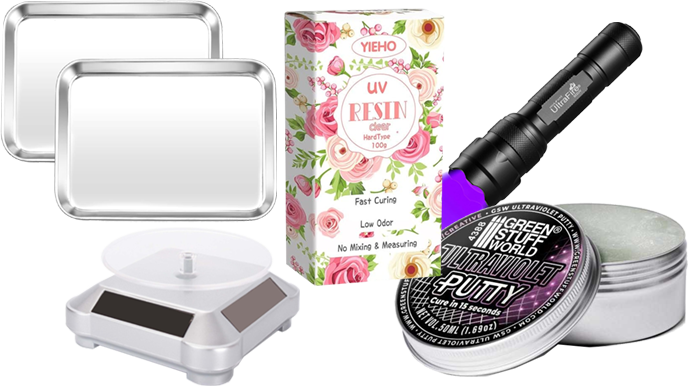
Silver Toaster Oven Trays - These help keep your parts organized, and you can pop them directly into your cure box where the shiny reflective surface acts as a mirror to help reflect light into hard to reach areas.
Solar powered display stand - If you don't feel like buying a super expensive all-in-1 wash and cure station, stick one of these cheap solar powered display stands inside your cure box to rotate parts for even coverage.
Portable 405nm UV Flashlight - Note: Make sure you get one that says it goes up to 405nm. There are other black light flashlights out there that are okay for checking IDs and pet urine but they won't cure resin. One of these flashlights will help you cure hard-to-reach spots of your models (like shining inside of hollow areas) but they're more important for minor repairs and filling in holes with UV resin and putty.
UV Fast Curing Craft Resin - If you happen to live in the Western United States or Japan near a Daiso store, check there first since they sell UV craft resin in small superglue-sized tubes which are much easier to handle and won't seize up over time. If you live elsewhere in the world, you'll probably need to buy UV resin by the bottle. I recommend going with the smallest sized bottle you can find, since in my experience, if you let it sit on the shelf too long it'll set up on it's own, even without UV exposure. I'll get into using UV Craft Resin more in the next post-printing section, but sometimes, if a part breaks, cracks, or gets a chip in it while you're cutting off supports, a little bit of UV craft resin can be used to repair the damage and seal any holes salvaging the print.
UV Putty - This stuff is currently a bit hard to find, but well worth tracking down a tin. It's basically just UV resin in putty form. It's not as transparent as resin, and you can't color it for creating eyes and TARDIS control panels, but it's thickness and maleability is absolutely perfect for filling in holes, covering over seams, and other repair jobs.
What brands of resin do you recommend?
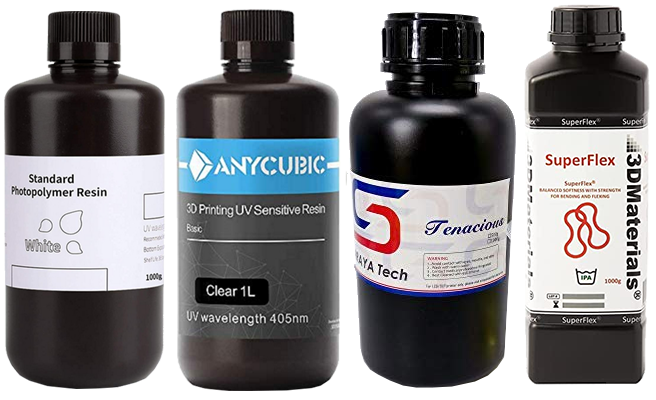
For resin printing, as far as I'm concerned, there are only four brands worth paying attention to. Elegoo and AnyCubic for general multipurpose resin, and Siraya Tech and 3D Materials for special flexible resin.
Elegoo and Anycubic resin are practically the same, though they do have some slight color differences. Both brands are usually quite affordable, print well with minimal distortion, and have the least noticeable odor of any resins on the market. In general, you should base your decisions on whichever one of them happens to be on sale at the time or matches your specific color needs. The only time I express a preference between the two is when I'm printing something transparent. I find the Anycubic Clear brand tends to be a little clearer and doesn't cloud up or yellow with time quite as much as the Elegoo brand.
Note that you can use Elegoo/Anycubic White or Clear for just about anything and add additional resin pigment in as an additive, without having to buy additional colors which will save you some money in the long run.
The one exception I'd make is to keep a bottle of Anycubic Flesh
color handy if you intend to print any human heads and hands. Every time you put down a layer of paint, you're covering up fine surface detail, so if your head is flesh-tone to begin with, all you need to do is put down the extra shading colors.
When I need to add flexibility to my prints, I generally use flexible 3DMaterials SuperFlex or SirayaTech Tenacious resin as an additive. Superflex is actually cheaper than Tenacious here in the United States and much more flexible (it's more transparent too) so there's no reason to use anything else if you can get it, but it appears that in the UK, a 500ml bottle of SuperFlex costs almost the same as a 1000ml bottle of Tenacious, so for that price, you're probably better off buying the larger bottle of Tenacious, which is already going to cost you an arm and a leg.
A roughly 50/50% mixture of flexible resin with Elegoo/Anycubic will allow small parts (like fingers) to move, while anything over 3mm in width will be rigid, but far less prone to impact damage. This does tend to make small parts slightly transparent, but since you'll typically be painting after printing anyways, that's usually not an issue.
Also note that the more flexible resin you use, the more flexible the support structures will be as well, so if you have to print something very tall, I recommend you increase the width of your supports to at least 3mm, and make sure you have plenty of cross-bracing going on.
What other tips will give me better print results?
Angle your support rafts.
Tips for trimming supports. Always trim before curing. drill out holes. Remove fragile pieces first.
Coming Soon.
My prints are failing, how do I correct this?
Coming Soon.
|