003 - Chumbley
From Galaxy 4 (1965)
Version 6 - Updated 2/8/2021
Finished: https://drive.google.com/open?id=1GNgPmIaYLgua90zUGSbUnV9umSWXezHg

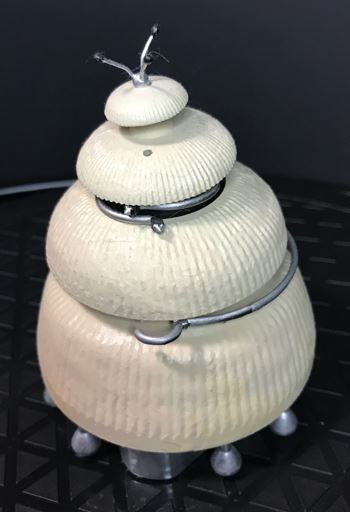
This figure has been completely redesigned from scratch to be more screen accurate and resin printer friendly.
This figure uses a mechanism similar to a clicky ballpoint pen to switch between raised and lowered states. As a result, the figure require several off-the shelf parts for assembly which I didn't realize when building it can be pretty tricky to locate outside of the US.

There are separate folders with different file variants for PLA (filament) and SLA (Resin)
printing. Make sure you use the correct files for your printer type.
If printing in filament, The pincers and claw arm should be printed individually at 100% fill at a very slow print speed (I used 10) to ensure the cleanest possible prints and to prevent possible snapping during assembly or play. If resin printing, I highly recommend you print these parts separate from the rest out of a flexible resin like Siraya Tech's Tenacious for maximum flexibility. It shouldn't take much to print these three parts, and if you have any left in the vat when you're done, top up with regular resin and print the bottom skirt next because the little feet are also delicate and easily snapped off, and printing out of at least 25-30% Tenacious will given them just enough flexibility to resist breaking if dropped.
If you are PLA printing, you will need to print the Split Cylinder Base, Split Lower Skirt, Split Lower Skirt Pegs, and Split Legs and Base as 4 separate pieces and then glue them all together. If resin printing, these four pieces will already be combined into a single piece called Lower Skirt Legs and Cylinder Base for SLA.

This figure requires the following parts, or the closest available approximate you can find. at least one 1.5mm wide brass rod to be trimmed to length for the
One 3/8"(9.4mm) by 1 7/8"(47.4mm) compression spring. (Required if you want the Chumbley to be able to stand at full height without being held up)
One 1/8"(4.7mm) by 1 1/2"(38.5mm) or shorter compression spring (Optional, if you want the
head part to wobble.)
One 1.5mm wide brass craft rod to be trimmed to length for the arm pivots and to secure the
top of the cylinder mechanism. These can be found in most craft stores that have a model
airplane section. Alternatively you can use a wire coat hanger or even toothpicks.
4 metal pins or 1mm thick plastic coated wire for the top antenna and telescopic probe. Large insect collecting pins with a
small teardrop shaped head work best.
A small tube of UV craft resin and a UV flashlight is recommended for sealing holes and locking
the craft rod arm pivots in place, but gel crazy glue or even paint will work in most cases.

Before painting, it is recommended that you fit all parts loosely together without glue to make sure that they fit and move freely. You may need to sand down some parts or drill out some holes if they are too tight or don't fit together smoothly.

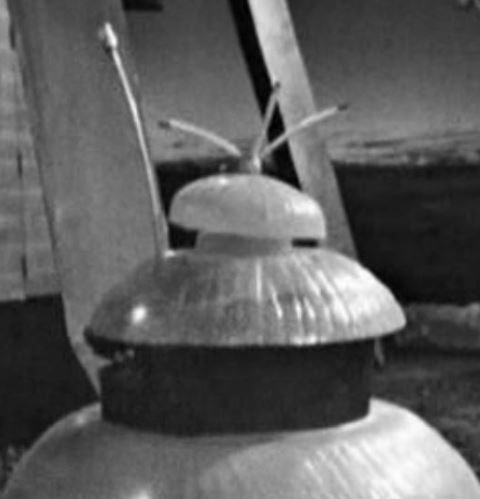
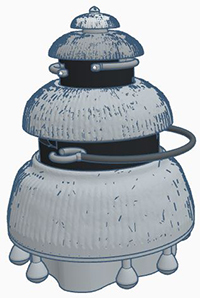
I've never been able to find a color photo of the original props themselves, however the colorized photo is probably pretty close. The dome parts appear to be of a semi-transparent tan or grey fiberglass material, and in one scene during the surviving Airlock episode, at least one of the three main Chumbley props had some blinking internal lights that are just barely visible from inside the bottom skirt section. The base, feet, and middle claw appear to be a standard brushed steel color.
The sections between the dome parts is solid black, and the tips of the antenna are painted black. The telescopic probe appears to be entirely silver.
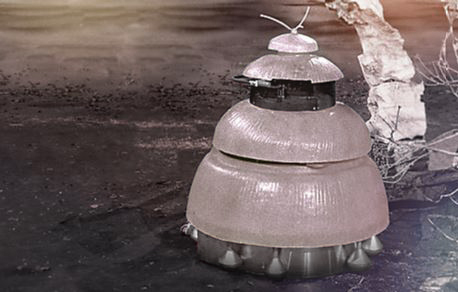
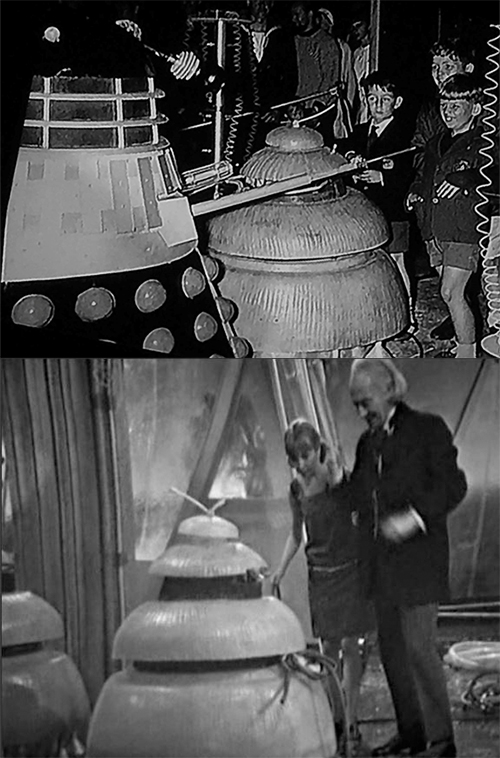
Note that a lot of people, myself included, thought the Chumblies were a lot smaller than they actually are. In reality, the props are very nearly the same size as a Dalek (which are also deceptively large in person) and a little bit bigger around the middle. While information on their costruction at Shawcraft is limited, based on how they move and the extremely limited way in which they "collapse" I believe they were built over the top of a moving dolly, that the operator sat or crouched down on with an A-frame over his shoulders to lift up the second dome, leaving his hands free to push himself along the studio floor or operate the claw arms. Overall, the operating mechanics probably weren't all that different from a Dalek.


This figure has some uncharacteristically complex assembly instructions. After all pieces have printed, do the following in this order:
- Paint all sections and allow to dry completely. You must do this first, because many of the areas you need to paint will be inaccessible after assembly. Several of the pieces will be rubbing on each other, so to ensure the best possible paint job, I recommend slathering on a layer of dullcote lacquer once finished to try to protect it as much as possible.
- Insert the two upper arm and middle arm pieces into their holes and insert your 1.5mm craft rod (or whatever you're using as a substitute) into the hole (if it won't slide in freely, you may need to very carefully and slowly drill out the hole). Once the rod is all the way in, mark it at the edge of the hole and then cut it a mm or so shorter. Reinsert the cut rods and seal it in place with UV resin or crazy glue. If using crazy glue make sure it's the gel kind. You don't want to accidentally glue the arms in place.
- Bend and insert 3 pins into the holes in the top of the head part (these will likely need to be cut short), and slightly bend and insert another pin into the hole on the top of the upper skirt part to create the telescopic probe. If your pin does not have a large enough head, you may need to make it larger by adding a drop of UV craft resin. You want it large enough that the head of the pin just barely sits on top of the hole without falling in but can be grasped and pulled up easily using your finger nails. Use more UV craft resin to create a stopper on the underside of the pin so the probe can't be pulled all the way out.
Note that if your pin is too long, you may need to trim it so it doesn't interfere with the travel path of the cylinder plunger.
- Next insert the Cylinder Plunger into the Cylinder. glue one end of your larger 3/8" spring to the
circular depression in the center of your lower skirt. *DO NOT* glue the top of the spring to
the underside of the plunger, it needs to be able to spin freely.
Once the glue has dried, the plunger should move up and down and you should be able to lock it at a lower
height by rotating clockwise as you press down, and then do the same to let it spring back up to full height.
- Raise the plunger to it's highest height. Stick on the middle skirt section and the upper skirt section. There should be a small hole on the side of the upper skirt just below the right claw that you can stick a 1.5mm craft rod through that will also pass through the hole in the top of the plunger mechanism and through to another hole on the other side of the upper skirt.
- As you did before with the arms, insert the craft rod, then pull it out slightly and cut it about 1mm short, then stick it all the way through again. If seated properly, this should firmly secure the upper skirt to the top of the plunger and allow you to use it to push down and set the height of the Chumbley. Seal the ron in place with UV craft resin or gel crazy glue.
- Finally, use the optional smaller 1/8" spring to attach the head to the upper skirt. You will likely
need to trim the 1/8" sprint to length before gluing it in place. It should be just long enough that the head part has a bit of wobble. If you don't have a spring of the correct size, you can glue the head onto the top of the upper skirt directly.

|
 |