013 - War Machine
From The War Machines (1966)
Version 4 - Updated 1/18/2019
Beta: https://drive.google.com/open?id=1EXLSnterjCvwVkx8FQDCBJeig8UEcpDx

This is another VERY large figure that will only fit on a filament printers with a 7" x 7" or larger build area. Please verify your printer is large enough to handle it before you attempt to print.
I have not yet gone back to create a resin printer-friendly verion of this figure, so there are a few snap-together parts that may not function exactly as designed if you attempt to print on a resin printer (Assuming you have one large enough to handle the figure in the first place. It's massive!)
This figure works perfectly fine for standard non-motorized use, but I've been having trouble getting the underpowered Go-Brix motors to work as intended. This latest Beta version strips the weight of the body down to an absolute minimum, but I haven't had time to reprint yet to see if it's drivable or if the new cam system for the arms has enough torque to make the arms whomp up and down.

Since weight is an issue, I recommend printing the three main body sections, the cams, tape spools, front wheel, and arms, at 60% fill. The gun tubes, radar dish, and headlight should all be printed at 100% for maximum strength.
The design comes with built-in heat barrier walls around the main body sections to prevent warping, but I highly recommend you use an Anycubic Ultrabase borosilicate glass plate, high quality PLA+ filament, some non-aerosol hairspray, and a printer enclosure to combat warping any way you can. This will also ensure that the visible undersides of the top section are nice and smooth.
This design comes with a few alternate parts depending on whether you plan on using a 2x3 LED Light-Up Brick for the headlight, please pay close attention to the instructions below:
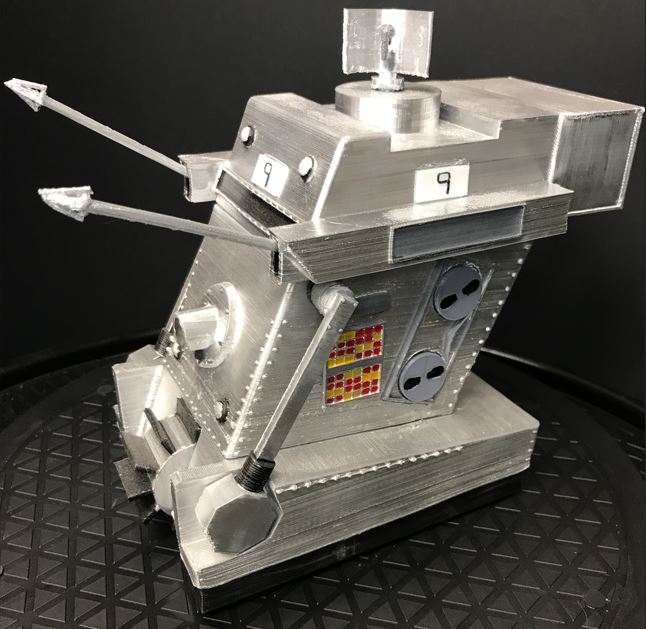
- The only two War Machines featured on screen were numbers 3 and 9 (9 being the one we saw the most of.) However, per the story, there were supposed to be at least 12 of them attacking London. I have included extra number plates for 2, 3, 5, 8, and a blank number plate that you can write your own numbers on if you wish, though if you're only building one machine or don't want to swap out plates, you only need to print the 9 or 6 number plate. (Incidentally, the numbers on the War Machines, and letters in the opening title cards are both based on the old E-13B font used for magnetic ink character recognition. You can view an example here if you want to paint your own.)
- If you are going to use a 2x3 LED Light-Up Brick for the headlight, print the WM body for LED brick version of the body. You can also print WM Headlight lens (Resin or PETG)out of clear resin or PETG, though if you have a bottle or small tube of clear epoxy resin, you can easily drip some into the front headlight hole to both hold the LED brick in place and form a nice clear headlamp that the LED can easily shine through.
If you are going to use a Go-Brix motor to power the whomping arms, it will then attach to the back of the LED brick.
- If you aren't going to use the light-up brick for the headlight, print the WM body without LED version of the body instead. You can use this version regardless of whether you intend to use any Go-Brix motors. You do not need to print the WM Headlight lens (Resin or PETG) file since the headlight section will be solid.
- If you have access to a resin printer, you can print the WM 63mm gear axle (Resin only) file to make your own axel for the whomping arms, however, a standard 63mm Lego brick axle works just as well, and is probably going to be cheaper.
- You only need to print the WM Radar dish motor or rubber band mount file if you intend to use a 4th motor to spin the radar dish, or attach a rubber band to it so it can be spun and released.
You must print the WM cams file, even if you don't intend to motorize the arms, since the top cam is used to hold each of the arms in place. Also make sure you print two copies of both the WM Gun Tube (PRINT 2) and WM Arm (PRINT 2) files, as it says in the file names. If having the figure printed by a print-to-order service, make sure this is clearly communicated.

Before painting, it is recommended that you fit all parts loosely together without glue to make sure that they fit and move freely. You may need to sand down some parts or drill out some holes if they are too tight or don't fit together smoothly.

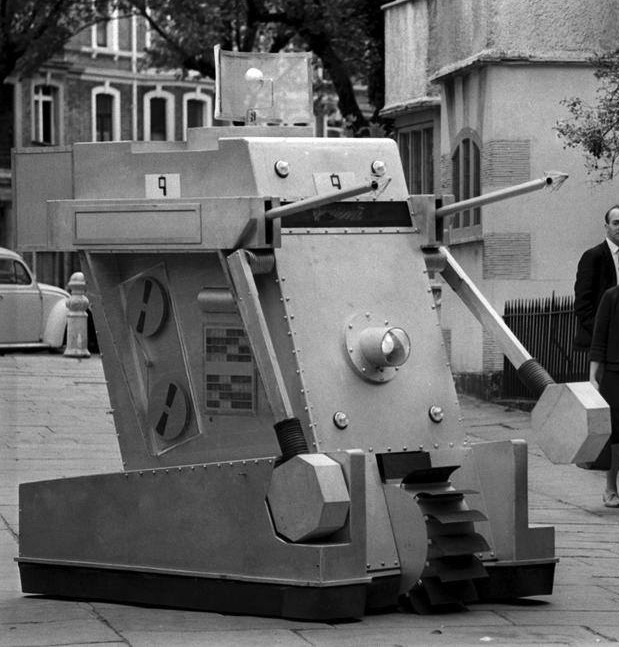
This is another Doctor Who villain for which no original color photographs exist, so we have to guess at some of the color detail.
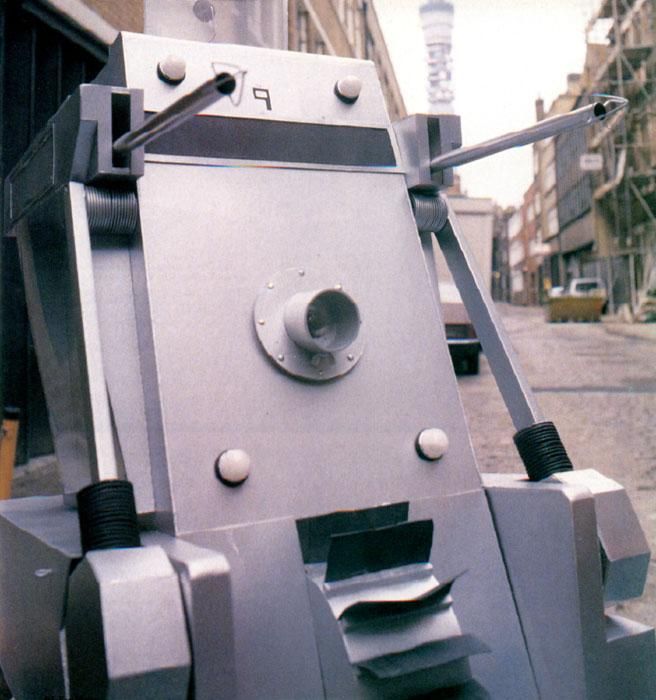
It seems most likely that the War Machine was a light silver color similar to the second photo below (which is a fan reproduction, not an original).
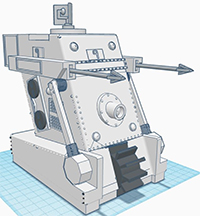
The bottom base trim, paddle wheel flaps, and rounded tubing area directly behind the hammers are all black. The rounded tubing at the shoulder pivot is silver though.
The large flat rectangular speaker grille (or whatever it's supposed to be) directly below the number plate on the front of the War Machine is also black, but note that the ones on the side are not. In some shots, these appear darker than the rest of the machine, so I ended up painting mine a slightly darker grey as opposed to silver. I also did the same to the trim around the access panel on the back. The "window" on the back door is black.
The number plates are white with black numbering. Each of the four smaller lights on the front of the War Machine are whitish opaque and have a small amount of black trim around the outer edge. The tape spools are grey with black (or dark grey) insides, and the half cylinder above the light panel appears to be silver with possibly a thin black trim around the outer edge (Though from another photo, it looks like the edged may have been designed to light up.)
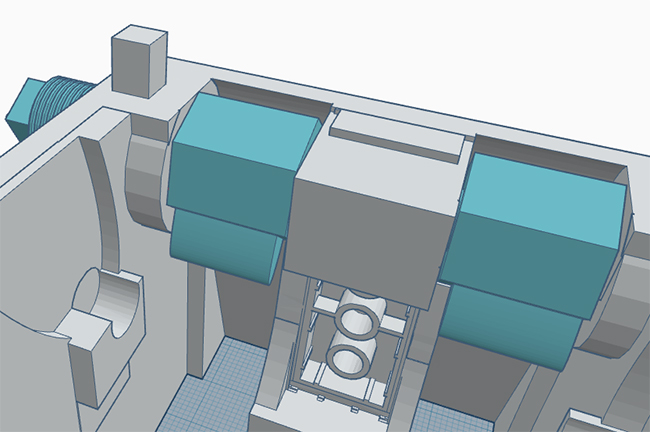
The light panels on the sides are the most frustrating pieces not to have color reference photos of, since it looks like the individual cells were probably at least three different colors. At least the bottom panel was back-lit, however, this is not really visible during the episodes themselves.
The grid pattern consists of 2 sets of 11x4 cells, and is identical on both sides of the machine. Just as a guess, I'm going to say they were yellow, orange, and red, and arranged in staggered formation like the example I put together below.


This figure can be compex to assemble, so pay close attention to the directions below:
First,
trim off the extra build supports and heat barriers from around the body sections. Be careful not to damage the door handle on the back of the body. It may be a bit tricky to clean all of the support structure out of the headlamp and Lego brick holes, but it's a lot easier to do before you glue any of the parts together. A pair of curved jeweler's tweezers comes in really handy at this point.
Next, you need to insert the top cams with the bump on the top and the hole in the bottom into the interior arm slots as shown below. (They may need to be sanded down if you can't squeeze them into the available hole) The cam levers must be pointed downward in the 8 o'clock position as show. Once positioned correctly, force the arms through from the other side. As long as everything is lined up, you should be able to do this without a hammer, but you may need to sand the ends of the arms down a bit if they're too tight.
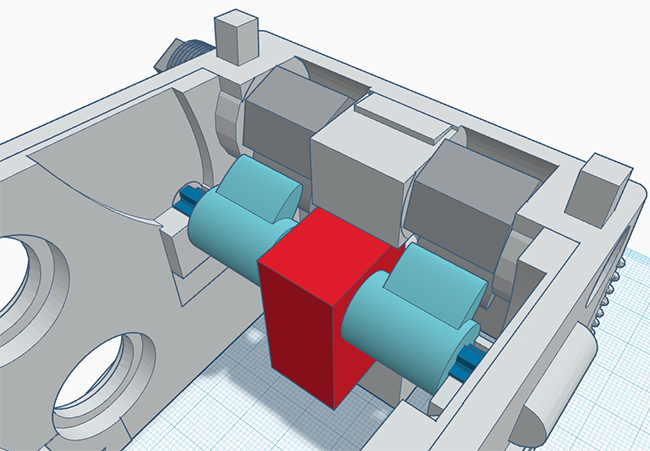
Next, if you are going to use a Go-Brix motor to power the arms, slide your 63mm axle through the middle of the motor, then attach the second set of rounded cams to either side of the motor as shown.
There should be just enough room to slide the axle and motor assembly down the incline slot on the side walls, then click the motor brick in place. If it's loose, you may need to crazy glue it, but the cams should spin freely on the axle (which should be slotted into the available hole) and turn the cams attached to the arms, causing them to rise up and fall back down.
If you do not plan on using a motor here, you can skip this part.
Then, snap the four tape spools through the round holes on the side of the body.
Depending on how good your printer is at printing overhangs, they may pop right in, or your may have to sand/grind down the rough edges of the holes to be more uniformly circular. A large 1/4 inch step bit
on a low speed (or even turned by hand) can often be enough to smooth out any minor imperfections.
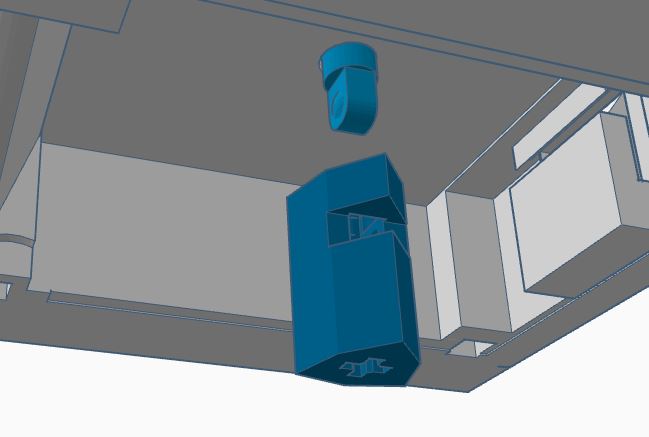
Carefully push the radar dish part down through the hole in the top of the War Machine. If you are going to use a rubber band to wind the radar dish, insert it through the horizontal hole in the rubber band mount then snap the mount in place on the underside of the radar dish part. The other end of the rubber band can loop around the hook on the back of the War Machine top.
If you are going to use a motor to operate the radar dish by remote control, insert a 95mm Lego axle into the plus shaped hole on the underside of the rubber band mount. This will connect to a motor in the base.
For the base, depending on how well the Lego mounts printed, you may have to glue the motors in place. You should be able to use the existing wheels and small blue axles that come with the Go-Brix. Make sure the switches are facing towards the inside of the War Machine so you can operate them during play.
If you are using a fourth motor to spin the radar dish, you will need to mount it in the rear Lego mount then push the 95mm Lego axle through the hole in the top.
The War Machine will drive smoother if you attach wheels to the underside of the back end so it doesn't drag along the ground. Depending on what Lego wheels you have available, you can attach 1, 2, or 3 of them here.
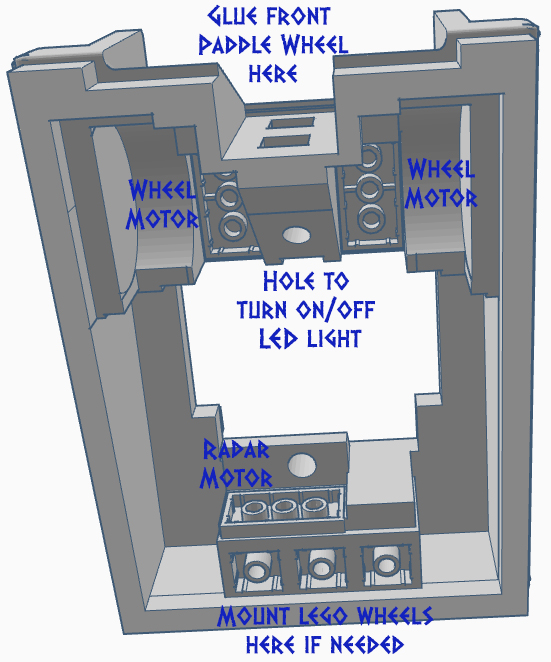
If you are using motors, you can glue the bottom and mid sections of the War Machine together, but do not glue the mid section to the top. This will make it impossible to change the battery in the arm motor at a later date, or manually free up any cam parts that have jammed.

|
 |