028 - Kroagnon
From Paradise Towers (1987)
Version 2 - Updated 06/20/2025
Finished: https://drive.google.com/open?id=1I6-ZYhXI52vO4TOTdg3h9jZ2D78nX92o

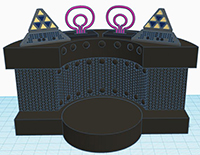
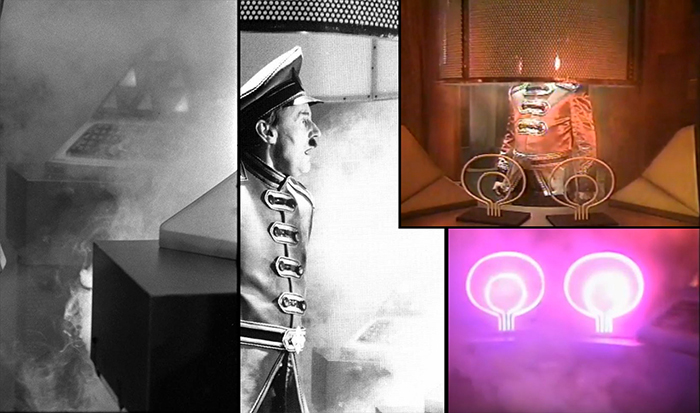
This figure is a best guess, because we know very little about what the Kroagnon prop truly looked like, as it was only ever shown on screen in tight close-up through thick smoke or from the back, with tinted lighting. Unfortunately, the only behind-the-scenes photos I have from the front are in black and white, and still mostly obscured by smoke.
Please note that this is an extremely large figure that may be too big to print on smaller resin printers. Be sure to check the design in your slicer software to make sure it fits before you start printing.

The files used to print this figure are the same for SLA (resin) and PLA (filament) printing except where noted. Also be sure to note that a couple of the pieces like the Eye, Eye Base, and Computer Base Tube need two copies printed.
The eyes in particular are best printed out of transparent flexible SLA resin for added durability, but there are an alternate set of PLA eyes that are designed to be printed flat directly on the build plate of a filament printer if you are using PETG or another transparent filament. If you are resin printing, it may take some trial and error adding in resin pigment if you want to give them a suitibly 90's hot pink color. My advise about using resin pigment is to always use way more than you think you'll actually need, because it'll always look darker in the vat than it really is. If you want to test it before you print, try using an eyedropper or toothpick to draw a thin line about the same thickness as the eye tubes on a clear piece of plastic, and then expose it manually under your UV cure light. Keep adding pigment until it looks right.
The Left and Right Computer have two alternate versions depending on whether you want to install a flashing LEDs and fill in the transparent buttons with craft resin, or just use a solid painted versions.
And the Desk Base comes in a one-piece or two-piece version. The two-piece version may be slightly easier to angle and print vertically on smaler resin printers. If the larger parts do not print, you may need to use a free program like 3D Builder or Meshmixer to cut parts down into smaller pieces until the parts will fit on your printer.
If you don't intend to use LEDs, there is no need to print the LED button.

If you want the figure to light up, you will need to purchase a flashing LED fairy light (the kind with a button) and some clear UV craft resin and resin pigment for filling in the control panel lights of the Left and Right Computer.

Before painting, it is recommended that you fit all parts loosely together without glue to make sure they fit together properly. You may need to sand down some parts or drill out some holes if they are too tight.

As I said earlier, since proper reference photos aren't available, color choices are a best guess only.
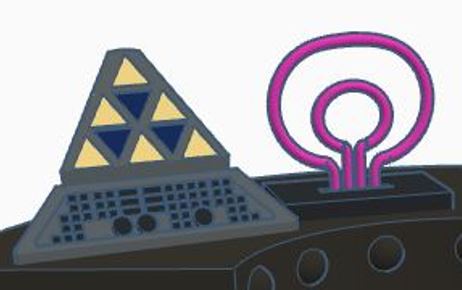
The back and bottom half of the triangular consoles to either side of the eyes appears to be a flat "stainless steel" color, and the buttons and trapezoid-shaped keyboard area are both solid black. The upper part of the triangle is either black or a very dark battleship grey matching the desk surface.
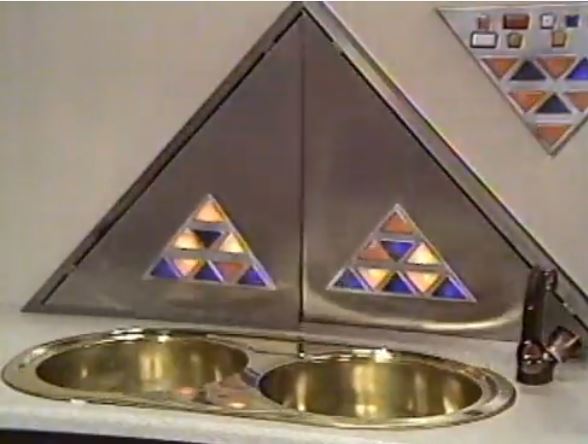
While it is nearly impossible to see in the black and white set photos, there are 9 triangular controls on the panel, six of which (the outer upwards facing ones you can see clearly) light up and flash orange and the remaining three downward facing ones in the middle are a dark purplish blue. They are very similar to the garbage disposal controls seen in the Rezzie's flat, and almost certainly use the same alternating color pattern.
The C-shaped desk is clearly darker than the computers, and while it looks sort of bronze-ish in the one good shot we get of it from the back when the cylinder is releasing the transformed Chief Caretaker, I believe this is mainly due to the orangeish gel filters being used, and the surface is actually a dark battleship grey similar to what was used on Resurrection-era Daleks. The rectangular mats under the base of the eyes are significantly darker than the table surface, so they are likely a flat black.

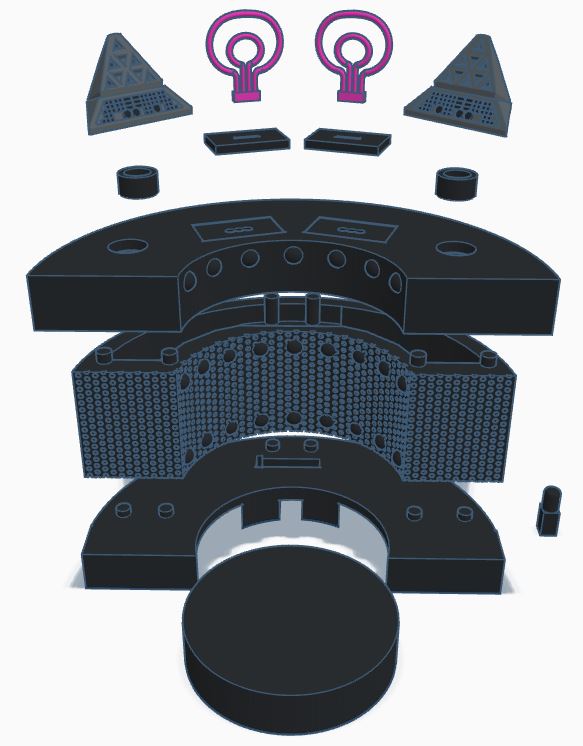
If you are going to be adding flashing LED fairy lights, begin by inserting the LED Button into the Desk Base from the inside so the round part sticks out through the circular hole, then insert the battery pack of the LED string light up through the rectangular hole so that the button on the battery pack lines up with the button on the figure and can be easily turned on and off.
Next glue the Computer Base Tubes into the top of the Desk Top.
Thread the wire containing the LEDs up through the Desk Base and Desk Middle, and begin inserting LEDs up through the holes in the Desk Top into the Left and Right Computer and the three holes directly below the Eye Bases. (Do not push the LEDs all the way through the holes under the eyes, you want them just below the surface so the eye bases sit flat but the light shines upwards)
Distribule the LEDs as evenly as you can between the four areas. If you end up with more than you need, DO NOT cut the string short. This will cause the wires to overheat and potentially burn out or start a fire. Wrap any LEDs you don't need in tinfoil or black electrician's tape. Cement the LEDs in place with UV craft resin or a strong clear-drying glue like E-6000.
Once you have your LEDs in place, start filling in the triangular recesses with clear UV craft resin that you have mixed with yellow or blue resin pigment so that the up arrows are yellow, and the down arrows are blue. It is a good idea to have the LEDs switched on as you are adding the resin and pigment so you get a good idea of how bright the color is going to be. Cure in place using a small UV flashlight or the light of your cure box if you have a resin printer.
Now that your LEDs are in place, or if you were never using them in the first place, just stack all the bits together.
The two computers should be angled slightly so that the corners of their keyboard areavery nearly touch the edges of the work surface, as seen above.
You may need to glue the computers in place, if the wiring from the LEDs is making them pop up and not sit on the desk properly.
Insert the eyes last. They should fit fairly snuggly without glue, but if you do glue them in place, I'd recommend something that's easier to remove later, because the tube parts are fragile, and if you didn't use flexible resin, they could easily snap or shatter if anything collides with the top of the model.

Coming soon.
|