041 - Arcturus
From The Curse of Peladon (1972)
Version 2 - Updated 3/5/2023
Finished: https://drive.google.com/file/d/1vaaJQ2e1mkT5A9J8IFc5ryvwNiWuPSSF/

The files used to print this figure are the same, regardless of whether you are printing in
PLA (filament) or SLA (Resin). Please note that the fluid tubes, wheels, and chest side walls all require you to print multiple copies. If you are using a print-to-order service, make sure this is fully explained or that you upload multiple copies of each file.
This figure is primarily designed for SLA resin printing,
since it has several transparent pieces that won't look correct if printed out of filament. (If you are filament printing I recommend at least using PLA+ for the main body and extra flexible TPU for the weapon tube and tires if you can get it.)
For SLA resin printing, Arcturus' head and the weapoon tube should be printed out of a flexible
resin like 3DMaterials SuperFlex (preferred, if you can get it) or SirayaTech Tenacious. Superflex is also perfectly clear and doesn't yellow, so it also makes a good choice for the bubble dome.
For the
transparent pieces that require colored tinting like the fluid tubes, internal light, chest side walls, and
weapon tube, I highly recommend just using CMYK resin pigment to tint whatever tiny amount you're using for
clear resin rather than buying three additional bottles of resin just to print a couple of tiny
pieces. I would print everything in the order yellow > orange > red, since you should be able to just add darker color to your resin vat without needing to empty it between print jobs.

This figure require one 1.5mm wide brass craft rod trimmed to length for the wheel axels.
These craft rods can be found in most craft stores that have a model airplane section. Alternatively you can use a wire coat hanger or even a toothpick in a pinch.
You will also need one set of LED fairy string lights (yellow or warm white) if you want your figure to light up.
This needs to be the style with the flat battery pack that that takes two CR2032 batteries. You could probably fit a AA battery pack up inside the chest, but you'd have to seriously modify the existing back body part to make it work.
For this particular figure both button or switch style will work, but of you plan on putting a false bottom on the underside of the figure, only the switch style will be accessible. Since you will only need to use a maximun of 12 LEDs, I recommend getting one of the shorter 20 LED strands.
You can also potentially replace most tranparent parts in this design with off-the-shelf pieces:
- The Bubble Dome can be replaced by a clear 2-inch (50mm) spherical gacha capsule from a gumball toy vending
machine. This will be very slightly larger than the groove that the printed dome is designed to fit into, but you can glue it down directly outside that circle and it won't be too noticeably larger. The pritnted dome has a smaller "nipple" up near the very top, which if you really want to be a stickler for detail, you can attempt to add to your capsule by building up small drops of UV craft resin.
- The Weapon Tube can be replaced by a transparent red Lego antenna part, or anything else the same color that's about 3mm wide.
- The Chest Side Walls can be replaced with any flat orangish bit of 0.5 to 1.5mm thick plastic cut to size. Check your local dollar store for cheap orange disposable plastic food containers similar to these.
- The Fluid Pipes can be replaced with 5/16" (8mm) yellow tubing. If you go this route, you will still need to print 4 of
the Alternate Fluid Pipe Top Only pieces, it won't be to noticeable if they aren't see-through. You can also potentially get clear tubes and then fill them with something yellow, but more on that later.

Before painting, it is recommended that you fit all parts loosely together without glue to make sure that they fit and move freely. You may need to sand down some parts or drill out some holes if they are too tight or don't fit together smoothly. Make sure you clean out the interior of the fluid tubes prior to curing. If you want to give the impression of bubbles insode the tubes, you can very carefully seal up one end

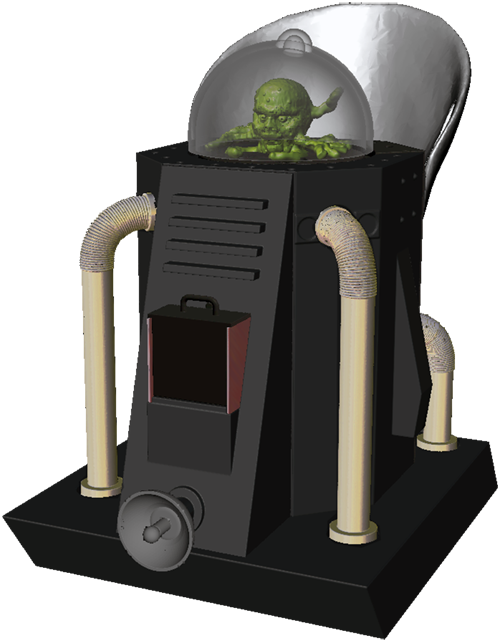
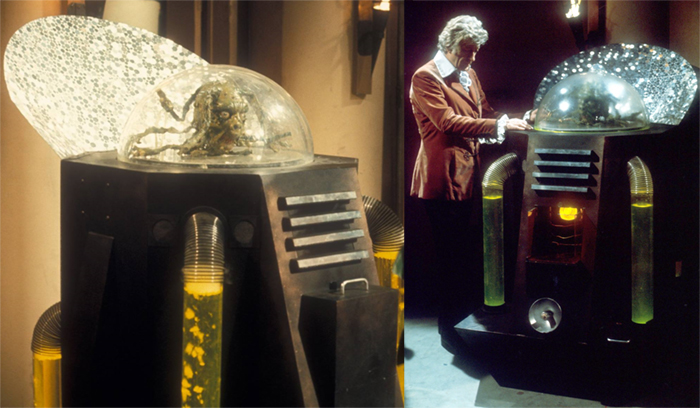
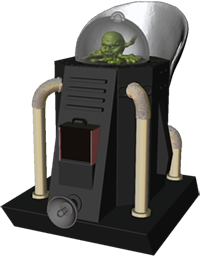
Arcturus' travel machine is flat black though oddly, you can see a little bit of brown or copper around the corners on the front and top. I believe this is actually where the brown MDF is showing through because the black paint they used didn't stick very well, and must have rubbed off on the studio crew's hands wherever they touched it.
The four horizontal bars on the front, the handle to the chest drawer, the weapon dish, and the rotating plate that Arcturus sits on inside his bubble are all metallic silver.
The two circular grilles
to the left and right of the fluid tubes are a dark charcoal grey (probably see-through cloth similar to what Dalek necks are made from) and the "cape" on the back is silver with a circular glittery mirror effect. You might want to try painting this part with silver glitter paint, unless you feel like stippling it by hand.
If you resin printed the dome, but it doesn't seem transparent enough for your liking, try spraying on some Krylon Triple Thick Clear Glaze. Don't spray on so much it pools in the top of the dome, but this stuff is incredible for making transparent parts proper smooth like glass.
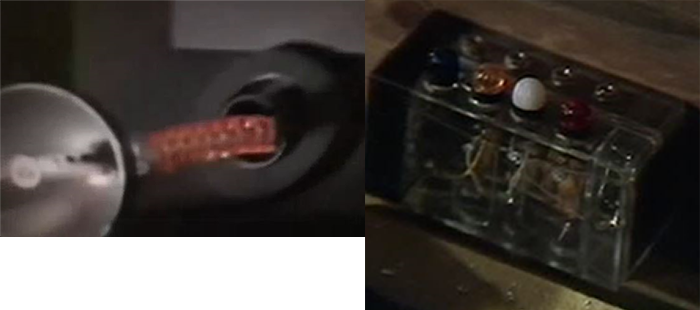
The gun tube is a light pinkish red, and the removable life support circuit is transparent, but the left side has an all black cap that covers the entire edge, while the other side has a smaller black square plug. The lights on the top are (left to right) dark blue, transparent orange, white, and transparent red. There are four silver 6.35mm speaker jacks located on the top directly behind the lights. This accessory is designed to be printed hollow, so theoretically, if you can get the uncured resin out, you might be able to stick some steel wool fibers up inside the cavity to simulate wires.
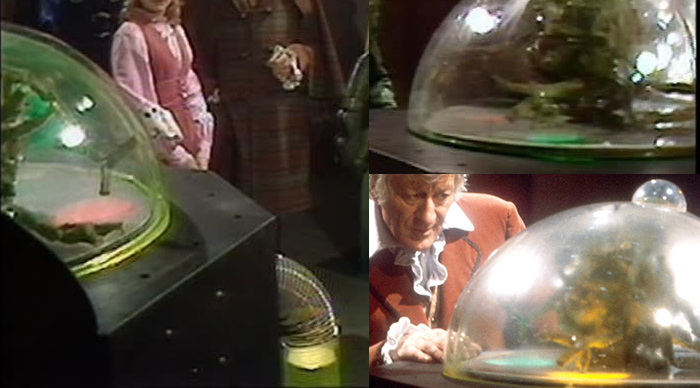
Finally, if you don't intend on using LEDs, the rotating silver disc that Arcturus sits on has a couple of color-changing light up circles near his front "hands." These appear in most shots to be alternating between red/cyan (on the left) and green/yellow (on the right) so you can fill in the holes in the top of the rotating platform with a mix of clear UV craft resin and either CMYK resin pigment or regular food coloring to make the circles the correct colors. (If you are using LEDs, you will need to place the LEDs first, and then complete this step after assembly)

Begin by gluing the back cape to the back body, front body to the middle body,and attach the wheels to the underside of the base with 1.5mm wide brass craft rod trimmed to be about 1mm shorter than the depth of the hole. If you are using off the shelf tubing for your fluid tubes, glue your fluid tube tops in place.
Now, if you REALLY want to get fancy here, you can use this opportunity to seal up the curved end of each tube with UV craft resin or better yet... UV light curing putty. (Make sure the end is completely sealed and cured before proceeding to the next step!) Then use an eye dropper to fill up the tube about halfway with water (check for leaks!) and then most of the rest of the way with vegetable oil, leaving about a centimeter or so of empty space at the other end. You will then need to very carefully seal up this end of the tube with resin or putty. There should still be at least 5mm or so of empty air pocket here between the two fluids and your plug. Once fully cured, flip over and check the bottom for leaks.
Theoretically, if you shake the toy vigorously, you should get some fluid bubble action this way, though how much will likely depend on the internal diameter of your tube. It's entirely possible that this may not work at all, so consider whether you want to potentially have a toy that leaks oil that can permanently stain your toy shelf before proceeding.
Once you have your tubes sorted, insert the shorter back fluid tubes into their slots and glue the back to the top of the baselocking them in place. (make sure this is perfectly vertical and the front fits snuggly... but don't glue the front or the front tubes in place yet!
Next, insert the internal lever through the horizontal slot in the back beneath the cape and drop Arcturus' rotating platform through the square hole to lock it in place, making sure the circular holes are in the front. (It's probably best not to glue the rotating platform and the lever together until you have all LEDs in place. The chest light LED is in a tricky position and you may need to reach down through this hole to maneuver it into place with a pair of tweezers.
If you are going to be using LEDs to make this a light-up figure, you will need to attach them next. UV craft resin is ideal for permanently sealing the LEDs in place, but be careful you do not accidentally snap the wires. If you have bare wires criss-crossing the internal chest cavity... don't worry about it, Arcturus' chest is supposed to be filled with wires. If you can't reach to the next LED placement without skipping a LED, just paint it black, cover it with electrician's tape, or stick it up inside the barrel shape of the chest tank.
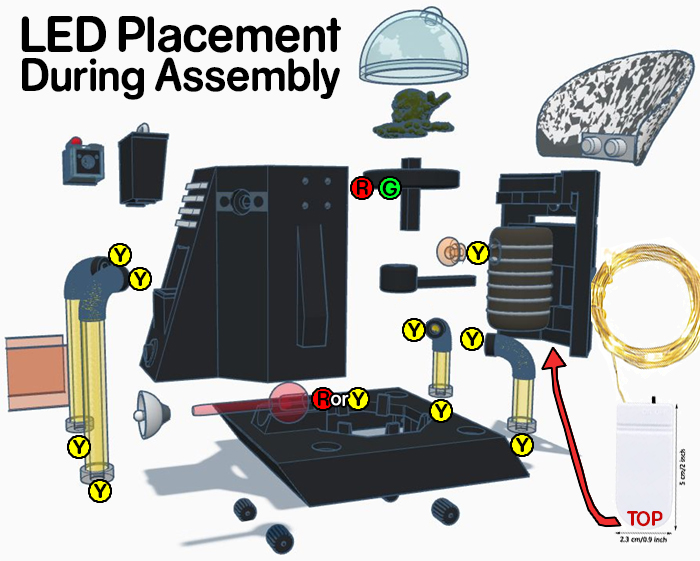
Begin by inserting the battery pack up into the hole in the back piece, rounded end first. The button or switch will need to be accessible on the bottom, as will the wires themselves.
Then begin inserting LEDs into the mounting holes. Ideally, you will want to do the bottom 4 fluid tubes first up through the base, then insert 1 LED into the back end of the weapon tube. Insert the pointy end of the tube through the hole in the front, and then glue the weapon dish in place on the end of this part. Make sure you have enough extra wire that you can fully extend the tube out from the hole before you move on to the next LED.
Next you will probably want to do the the tops of the fluid tubes. These may be a little tricky to reach, as you may need to use tweezers. And while not glued in place yet, you will need to keep the front and front fluid tubes fairly close to their final positions.
Then we come to the two LEDs that go into the rotating disc.
Again, if you want to get extremely fancy here, you can take an extra step and splice in two alternate LEDs from another LED string light set that contains red and green LEDs. The secret to doing this is that the silver wires contain a very thin layer of clear insulation on the outside, which you have to burn away with a lighter before you can twist the two different wire strands together to form the circuit. If you do this, I recommend rewrapping each of the exposed wires in electrical tape so they don't accidentally touch and short out. Also, if you splice in two wires, you will want to cut off two at the very end to maintain the same voltage level. (Don't cut off any more than that, otherwise the wires will start to overheat.)
If you don't feel like splicing in special colored LEDs, then what you need to do is insert the LEDs up through the holes in the bottom of the disc, and then use a mix of clear UV craft resin and either CMYK resin pigment or regular food coloring to make the circles transparent red on the left and transparent green on the right, while locking the LEDs in place at the same time. Once this is done and fully cured, you can actually paint over the top with silver so that the red and green lights shine through somewhat muted, just like the lights on the original prop.
Finally, insert a LED up through the bottom of the barrel shaped chest tank that's part of the back and through the hole that the internal chest light fits into. Glue the LED into the hole in the internal chest light, then glue the chest light into it's hole. All remaining LEDs on the string can be crammed up inside the chest tank.
Before you lock the front and front fluid pipes in place to seal the figure up completely, make sure that the internal lever and rotating platform are in place, and then glue them together. You don't want the platform popping up or out if you shake the figure.
The last steps are to insert the two orange chest side walls on either side of the slot where the chest drawer goes, glue Arcturus' head to the top of the rotating plate. Wait for any crazy glue fumes to fully dissipate, and then glue on the dome.

Coming soon.

|
 |