043 - Eye Plants
From Planet of the Daleks (1973)
Version 1 - Updated 6/6/2023
Finished: https://drive.google.com/file/d/1DVfmRZqYie2K2azgwh-XSVYPPTdh1tvF

This was supposed to be an April Fools Day 2-pack with the Spiridon, but I ended up getting sick and having to release them as a separate figure.

This figure is primarily designed for SLA (resin) printing, but can be printed out of PLA (filament). The files are the same for both versions except where noted. If you are filament
printing I recommend using PLA+/Flex PLA for improved surface detail and stability. You will need to print two copies of the Eye part. If you are having the figure printed for you by a print-to-order service, you may need to explain this or simply upload two copies of the same file.
For SLA resin printing, I recommend adding a flexible resin like 3DMaterials SuperFlex (preferred, if you can get it) or SirayaTech Tenacious as a strengthening agent for added durability. If you have flexible resin, you can print the Eye and Stalk for Flexible SLA using a 50%/50% mixture of flexible/regular resin. Otherwise, you should print the Eye Only for PLA or Regular SLA and use a length of metal craft rod for the stalk part, but be warned that the petal parts of the eye are going to be very fragile.
Before you final cure any of the parts, make sure that the holes of the black cylinders and slider bar have been fully cleaned. It is a good idea to insert a 1.5mm rod or drill bit into these holes to make sure that they move freely.

This figure requires at least one 1.5mm wide brass rod to be trimmed to length for the internal pivot levers
and eye stalks (unless you are printing the eye stalks as single pieces out of flex SLA.)
These craft rods can be found online or in most craft stores that have a model airplane section.
Alternatively you can use a thin wire coat hanger, but you may need to widen some of the holes
prior to final curing with a drill.

Before painting, it is recommended that you fit all parts loosely together without glue to make sure that they fit and move freely. You may need to sand down some parts or drill out some holes if they are too tight or don't fit together smoothly.

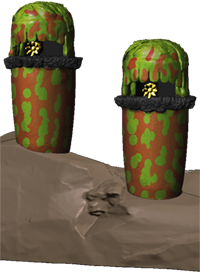
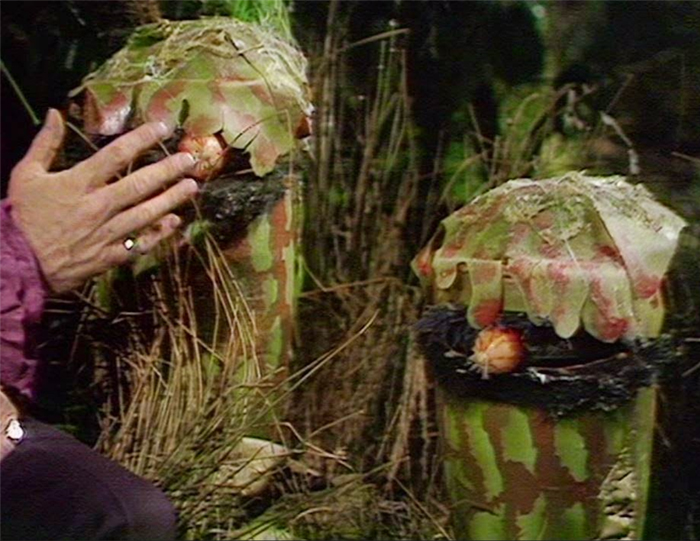
Eye Plants are a light green color on top with reddish-orange splotches, and primarily reddish-orange on the lower pitcher part with green splotches. The interior cylinder and top rim of the pitcher are black. The "Eye" is a yellow color with red veins and white "petals".
The rock was actually a grass-covered mound in the televised story. If you want to get fancy, you can paint it brown and then cover the exterior with model grass terrain powder or fake shrubbery like they use for model railways and wargaming miniatures.

To create the internal pivot levers, trim one of the rods into two 60mm sections, and then mark them near the middle at the 28mm point. Using a vice or a sturdy pair of locking pliers,
bend both rods into an L-shape so that they are 28mm at the top and 32mm at the bottom.

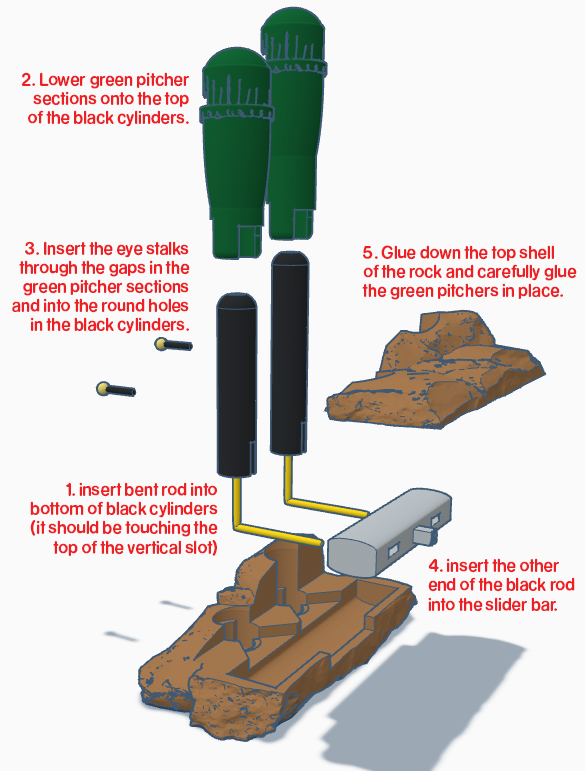
Next, follow the diagram below to assemble the parts in order.
Begin by inserting the bent rodes up into the two black cylinders (make sure the taller cylinder is on the left.) These should go all the way up inside the cylinder so they are resting up against the top of the notch.
Then slot the green pitcher sections over the top of the black cylinders and insert the eye stalks (or short length of brass craft rod) into the hole visible through the gap in the top of the green pitchers.
Next insert the bottom end of the pivot rods into the holes on the inside of the slider bar.
Then insert the Eye Plants, pivot bars, and slider bar into the inside of the rock base.The eyes should now move left and right when you slide the slider bar left and right. If it doesn't move freely, you may need to sand down the slider bar, track, and/or black cylinders to make sure nothing it catching.
When the figure moves smoothly, carefully glue down the Rock Base Top
and bottoms of the green eye plants, making sure that the black cylinders or bent picot bars do not get glued in place.

Coming soon.
|