REMIX001 - Battle Damage Emperor Dalek
Original design by Edward Felix
Remixed by Troy Ryan Wood
Version 3 - Updated 1/16/2021
Final: https://drive.google.com/file/d/1_swhbjRDHv3TzoksyxxtzYThxmMEVuMo

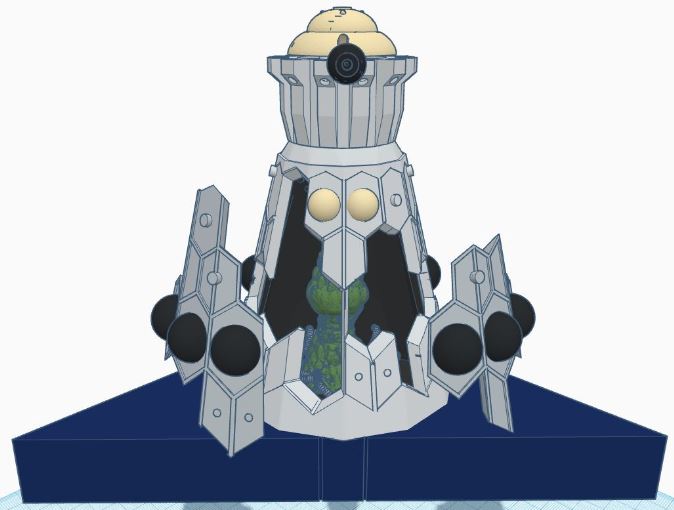
This was my first remix, and mainly a superficial one. The outside is almost entirely Edward Felix's original design, I just pimped it out by adding
a movable eyestalk, alignment pegs, Flashing LED string light support, the large triangular plinth and two removable front panels and an exposed central core that will let you transform the figure into the burnt out "dead" version with exposed wiring as
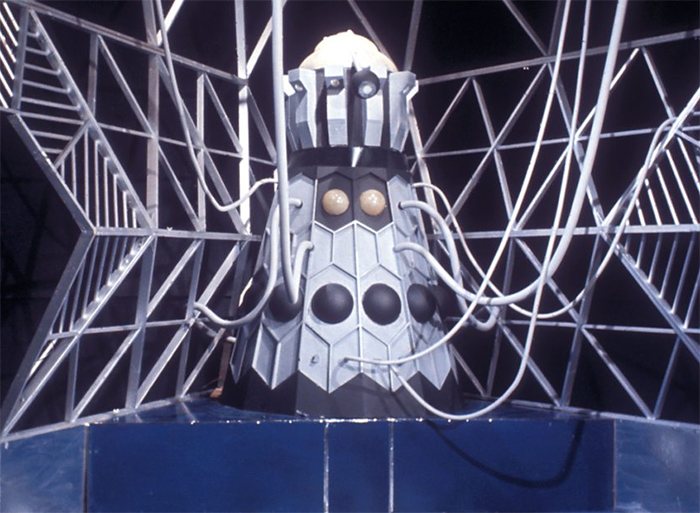
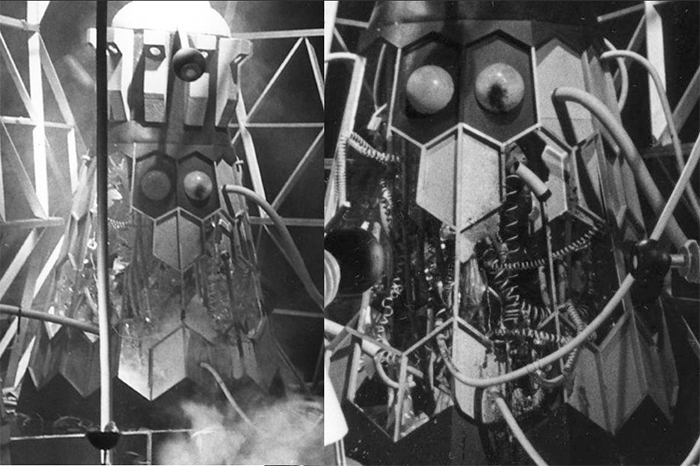
seen in the climactic battle at the end of episode 7. (Even though this episode is missing and all we have are some behind-the-scenes videos shot with a handheld camera)

This figure has multiple alternate file options depending on what features you want to add to your Emperor. Note that while there *is* a SLA resin version, the Emperor is far too big to print on a regular-sized resin printer like the Anycubic Photon or Elegoo Mars. You'd need to print the skirt on a regular filament printer or one of the expensive large scale resin printers if you want it to come out successfully.
For PLA filament printing, I recommend printing at 80 to 100% infill if you're planning on adding LEDs so it doesn't glow through the plastic too badly. You can drop down to a lower infill amount for most pieces if you won't be using lights. The eyestalk should be printed at 100% fill for maximum durability. (You may want to print a spare just incase the first one snaps.)
All versions of the figure use the same Head and Dome parts. There are two versions of the Eyestalk depending on whether you are printing in PLA or SLA resin (on a resin printer you have the option of inserting a tiny LED into the eye itself!).
There are two versions of the triangular Corner Plinth (which is entirely optional.)
There's a Solid version that can only be printed of very large printers, and a Split version, that is split into three parts, if it makes it easier to print.
Battle Damage Skirt (No Hemis) - Use this version if you are printing the Battle Damage version on a PLA filament printer.
You will need to print the Left Damage Panel No Hemis, Right Damage Panel No Hemis, Black Hemis and Black Button Hemi files to go with this version. The hemispheres (or dalek bumps) are separate so you can print them flat without overhangs. You only need to print the Black Button Internal for LED file if you intend to mount Flashing LED string lights (this should be the type that has a button.) If you do not, you still need to print the separate Black Button Hemi to cover the hole. It is recommended that you print the Internal Battle Damage Core with this version as it provides support for hoses and wires, but is not essential if you want to completely build the inside from scratch.
Battle Damage Skirt (With Hemis) - Use this version if you are printing the Battle Damage version on a large sized resin printer or are using one of those fancy dual-extruder filament printers that lets you print disolvable supports so you don't have to worry about ugly overhangs.
You will need to print the Left Damage Panel With Hemis, Right Damage Panel With Hemis, and the Black Button Hemi files to go with this version. You only need to print the Black Button Internal for LED file if you intend to mount Flashing LED string lights (this should be the type that has a button.) If you do not, you still need to print the separate Black Button Hemi to cover the hole. It is recommended that you print the Internal Battle Damage Core with this version as it provides support for hoses and wires, but is not essential if you want to completely build the inside from scratch.
Solid Skirt (No Hemis) - Use this version of the skirt if you want a regular undamaged Emperor. You do not need to print the Internal Battle Damage Core or any of the Damage Panels. You will still need to print and glue on the Black Hemis and Black Button Hemi for this version, even if you do not intend to mount LED lights.

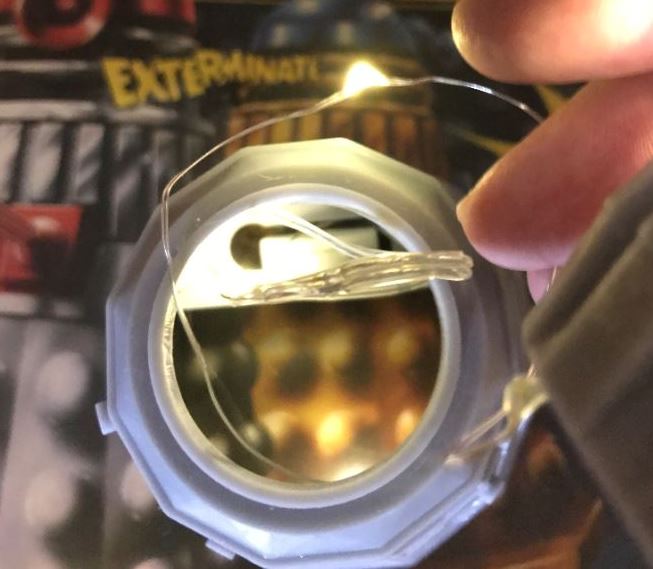
This figure requires at least one 1.5mm wide brass rod to be trimmed to length for the eye stalk pivot, several lengths of 2mm or thicker wire if you want to add internal tubing to the "guts" of the Emperor, and a Flashing LED string light (the kind with a button) if you want the lights in the crown to flash when the Emperor speaks.

Before painting, it is recommended that you fit all parts loosely together without glue to make sure that they fit and move freely. You may need to sand down some parts or drill out some holes if they are too tight or don't fit together smoothly.

The exterior is pretty simple since we have good reference photos. The upper dome and upper two chest hemispheres should be a yellowed cream color, approximately the same color as unpainted fiberglass resin. (Fun fact... the head of the Emperor Dalek is actually a Chumbley dome recycled from Galaxy 4!)
The majority of the head and body is light grey (Testors "Light Ghost Grey" seems to be a pretty close match) however, the interior of the lights encircling the head are white, and the slats between the "crown" parts of the head are painted the same black as the body hemispheres, "candy apple" part of the eyestalk, collar, and "bib" behind the upper two hemispheres. The end of the eyestalk is grey with a white iris.
If you intend to hook hoses to the outside of your model, you'll want to look for some 4mm OD/2mm ID white silicon tubing.
If you want to be extra accurate, paint or sharpie the last mm or so of the tube black where it connects to the pegs on the body.
The plinth is dark blue, with silver trim around the edges.
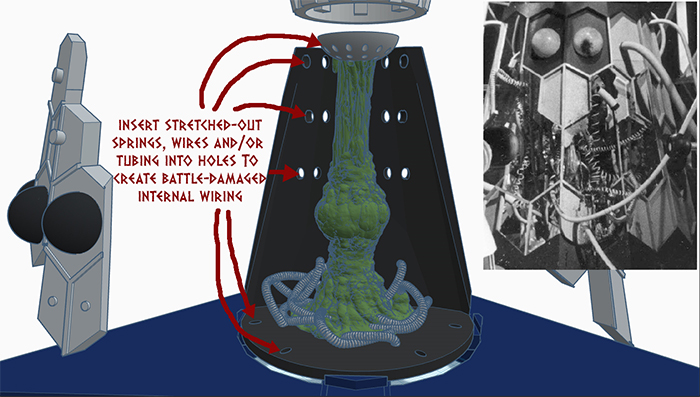
The interior is another matter. I recommend painting the Internal battle damage core and most of the Emperor Dalek interior black to start with. The mutant core should be green. The curled "telephone" hoses are easiest to replicate by getting a few different thicknesses of wire, and just wrapping them around different cylindrical objects like pencils, painpaintbrush handles, and the 1.5mm rod used for securing the eyestalk. It looks like they were a wide variety of colors, so just use whatever's handy. You may want to give the core a light spraydown with dilluted black airbrush paint before final assembly to blacken and stain everything a bit so that it looks like it's been on fire.

If you are using the optional LED string lights, the first thing you need to do before assembling anything else is push the Black Button Internal for LED (the little peg part) through the square hole on the inside of the emperor so the round end sticks out through the back. This is what you'll be gluing the Black Button Hemi to eventually, but once you've got the button through the hole, hold the skirt so the button is lying flat, and you can slide your LED string light into position from the slot near the neck section, you'll need to slide it down so that the LED string comes up through the same hole on the left side (which has a slight circular hole cut into it) Everything should line up in such a way that the peg you inserted earlier lines up with the button on the LED battery pack, and pushing it from the outside will turn the lights on and off.
If you want to be able to change the batteries later, I recommend that you do not glue the battery pack in place, or only use hot glue that is easy to remove later.
The rest of assembly is easy. The head and dome only go on one way. (If you want to leave the battery pack accessible You should either not glue the head, or glue it with hot glue or something you can pry loose later.
If you're using LEDs, Insert the LED string lights into the light holes around the edge of the crown. These will need to be sealed in place. You can use crazy glue, but I prefer using UV craft resin. The lights will alternately blink when you turn them on with the button. This is screen accurate from what we can tell from a few surviving behind the scenes clips.
If you printed in resin and intend to mount a LED in the eyestalk, you will need to clip off the very end of the LED string (leave at least a couple of centimeters of wire after the next light) then burn the ends where you cut the wire with a lighter. There's an incredibly thin insulation coating you need to strip away. Once that's done, insert the lone LED into the eyestalk hole and feed the wire through the tiny hole into the head. Use electrical
tape to very carefully reattach the wires. This is easiest done with the lights turned on, so you can make sure you're getting a clean contact. The voltage on these lights is so low, you don't have to worry about getting a shock.
Once you've got LEDs in place (if you're using them) mount the eyestalk in place with a length of 1.5mm wide brass rod trimmed to the right length, or failing that, a toothpick or bit of coat hanger.
The internal Battle Damage Core has several holes where you can mount springs, wires, or bits of extra tubing. I originally intended to use springs for my design, but found that simply wrapping lenths of different gauge wire around the 1.5mm brass rod, an old screwdriver, and a few different sizes of paintbrush handle gave me a nice assortment of curly tubes to add to the center. I recommend gluing the Battle Damage Core in place to the back wall once you have everything set up the way you want it. there should be no reason to remove it from the figure once it's in place since it doesn't interfere with the LED pack.

Coming soon.
|
 |