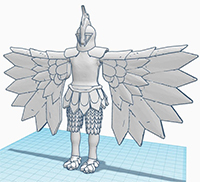
REMIX002 - Kronos (Chronovore)
Original design by James Lee
Remixed by Troy Ryan Wood
Version 2 - Updated 11/16/2020
Final: https://drive.google.com/file/d/1n1HSEg9pMhIpdJ7vM7rc62N9hprBneo2

This is the first of many amazing figures designed by James Lee that I'll be adding articulation and minor tweaks/detail upgrades to. He's cranking these things out 6x faster than I can work on them, so check out all his other incredible creations and know I'll try to get to as many of them as I can, but I still have my own figures to work on as well!


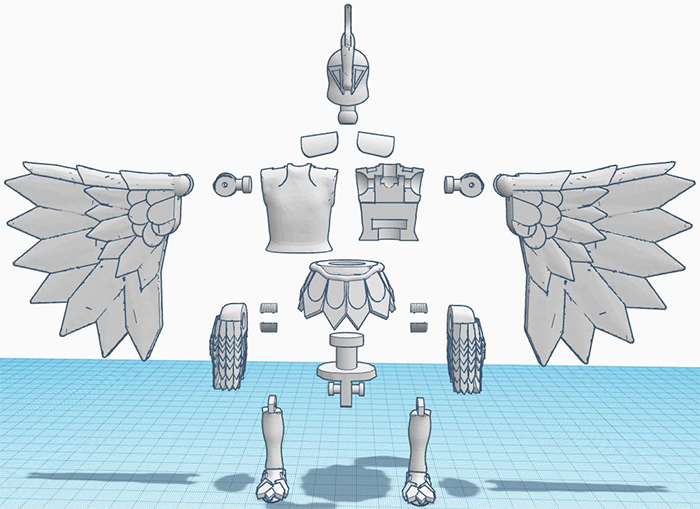
The files used to print this figure are the same, regardless of whether you are printing in
PLA (filament) or SLA (Resin) unless specifically noted. This figure should be printable in PLA (James original was) but the shoulder pads are very thin and may require additional support. I have included two alternate versions of the wings; a solid version for PLA and a SLA version that has a separation between the front and back edges of the wings.

This figure requires at least one 1.5mm wide brass rod to be trimmed to length for the knee and shoulder joints. These craft rods can be found online or in most craft stores that have a model airplane section. Alternatively you can use a thin wire coat hanger or even a toothpick, but you may need to widen some of the holes prior to final curing with a small hand drill.

Before you paint and assemble your figure(s) it is recommended that you fit all parts together without glue to make sure all points of articulation slot into place and move correctly. You may need to sand down some parts or drill out holes if pieces do not move freely.

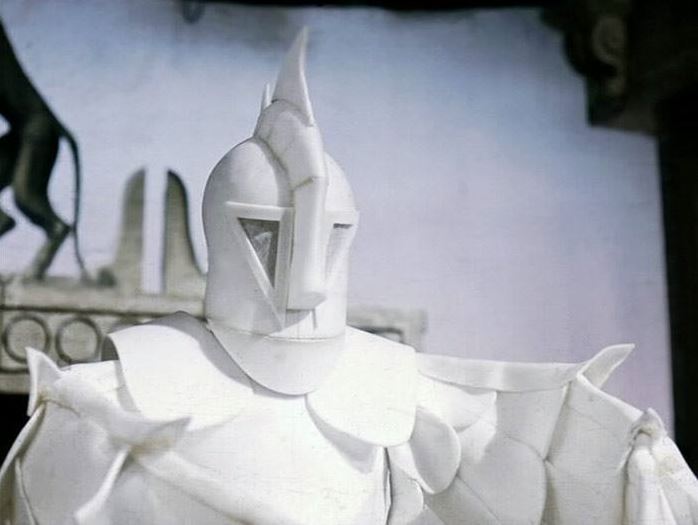
This is one figure you can get away with not painting at all if you printed him in white to begin with.
If you want to add an extra bit of detail, the eye screens in the mask should be a dirty grey, and there's some slight discoloration around the edges of the crest. Otherwise, he's all white.

Begin by attaching the wings to the shoulder pivots with 1.5mm wide brass rod trimmed to just a couple of mm shorter than the depth of the hole. I prefer the brass rods for my design because they're incredibly sturdy while still easy to cut, but you can always use
a toothpick or bit of coat hanger if you want.
Once the rod is all the way through the shoulder pivot, seal the open end with UV craft resin, craft putty, or crazy glue gel. Then do the same to attach the legs to the thighs (make sure you have the feet pointing the correct direction before you seal it in place! The legs should bend backwards but not forwards)
Next, take the hip sheaths (the small half cylinders) and clamshell them around the hip joints on the crotch. they should spin freely. If not, you may need to file them a bit. Usually, you don't need to glue the hip sheaths together themselves, just put some crazy glue into the thighs, and slide the hip sheaths into place.
Stick the leg assembly up through the central hole in the skirt, and clamshell the torso around the other end, as well as the two wings and the head. Make sure all the pieces fit together and move correctly before you crazy-glue the torso shut. If the hips are loose, you may need to glue the top part of the skirt to the underside of the torso.
Finally, add the shoulder pads, and you have an fully assembled Chronovore.

Coming soon.
|