REMIX008 - The Kandyman
Adapted from an original sculpt by Rob Ackers, remixed by Leighton Humphrey, and then remixed again by
Troy Ryan Wood to add articulation and multiple
cosmetic improvements!
Version 1 - Updated 5/27/2024
Beta: https://drive.google.com/file/d/1wWHq5zejyj2OaiOp24pR2DoF3RS8vnUn

This was another collaborative super team-up between several of the artists on our facebook group.
While I did make several small improvements to the design to improve screen accuracy and articulation, credit where it's due, Rob and Leighton did most of the heavy lifting on this one before I even touched it.
Note that the optional deluxe head with the spinning eyes is currently untested and I don't know if it will function at all. The regular non-eye spinning version should work fine, so if you're paying a print service to print this for you, I'd either go with the safe option or wait a few weeks until I've had a chance to test the more complicated deluxe version and work any bugs out.

The files used to print this figure are the same, regardless of whether you are printing in PLA (filament) or SLA (Resin), except where noted below.
This figure is primarily designed for SLA resin printing, and some small parts, like the hands and icing on the chest may not print properly in PLA. If you are filament printing I recommend using PLA+/Flex PLA for improved surface detail and stability.
For SLA resin printing, I highly recommend using a flexible resin like 3DMaterials SuperFlex (preferred, if you can get it) or SirayaTech Tenacious as an additive and strengthening agent.
I'd recommend printing most body parts out of a minimum 80/20%
mix of regular ABS-like resin and flexible resin, but the hands, chest (if printing the version with icing), and feet should be printed out of at least a 50/50% mixture. If you do not print the feet our of flexible resin or PLA+, the pinch-to-close connectors will probably snap off when you try to force them into the holes and you will have to simply glue the feet in solid to the bottom of the legs.
This figure comes with three different alternate versions of the head:
- Head Hollow -- A pre-hollowed version of the head for SLA resin printing.
- Head Solid -- A solid version of the head for PLA printing or anyone who prefers to hollow their own resin prints.
- Optional Deluxe Head -- This folder contains six pieces which can be assembled to make a deluxe version of the head where the eyes can be made to spin using a concealed gear. (Currently untested)
This figure also comes with two different version of the front and back torso:
- Front Torso and Back Torso -- The default version includes icing drizzles incorporated into the body. This version is best printed using a SLA resin printer using a 50% mixture of flexible resin, as the icing drips will be extremely fragile and require additional manual supports 1mm in width if you want them to print properly.
- Optional No-Icing Front and Back Torso -- A version without any icing drizzles intended for PLA printing or anybody who doesn't want to use flexible resin or add a bunch of supports in manually. This version will also make painting the internal circuit boards a little easier.

This figure requires at least one 1.5mm wide brass rod to be trimmed to length for the elbow and knee joints. These craft rods can be found online or in most craft stores that have a model airplane section. Alternatively you can use a thin wire coat hanger or even a toothpick, but you may need to widen some of the holes prior to final curing with a small hand drill.

Before painting, it is recommended that you fit all parts loosely together without glue to make sure that they fit and move freely. You may need to sand down some parts or drill out some holes if they are too tight or don't fit together smoothly.

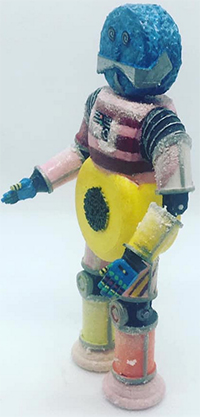
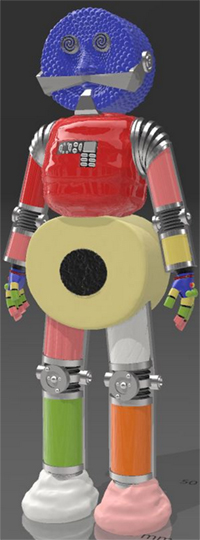
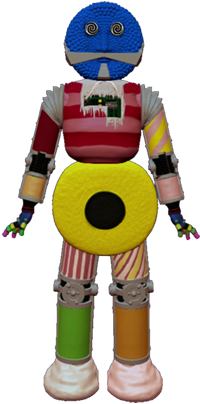
This will be an incredibly difficult figure to paint, and you'll mostly just have to go off of source photos, but I'll point out some key details...
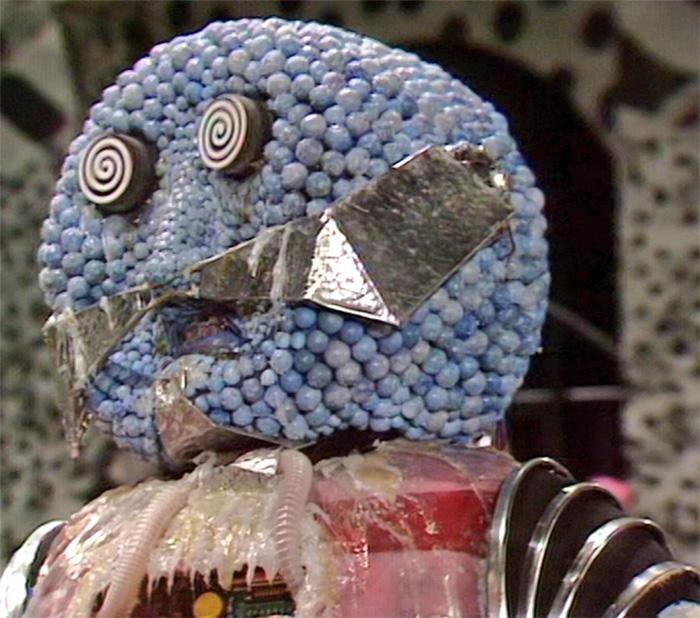
The head: The gumballs are a pale blue, but there is quite a bit of color variation between them. The lips and mouth area are a slightly darker blue or purple compared to the rest of the face.
The mustache and goatee are both polish silver, but discolored by icing spatters.
The eyes are black puck shapes with white swirls. (It looks like there were a few different swirl patterns used during filming. Perhaps getting them to spin at the correct speed was problematic?)
The shoulders are sliver, but the areas inside the rings are black.
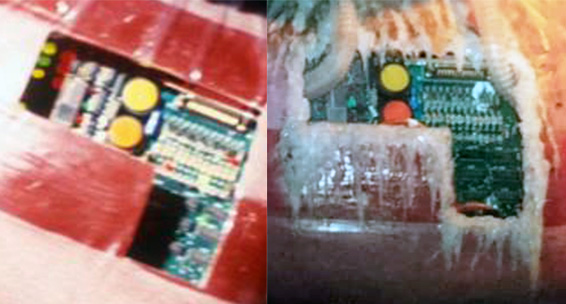
From the top the chest stripes alternate between pink and red, but a good chunk of the top pink area is covered in yellowish-white congealed icing. The corrugated tubes leading up from the chest cavity inside the head are white.
The chest circuits: The circuit boards are green, with the mostly gold circuit patterns and some black chips towards the bottom. The two large circular resistors are yellow and orange. During filming, the bottom circle doesn't appear to be quite as dark, so it's possible that piece was later replaced or repainted when the costume went on exhibition. There are six small lights on the far right of the chest colored yellow green yellow and red red red.
The circuits on the back of the chest and head are never shown in any detail, so use your best guess based on the coloration of the front circuits.
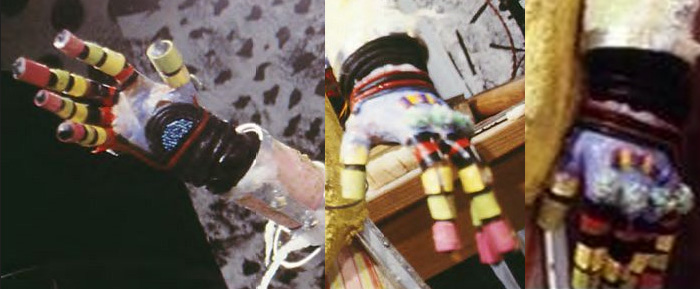
The hands: Note that if you find photos of the Kandyman while it was on exhibition, the "restored" hands are a completely different yellow and black color scheme with pink fingers.
The correct color layout has bluish-purple hands (I can't be certain, but I think this may have been makeup applied directly to the actor's skin, similar to what was used around the mouth) with six cylindrical capsule-shaped objects glued to the back of the hand. For the right hand (as pictured below on the bottom left) these are colored red-yellow-red-yellow-red-purple. The coloration on the left hand goes the opposite direction. The frosting spikes on each knuckle are a light green. The wrists have an alternating red and black ridge,and one of the red ridges goes up the blade of the hand to connect to the pinky and thumb.
The four fingers (but not the thumb) begin with a red-black-red stripe at the bottom, followed by yellow, green, and pink finger bones. The areas between these sections are black, and the tips of each finger are black. The thumb only has two finger bone sections which are yellow and green.
The palm of the hand has a half circle section composed of tiny circles the same blue color as the gumballs that make up the head.
The rest of the body: The groin area is a bright canary yellow with a black center.
The upper left arm is a solid dark reddish orange color, and the bottom left is a solid light pink.
The upper right arm is alternating diagonal striped yellow and pink, and the bottom
right is a solid pale green.
The upper left leg is alternating pink and white vertical stripes, and the bottom left is a solid neon green.
The upper right leg is a very complex diagonal striped candy cane
pattern which appears to have a medium red stripe, a thick white stripe, a medium red stripe, a medium yellow stripe, a thick pink stripe, a medium yellow stripe, pattern repeating. The bottom right leg is a solid neon orange.
The left foot is a whiteish yellow marshmallow color. The right foot is a light pink marshmallow color.
The knee and elbow joints are black, but there are solod silver bands that connect up the side braces and each of the cylinder edges for the arm and leg sections.

The wires out the back: If you want your Kandyman to be extra detailed, there are several loops of wires running out of the back of the head and chest circuit board. There are holes in both of these sections of the model for you to insert colored 0.5mm wire of different colors that you've braided together to form loops. as shown below.
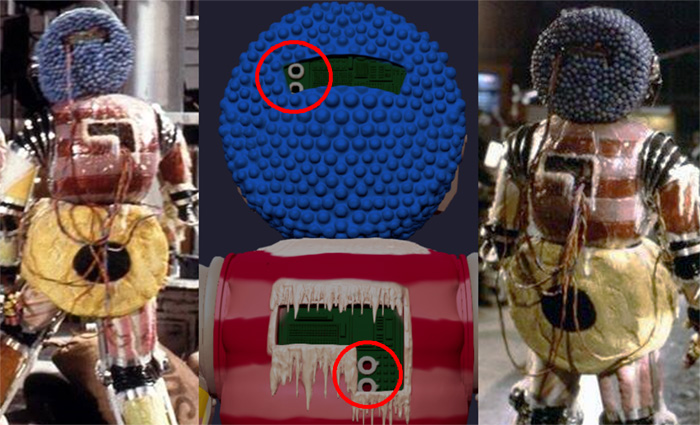

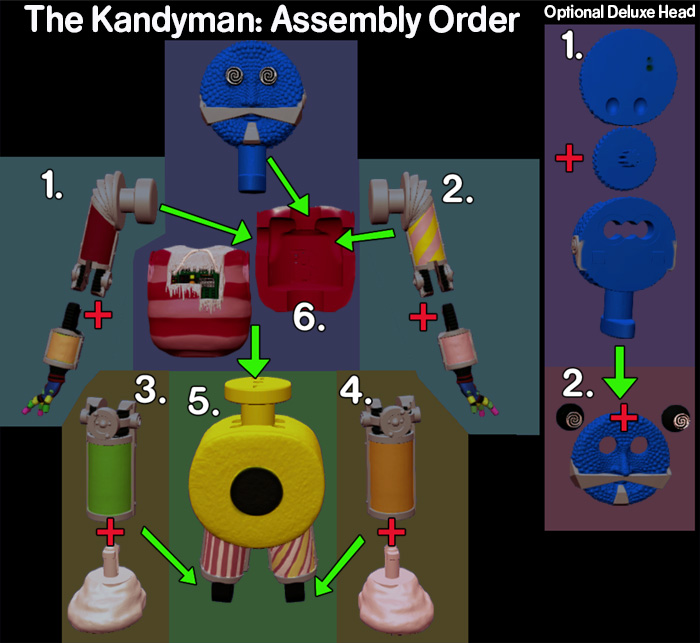
If you have printed the Optional Deluxe Head, begin by sandwiching the Large Gear between the Back of Head and Middle of Head.Then insert the Spinning Left Eye and Spinning Right Eye into the circular cavities between the Middle of Head and the Front of Head. Before you glue these parts together, make sure that the gearing spins freely.
To assemble the main figure, begin by attaching the arm and hand joints together by taking your 1.5mm wide brass rod and snipping it about 1-2mm shorter than the hole. You can then seal the open end of the hole with UV craft resin, glue, or sculpter's putty to seal the rod in place.
Attach the feet to the legs, and then attach the legs to the groin using 1.5mm wide brass rods again, making sure that that you note the orientation of the bolts on the knees so that you attach the left and light legs to the correct sides of the body. The groin will have a F and B etched into the T-plug to help identify which is the front and which is the back of the figure.
Before you clamshell the front and back torso around the arms, head, and groin, fill in the four drainage holes next to the T-Plug on the groin with UV craft resin, UV putty, or milliput, and repaint as needed.
When gluing the two halves of the torso together, make sure that sure that all articulated parts move freely and do not accidentally get glued in place.

Coming soon.
|
|