What follows is a list of the various tools, tweaks, and other generally useful information I've picked up over the course of building my figures. If you're looking to squeeze every last ounce of detail into your printed model (as I constantly am) these are just some of the ways to go about it...
 |
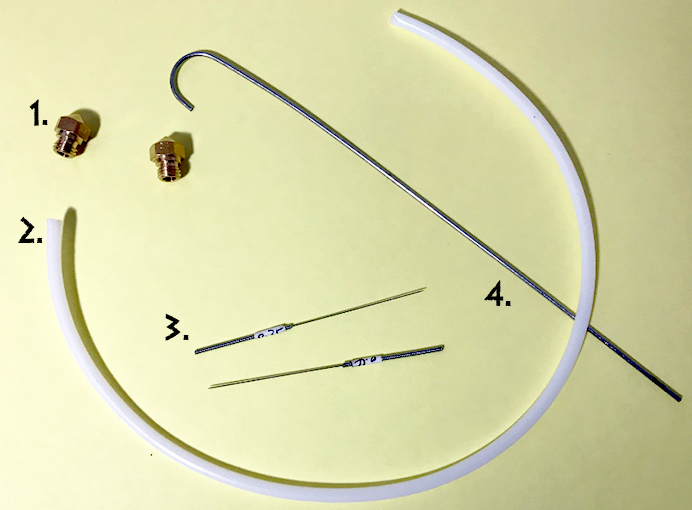
- Spare print nozzles - You will always want to make sure you have a couple of spare nozzles of the same size and style as your extruder and heat block. Most printers use 4mm nozzles (don't change the nozzle size unless you know exactly what you're doing, and know where to change all the appropriate settings in CURA), but there are multiple styles, including M6 (short stubby nozzles) and MK10 (larger, more pyramid shaped nozzles), with different thread types.
Nozzles eventually wear out or get hopelessly encrusted/jammed.
Don't wait until your last nozzle is unrecognizably encrusted in a ball of molten plastic goo to buy new ones.
- Spare teflon tubing - Many filament printers use teflon tubing to guide the filament into position, and most have short sections of pre-cut tubing inside the extruder itself, which slot into the nozzle.
This is where most printer jams occur, and after you've been printing for a while, you're going to get really good at unscrewing the nozzle and swapping out this bit of tubing. You can save a bit of money by buying a long length of this tubing and cutting it down to size yourself, though be warned that the inner and outer dimensions of this tubing can vary slightly from printer to printer, and purchasing the the wrong size can cause you loads of problems. (Most printers I've seen use
4mm outer/2mm inner tubing, but try to search specifically for your model of printer to make sure) Also
make sure you mark with a sharpie exactly how long the pieces should be before you cut your own, otherwise it may not fit in the available space or leave a gap where a filament jam can form.
- 0.4mm nozzle cleaning bit - I prefer the long stainless steel ones that look like acupuncture needles. The short stubby ones tend to break off inside the nozzle and cause problems of their own. To clean a stuck nozzle, heat the nozzle to normal printing temperature (or slightly higher) and then carefully insert the cleaning bit up inside the nozzle to tease out stuck filament.
- 1.75mm steel cleaning rod - Your printer should have come with one of these. Don't lose it, since they're unusually hard to replace. Use this to free up filament jams from the other end of the extruder when the nozzle cleaning bit isn't working.
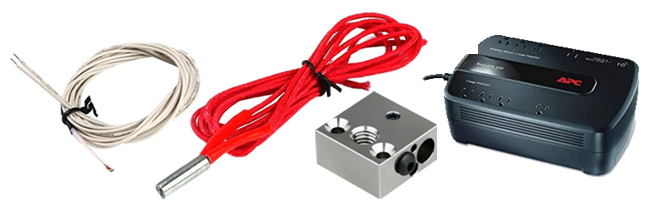
- Spare Thermocouple - The sad fact about 3D printing is you're going to spend half your time troubleshooting why your printer won't print. If your prints are failing and you've already switched filaments, nozzles, releveled the bed, and cleaned the extruder, the next most likely culprit is the the thermocouple. In most cases this isn't too expensive or difficult a part to replace. It's typically only held in by one screw in the heater block and (if you're lucky) snaps directly into a wire harness at the other end. It's always useful to have a spare since this is a part that will wear out eventually, and until that day you can swap back and forth between ones that you know are functional in a process of elimination when trying to diagnose printer problems.
- Spare Heating Element - See above. When a heating element goes bad it's usually a little more obvious because the machine will just shut-down mid-print (because the thermocouple tells the machine the element isn't heating or is overheating). Still, it's one of those parts that will eventually burn out with use, so it's always good to have a spare.
Note that on certain brands of printer, the Thermocouple and Heating Element are part of the same wire harness and to replace one, you must also replace the other. This is a stupid (and costly) design flaw, because the thermocouple typically needs to be replaced 2 or even 3 times as often as the heating element, but what can you do? Somebody thought it was a good idea at the time.
- Uninterruped Battery Backup/Surge Protector - If your electrics are the slightest bit dodgy or you live in an area that sometimes gets brown-outs or power surges, you'll want to spring for a cheap uninterrupted power supply with battery backup. It doesn't have to be a fancy one, as even the best battery backup usually won't last more than an hour, but while it won't help if a winter storm knocks out the power to your entire neighborhood for several hours,
it may just save your 3-day print job if you get a brief power flicker or somebody trips the breaker by plugging in the vacuum cleaner and the hair dryer at the same time, and you need a couple of minutes to run to the fuse box.
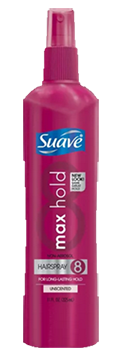  
- Cheap non-aerosol hairspray - I use Suave Max Hold, since it's literally the cheapest. Non-aerosol hairspray is your secret weapon for getting the bottom layer of your print to stick to the build area and prevent curling, especially on heated beds.
For extra large prints (like the TARDIS Console, War Machine, etc.) I recommend squirting down a layer seconds before it starts printing (don't put it down too early or it'll evaporate before it does any good) and then at various points while it's printing the first layer, especially around the corners. Try to only spray in areas when the print head is in the opposite corner so you don't gunk up the fan or print head itself. If you're not using a glass plate, you will occasionally have to use the paint scraper to scrape off the disgusting residue once it's built up.
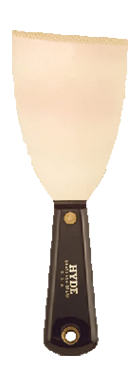
- Paint Scraper - One of these should have come with your 3D printer, but if not, pick one up for prying off stuck print jobs and/or scraping off residue. If you're using a glass plate, and worried about accidentally scratching the surface you can get a brass one which is less likely to leave marks.
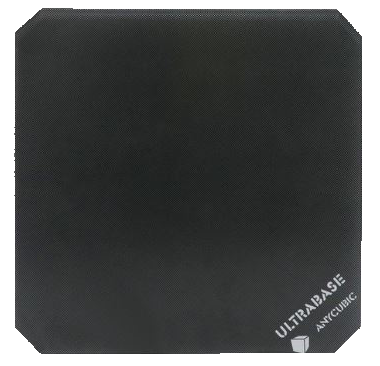
- Borosilicate Glass Plate - Of all the bells and whistles I've added to my printer, this one has made the most significant difference in print quality. If you have a heated print bed, the plate helps distribute heat evenly across the entire build area (which prevents warping), and will give you an absolutely gorgeous smooth finish to the underside to your prints, both of which are essential when printing large scale designs like the TARDIS console, War Machine, Dalek Time Machine, etc.
I still tend to spray a bit of hairspray on the plate for large builds, just to make sure everything stays put, but when printing smaller pieces you can largely do away with hairspray and other fixitives to keep your designs in place. You also don't have to use the paint-scraper to remove your prints. If you allow the plate to cool back down to room temperature, they'll pop right off.
Note that if you've been printing for a while without a glass plate and your print bed has a bunch of filament and hairspray stuck to the existing mat, you may need to peel off the mat and stick the glass directly to the metal build plate. If it pops off, you can even crazy glue it in place. When you first install the plate, because it raised the height of your build plate by about 1/4 of an inch, you will need to relevel your bed and probably adjust your Z axis endstop. Depending on what model of machine you're using, this may be an electronic setting, or you may have to physically unscrew and remount the Z axis endstop sensor. When in doubt, check YouTube for instructional videos pertaining to your particular model of machine.

- PLA+ (sometimes also called "Flex PLA") - I don't do much filament printing anymore, but when I do, I try to always print with PLA+, which is a mixture of standard PLA and the more flexible TPU filament. It costs a tiny bit more than regular PLA (about $5 more per roll than the cheap stuff) but is worth every penny. Despite the name, this won't make your prints any more flexible. Instead, this filament is harder, stronger and tends to print fine details significantly better than your regular run-of-the-mill PLA. It's also more resilient to bending and seems to come out of the print nozzle cleaner and more precisely, which is good for smallish high detail parts (like hands and antennae) that might otherwise break during assembly.
I typically buy my PLA+ from eSUN (Who list it as PLA Pro, and have a fairly decent color selection) or as Flex PLA from Paramount, who I'm fond of for filament in general since their stuff isn't too expensive, the company is operated out of the US (which may make their level of quality control a bit higher), and they tell you the exact Pantone color that the filament is supposed to match (ex: British Racing Car Green 3435c) so you can be reasonably certain that the next time you order, you'll be getting the exact same color as what you bought previously.
- A print enclosure (Even if you have to make it yourself) - Most entry level filament printers do not come with an enclosure. While PLA does off-gas a tiny bit (nothing like resin printing) the primary advantage of an enclosure is heat control. When printing large objects over the course of several days, it's not uncommon for some parts of the design to cool down, which can cause warping. It is therefore useful to have some method of keeping the heat contained, but not so much that the filament overheats and starts pre-melting in your extruder (which will cause a jam.)
Yes, you can buy a fully sealed acrylic enclosure for a couple hundred dollars, but the simplest way to go about building an enclosure is to simply get five sheets of foamcore from your local dollar store or craft supply outlet, then tape four of them together into a large square box, and use the 5th one for a lid that you can rotate to alter the amount of hot air escaping at the corners.
If you find your prints are overheating and causing jams, rotate the lid to let out more heat. If they're curling around the edges, rotate it so the box is almost sealed and less heat is allowed to escape. Depending on how climate-controlled your environment is, you may find yourself fine-tuning the adjustments at different times of the year to compensate for the changing ambient temperature of the room.
If you do have a fancy printer with a full enclosure, unless it's a super fancy one with built in temperature controls ba aware thay you may need to leave it propped open a bit at times, especially when printing in hot weather.
 |
I provide more details about resin printing in general on the F.A.Q. page.
There are several items that are absolutely essential if you want to be able to print with resin safely, so I'm just going to assume you are a responsible adult and have already purchased the most basic safety precautions like disposable gloves, goggles, and masks, are operating the machine in a well-ventilated area or with an exhaust system, and you already have your UV cure station set up with a UV cure light, a wash station with isopropyl alcohol (90 to 99% if you can get it), and plenty of paper towels and alcohol wipes to clean up any spills.
Now that the basics are out of the way, here are a few items that will make your life easier:
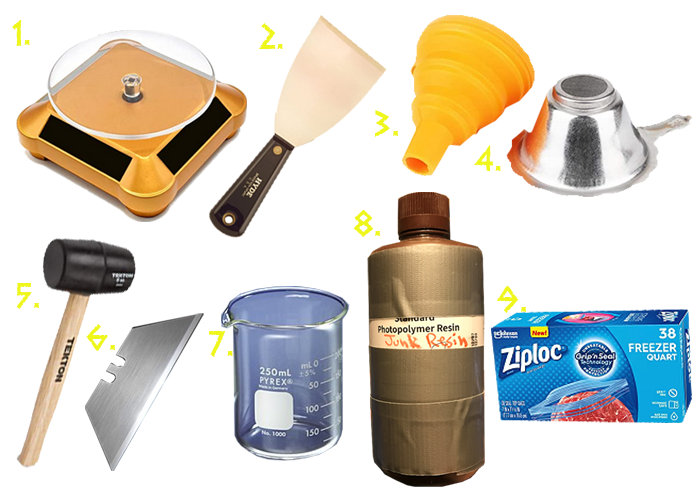
- Solar Powered Turntable - These cheap window display turntables are perfect for placing under your UV cure light to make sure your resin-printed figures get cured from all sides. Most have a spot where you can install batteries, but after a few seconds under the UV light they'll start turning on their own.
- Brass Paint Scraper - To avoid scratching your build plate or more importantly, the glass plate above your LCD screen if you happen to get a FEP vat leak, a brass paint/windshield scraper is less likely to scratch your glass when removing hardened resin.
- Resin Funnel - Need to pour resin back in the bottle. Get a funnel.
- Resin Strainer - Typically sold alongside the resin funnel. The strainer strains out any potential floating bits when pouring resin back into the bottle to reuse.
- Small Rubber Mallet - It can cometimes be tricky to get prints off the build plate without one.
- Disposable Razor Blades - When you get a break in your FEP liner you're going to have some hardened resin stuck to the glass plate about the LCD screen. First, try using alcohol wipes to wash it off and potentially expose the edges of the blob you need to remove. If you can't get it up with the brass paint scraper, carefully try to get under the solidified spill by gently scraping one of these razor blades along the surface. I find it helpful to pour some isopropyl alcohol down on the area where I'm working to help dislodge the hardened resin. Whatever you do, don't press too hard or press down with the cutting edge. Also, don't use a razor you've used to cut anything else. If it's chipped or nicked in any way, you can destroy your screen.
- Pyrex Beakers - I like using pyrex beakers for my Isopropyl alcohol baths. It's also useful to have one around that you can stick a zip-seal freezer bag into when you need to pour resin out of the FEP vat.
- An Old Resin Bottle - Do not throw away your first couple of resin bottles when they are empty. As long as you keep your printer and resin bottles in a dark cabinet or away from UV light sources, your resin is unlikely to go "bad."
You can usually just pour it right back into the bottle, but if you mixed two colors together (or mixed in some Tenacious resin for flexibility) and don't want to "pollute" your nice clean resin, just pour anything you don't want into the old resin bottle through a strainer to filter out the junky stuff. Label this old bottle as your "junk resin" and use it whenever you just need to test print something or plan on printing an item that you know is going to get painted over anyway. Resin is so expensive (not to mention damaging to the environment) that there's really no excuse for just throwing the stuff away every time you need to change colors.
- Zip-Seal Freezer Bags - You are going to need to empty your FEP vat at some point, either to change colors or locate a leak in the FEP liner. When you do so, stick a quart sized freezer bag over the edge of a beaker or old coffee cup you don't care about and pour off the resin into the bag.
When you're done doing whatever you need to do, you can either pour the resin from the bag back into the FEP vat or a resin bottle for storage, but you're never going to get all of the resin out of the bag. Assuming it's not pouring rain outside, just take the back outside and clothes pin it to a clothes line, ideally so that it gets sun from both sides and with one edge of the bag slighty open so that heat can escape. Come back later that night or the next day, and all the resin in the bag should be solid and much easier (and safer for the environment) to dispose of.
If you absolutely have to get rid of an entire batch of resin for some reason, you can use the same method, but I recommend putting the bag out at night so that it can get a slow UV build-up over several hours. You do not want to put the baggie under your UV cure light because the resulting heat can melt the bag.
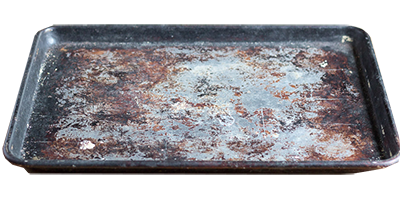
The freezer bag method can also be useful for disposing of resin-tainted alcohol, but it'll take a long time to evaporate. I've found the best way to safely dispose of you tainted alcohol is to pour the contents into an old junky cookie sheet you no longer care about and set it out in the sun. Mind you, this method only works if you don't have little kids or animals around who are likely to stick their noses into it, and for those of you who live in Scotland, sun.
After a day or so's exposure to UV, you should be left with a powdered substance that can be scraped off into a trash bag. Please make sure that you wear a mask while you're doing this, as inhaling any sort of powdered resin is extremely bad for your lungs.
 |
There are all sorts of how-to tutorials when it comes to painting models and miniatures, and I can't tell you in a couple of paragraphs how to become an artist. But the following items are extremely useful for cleaning up your prints before painting.
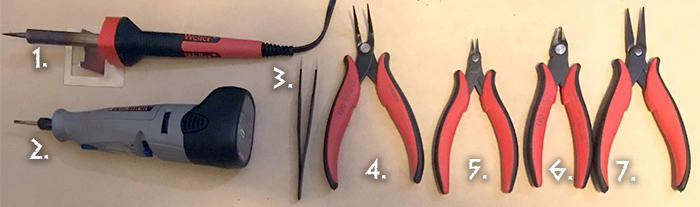
- Soldering iron with a narrow tip (and a LED light, if possible) - Very useful for "cleaning" prints of stray blobs of filaments, smoothing rough areas (especially stringy overhangs) and if you're brave enough... can also be used to manually add lines and other details to a print prior to painting. You'll want the narrowest most needle-like tip you can get, and one with a LED light is nice so you can see what you're doing.
- Dremel tool - Also useful for fixing mistakes especially when you want to slightly grind a part down or widen a hole. Be cautious when using the dremel on PLA prints, as it will quickly heat up the plastic and pull off larger chunks than you may have wanted. This is especially the case if you used a fill percentage below about 80%.
A dremel can also be useful for cleaning up SLA prints, but be warned that this will produce resin dust so you should A) always wear a mask and goggles... you absolutely do not want resin dust getting in your eyes or lungs, B) vacuum up the surrounding area afterwards, and C) make sure you clean any dust off your skin and clothes when you are done since it can be an irritant.
- Very sharp needle nose tweezers - The finest narrowest pair you can find. Essential for when you have to reach down into crevasses either to position a small part or retrieve some little bit of support structure that's rattling around in there.
- Hakko CHP PNB-2005 Long-Nose 45° Angled Pliers - These pliers are a livesaver when trying to get a grip on small components at an angle, and removing support structures up inside the body of figures.
- Hakko CHP PN-20-M Pointed Nose Micro Pliers with Smooth Jaws - Small but allows you to get a good grip of very small pieces. I prefer the smooth jaw ones since they're less likely to leave lines on whatever part you're gripping.
- Hakko CHP 170 Clean Cut Micro Cutters - These wire cutters cut in nice clean straight lines, and are excellent for snipping off unwanted support structures. If you are resin printing, these are a must-have item, as your prints are always going to have support structures that need to be removed as cleanly and precisely as possible.
- Hakko CHP PN-2008 Long-Nose Flat-edged Pliers with Smooth Jaws - Less essential than the others, but it's nice having a larger flat smooth pair of pliers that won't leave marks. Sometimes, if a PLA component got bent or squished, you can use these to squish it back into shape without leaving grip marks.
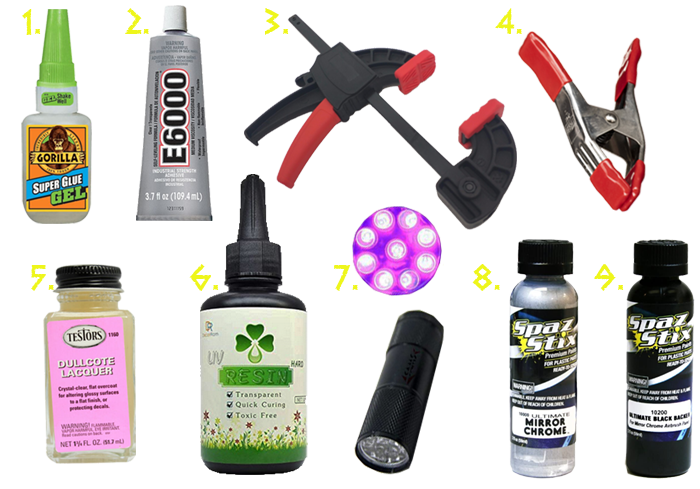
- Gel Super Glue - Never use the liquid stuff or model glue if you can help it. It just gets everywhere and leaves those nasty white "fume fingerprints" on everything. Gel superglue should be used for gluing most small pieces together when you don't want them to have any flex or give.
- E6000 - Better than crazy glue for gluing down large pieces that need to be able to flex like springs, when you need to cover a lot of surface area at once (like gluing the two TARDIS console halves together) or when you need to glue something in place in such a way that it the glue is entirely transparent (like a LED.)
- Plastic "F" or "Bar" Clamps - Can be useful when gluing larger pieces together where a spring clamp won't fit. (or you need to clamp somethng to a table)
- Rubber Tipped Spring Clamps - Vital when gluing large flat pieces together (like the TARDIS console) where they need to be absolutely flush.
- Dullcote Lacquer - Adds a protective layer to bare filament and enamel paint alike, with the added benefit of toning down the gloss sheen of enamel paint when finishing off your figures. Very useful stuff indeed, but make sure you shake the bottle thoroughly before using and try to keep even coverage over the whole figure.
- UV Craft Resin - This is different from the resin typically used for 3D printing, as it's designed to be cured all at once rather than in super-thin sheets.
UV quick-set resin in a godsend for fixing small mistakes, patching holes, and tightening loose joints. It's pretty cheap and you rarely need more than a single drop at a time, so one bottle should last you a long time.
You can also mix UV craft resin with a tiny bit of
Epoxy Resin Pigment to make colored light-up control panel elements for the TARDIS consoles or tint your printer resin pink if printing Kroagnon eyes.
- UV Cure Flashlight - You can technically cure UV craft resin by setting it out in regular sunlight, but the easiest and quickest way is with a small UV flashlight. Note that you want to make sure you get a proper UV cure light specifically designed for curing resin and not just some generic purple-tinted black light you picked up for a couple of bucks at the hardware store.
- Spaz Stix Mirror Chrome Airbrush Paint - A lot of my figures are silver or have silver metallic parts. This is the best silver paint I've ever found and it works great even if you don't have an airbrush. Though if you do, it works even better.
- Spaz Stix Ultimate Backer Airbrush Paint - Also useful to have around. It's an excellent quality none-more-black paint that goes on extremely smooth. if you have to paint an ultra fine detail (like eyebrows or the iris of an eye) there's nothing better. Plus if you put a layer of this stuff down on a comparatively smooth surface (either resin printed or filament printed that you've sanded well) and then put down a layer of Mirror Chrome, you can get an effect that looks like polished chrome steel.
|