How do I print this stuff with a filament printer (the basics)
Disclaimer: I haven't used a filament printed in over 5 years, so I apologize if any of the information presented below is now out of date.
- Step 1 - Familiarize yourself with your printer. If you've never printed before, watch a bunch of YouTube videos and read a few reddit forums to get tips for first time printer setup. I'd recommend printing something extremely simple like a TARDIS key first, before diving into anything too complex.
- Step 2 - Download the STL or OBJ files you want to print from the link handily provided on the My Designs, Guest Designs, or Remixes page. These will typically be grouped together in a convenient zip file if the figure comes in more than one piece.
Don't forget to read the instructions, as some designs may ONLY be intended for use on resin printers or come with alternate versions of files depending on whether you're printing out of filament or resin. If you see a file that mentions that it's "pre-supported" and has a bunch of coral-like branches propping up the model, that file is formatted for SLA resin printing and isn't really designed for printing out of PLA.
The instructions may also tell you what infill percentage to use, whether you need to print multiple copies of some pieces, or if some parts need to be printed out of a flexible material like TPU or require any additional non-printed parts like metal craft rods, springs, Lego pieces, or LEDs, in order to produce a completely functional figure.
- Step 3 - Once you've read the instructions and have selected which files need to be printed, you will need to import the files in your slicer software and set basic print settings. The slicer is what converts a 3-dimensional wireframe model into instructions that your printer can use to build up the model one layer at a time (Typically GCODE).
If you have a regular filament printer, you are most likely using CURA, which is completely free and probably came with your printer, though there are other programs out there that have a few additional bells and whistles. The first time you use CURA, you'll need to set global settings that are particular to your printer (like the build area size, resolution, etc.) and then after that, you can adjust per-print settings, like what fill percentage to use, where to print support structures around the object, and whether to use a Brim or Raft to make it stick to the build plate easier. These are the typical CURA settings I use for most of my prints:

- Step 4 - Change the orientation of your models and adjust support settings as needed.
This is one of those areas where the more you print, the better you'll get at making small adjustments to improve print quality. The two most important things to remember when orienting your prints is that any parts that are floating (i.e. you can see underneath it) will need to be supported by removable supports. These overhang areas will come out looking extremely rough and will usually need to be sanded down or smoothed manually.
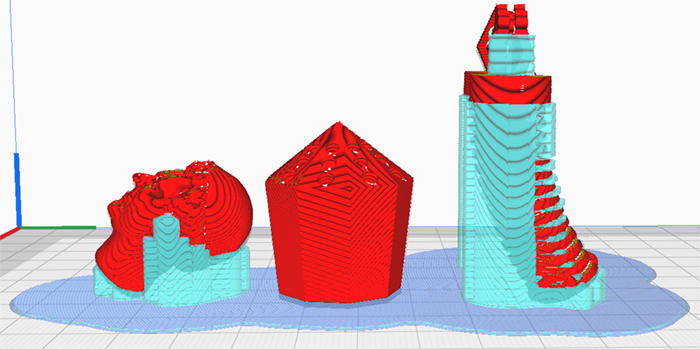
In general, the top of your prints will come out looking cleaner and with better surface detail than the sides or bottom of your print. So, if you're printing a human face or something else with lots of intricate holes or crevices, you will want to orient those so that the area that requires the most detail is facing up (see examples below.)
Heads in particular are best oriented at the angle shown below so that the chin and nose are pointed up and supported by the rest of the head so that it's not trying to print any support structures on the face. If one part of your print is always going to be rough and ugly looking, make sure it's the part nobody is going to be looking at too closely. (ex: the back of the head)
Thin skinny parts like fingers or antenna are also best oriented directly up and down to minimize overhangs.
Printing out of PLA+ will also give you much cleaner looking prints that don't show layer lines and rough overhang edges quite as much as regular PLA.
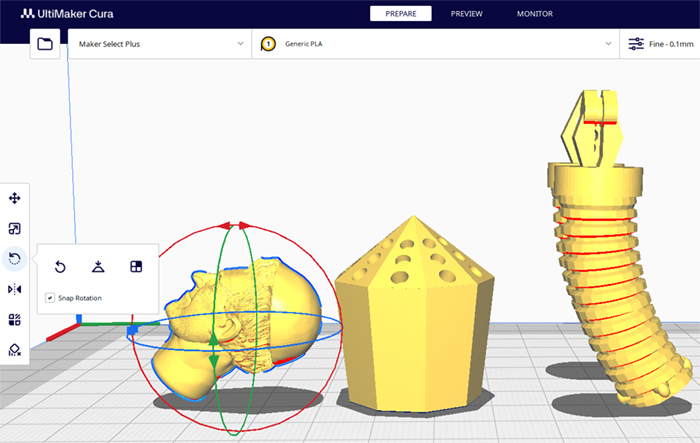
Always make sure you preview your print before saving the file so you can make sure that auto-supports are set up the way you want them and aren't hanging off any part of the model that you want to be able to see clearly.
Also, be aware that it is best to group pieces together by their infill percentage, so you are not wasting filament.
Items like hands and small accessories are best printed at 100% fill, but large bulkier pieces (like solid torsos) can be printed at 60% or even 40% infill and still maintain their structural integrity. The one exception is if you're planning on using internal LEDs, in which case, you'll want to print the entire figure at 100% infill so that the light from the LEDs won't shine through.
- Step 5 - Once you've oriented all the finished, you should be able to save the GCODE files onto a USB or SD card that the printer reads from or potentially transfer the file across to the printer via wi-fi, depending on your particular printer's requirements.

After that, follow whatever instructions came with your printer for physically starting the printing process. This may vary slightly depending on what brand of printer you have, but on mine,
the process looks a bit like this:
- I
pop the USB or SD card into the printer and power it on, hit "warm-up" and then specify "PLA".
- Wait a minute or two for it to reach starting temperature.
- Pick off any stray bits of filament that have leaked out of the nozzle.
- Hit the "print" button.
- Choose my GCODE model from the available list.
- Wait for the printer to almost reach target temperature (target for PLA is 220°) then spray a couple of quick spurts of hairspray on the build plate if it's going to be a large design. (Having a heated bed with a borosilicate glass plate largely renders this step unnecessary.)
- Let the printer lay down the first initial outline for the brim or raft (the solid bit that goes under your print job)
- Quickly pick off any blobby or stringy bits that might interfere with printing.
- Then the hardest part.... waiting several hours up to a solid week for it to finish the print job. (Though it is good to peek in every few hours to see how it's doing and make sure that the print hasn't self-destructed.)
What tools or add-ons do I need to improve my printing experience?
Filament printers are extremely prone to breaking down and getting clogged, so to minimize your downtime while you make repairs, it is a good idea to have spares on hand for just about all of the major parts that need replacing.
I'll go over those in more detail in just a minute.
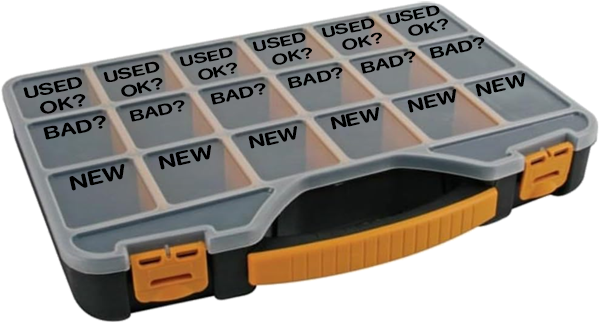
Since it's often very difficult to tell which part is causing your prints to self-destruct, you will spend a lot of time randomly swapping out pieces, some of which may turn out to be perfectly fine if another component was the real culprit. To avoid throwing away potentially still usable parts, I highly recommend purchasing one of those large part organizer boxes, and storing your spares in labeled compartments like the example below.
If you replace a part but you don't see any obvious damage, put it in the "Bad?" compartment until you've run a few more print jobs and determined that it was the part causing you problems (at which point it can be thrown away), or that it probably wasn't the part causing your problems because they are still occurring with the fresh replacement (at which point you can move it to the "Used OK?" bin, and pull from that one the next time you need a nozzle, thermocouple, heater element, etc. for troubleshooting.
In terms of useful spare parts to keep around....
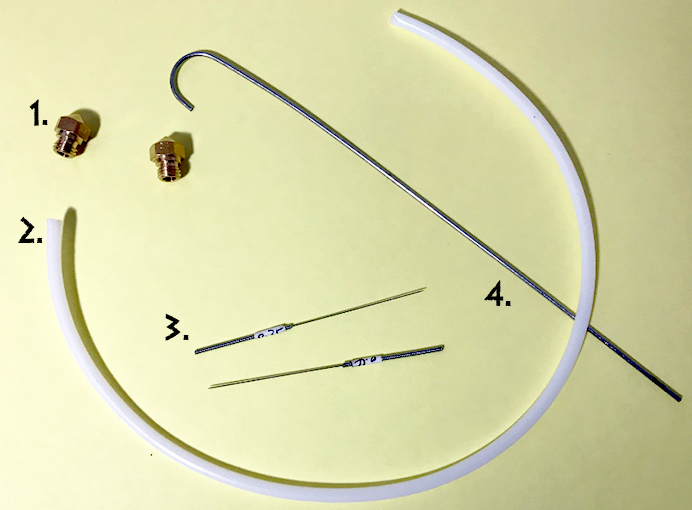
- Spare print nozzles - This is usually one of the first part on the printer you want to try replacing when things go wrong. Make sure you have a couple of spare nozzles of the same size and style as your extruder and heat block. Most printers use 4mm nozzles (don't change the nozzle size unless you know exactly what you're doing and know where to change all the appropriate settings in CURA), but there are multiple styles, including M6 (short stubby nozzles) and MK10 (larger, more pyramid shaped nozzles), with different thread types.
Nozzles eventually wear out or get hopelessly encrusted/jammed.
Don't wait until your last nozzle is unrecognizably encrusted in a ball of molten plastic goo to buy new ones.
- Spare teflon tubing - Many filament printers use teflon tubing to guide the filament into position, and some have short sections of pre-cut tubing inside the extruder itself, which slot into the nozzle.
This is where most printer jams occur, and after you've been printing for a while, you're going to get really good at unscrewing the nozzle and swapping out this bit of tubing. You can save a bit of money by buying a long length of this tubing and cutting it down to size yourself, though be warned that the inner and outer dimensions of this tubing can vary slightly from printer to printer, and purchasing the wrong size can cause you loads of problems. (Most printers I've seen use
4mm outer/2mm inner tubing, but try to search specifically for your model of printer to make sure.) Also
make sure you mark with a sharpie exactly how long the pieces should be before you cut your own, otherwise it may not fit in the available space or leave a gap where a filament jam can form.
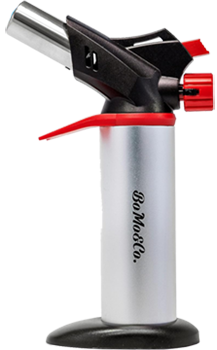
- 0.4mm nozzle cleaning bit - I prefer the long stainless steel ones that look like acupuncture needles. The short stubby ones tend to break off inside the nozzle and cause problems of their own. To clean a stuck nozzle, heat the nozzle to normal printing temperature (or slightly higher) and then carefully insert the cleaning bit up inside the nozzle to tease out stuck filament. A butane creme brulee torch can be handy for heating nozzles that you've unscrewed first to liquify any stuck resin... just make sure you're using a long pair of pliers or tweezers to hold it, since it will be extremely hot.
- 1.75mm steel cleaning rod - Your printer should have come with one of these. Don't lose it, since they're unusually hard to replace. Use this to free up filament jams from the other end of the extruder when the nozzle cleaning bit isn't working.
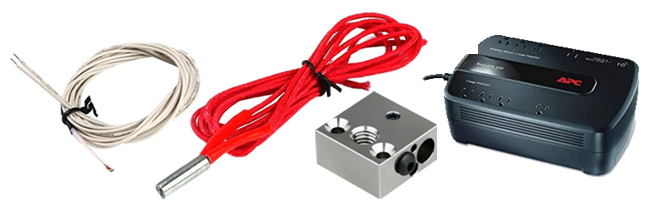
- Spare Thermistor/Thermocouple - After the teflon tubing and the nozzles, the next most likely culprit for failures is the thermistor/thermocouple. This just a fancy word for "thermometer" that detects how hot your heater block is getting so that your printer can heat up or cool down to keep the filament at target temperature. If this breaks, you may start getting temperature errors (especially if it never reaches target temperature on your machine's display during the preheat stage, but the heating block is clearly getting extremely hot) or it may not read temperatures accurately, meaning that your filament is actually too cold (won't come out of the nozzle) or too hot (backs up and jams).
In most cases this isn't too expensive or difficult a part to replace. It's typically only held in by one screw in the heater block and (if you're lucky) snaps directly into a wire harness at the other end. This is a part that is pretty much guaranteed to wear out eventually, but it is very difficult to tell whether the problem lies with the thermocouple or the heating element, so use your labeled parts box to store them until you're sure whether the part is genuinely bad or not.
- Spare Heating Element - See above. When a heating element goes bad it's usually a little more obvious because the machine will just shut down mid-print (because the thermocouple tells the machine the element isn't heating or is overheating). Still, it's one of those parts that will eventually burn out with use, so it's always good to have spares.
Note that on certain brands of printer, the Thermocouple and Heating Element are part of the same wire harness and to replace one, you must also replace the other. This is a stupid (and costly) design flaw, because the thermocouple typically needs to be replaced 2 or even 3 times as often as the heating element, but what can you do? Somebody thought it was a good idea at the time.
- Spare Heater Block - It is nearly impossible to break a heater block, but sometimes you may end up with a nozzle you simply can't get out, stripped threads, or a print job fails so spectacularly that the entire block ends up cocooned in a solidified blob of filament, at which point it's just easiest to just replace the entire thing.
- Uninterrupted Battery Backup/Surge Protector - If your electrics are the slightest bit dodgy or you live in an area that sometimes gets brown-outs or power surges, you'll want to spring for a cheap uninterrupted power supply with battery backup. It doesn't have to be a fancy one, as even the best battery backup usually won't last more than an hour, but while it won't help if a winter storm knocks out the power to your entire neighborhood for several hours,
it may just save your 3-day print job if you get a brief power flicker or somebody trips the breaker by running the vacuum cleaner and toaster oven at the same time, and you need a couple of minutes to quickly run to the fuse box.
- Cheap non-aerosol hairspray - I use Suave Max Hold, since it's literally the cheapest. Non-aerosol hairspray is your secret weapon for getting the bottom layer of your print to stick to the build area and prevent curling, especially on heated beds.
For extra-large prints (like the TARDIS console, War Machine, Dalek Time Machine, etc.) I recommend squirting down a layer seconds before it starts printing (don't put it down too early or it'll evaporate before it does any good) and then at various points while it's printing the first layer, especially around the corners. Try to only spray in areas when the print head is in the opposite corner so you don't gunk up the fan or print head itself. If you're not using a glass plate, you will occasionally have to use the paint scraper to scrape off the disgusting residue once it's built up.
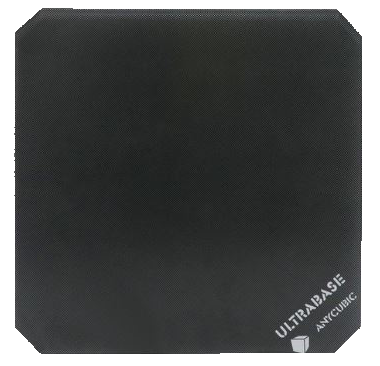
- Borosilicate Glass Plate - Of all the bells and whistles I've added to my printer, this one has made the most significant difference in print quality. If you have a heated print bed, the plate helps distribute heat evenly across the entire build area (which prevents warping) and will give you an absolutely gorgeous smooth glass-like finish to the underside to your prints.
I still tend to spray a bit of hairspray on the plate for large builds, just to make sure everything stays put, but when printing smaller pieces you can largely do away with hairspray and other fixatives to keep your designs in place. You also don't have to use the paint-scraper to remove your prints. If you allow the plate to cool back down to room temperature, they'll pop right off.
Note that if you've been printing for a while without a glass plate and your print bed has a bunch of filament and hairspray stuck to the existing mat, you may need to peel off the mat and stick the glass directly to the metal build plate. If it pops off, you can even crazy glue it in place. When you first install the plate, because it raised the height of your build plate by about 1/4 of an inch, you will need to relevel your bed and probably adjust your Z axis endstop. Depending on what model of machine you're using, this may be an electronic setting, or you may have to physically unscrew and remount the Z axis endstop sensor. When in doubt, check YouTube for instructional videos pertaining to your particular model of machine.
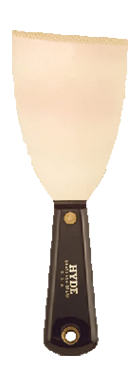
- Paint Scraper - One of these should have come with your 3D printer, but if not, pick one up for prying off stuck print jobs and/or scraping off residue. If you're using a glass plate, and worried about accidentally scratching the surface you can get a brass one which is less likely to leave marks.
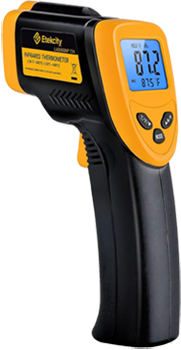  
- Infrared Grill Thermometer - I wish we'd had these when I first started printing. Extremely useful if you want to tell whether your heater element is actually heating the heater block to the correct temperature. Since most printers print at over 200° you will need to make sure you get the kind designed for grills or ovens. While they look nearly identical to the kind used for taking human body temperatures, they are designed to be used from further away and have a much higher maximum temperature range.
- Butane Torch - Useful for heating up nozzles or heater blocks when trying to liquify solidified filament. Since these parts will be getting quite hot, and metal conducts heat you should obviously be using a very long pair of tweezers or pliers to hold the part when you heat it, and make sure you're holding it over something other than your lap (a metal tray or pie tin works best) in case you have to drop the hot part in a hurry.
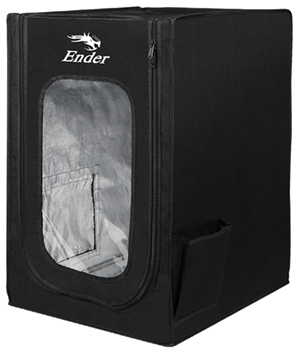
- A print enclosure (Even if you have to make one yourself) - Most entry level filament printers do not come with a print enclosure, but you can usually buy them as add-on parts. These are often very similar to the pop-up-tent style enclosures used for airbrushing and may come with special hook-ups for fume extraction kits, which can be nice if you need to print in an area close to where you work or sleep. While PLA does off-gas a tiny bit (nothing like resin printing) the primary advantage of an enclosure is heat control. When printing large objects over the course of several days, it's not uncommon for some parts of the design to cool down, which can cause warping. It is therefore useful to have some method of keeping the heat contained, but not so much that the filament overheats and starts pre-melting in your extruder (which will cause a jam.)
Fully sealed acrylic enclosures with built in thermometers and auto-adjusting exhaust fans typically cost more than the printer itself, but if you're not worried about potential fumes and just looking for a super simple solution to prevent your larger prints from warping, the simplest way to go about building an enclosure is to get five sheets of foamcore from your local dollar store or craft supply outlet, then tape four of them together into a large square box, and use the 5th one for a lid that you can rotate to alter the amount of hot air escaping at the corners.
If you find your prints are overheating and causing jams, rotate the lid to let out more heat. If they're curling around the edges, rotate it so the box is almost sealed and less heat is allowed to escape. Depending on how climate-controlled your environment is, you may find yourself fine-tuning the adjustments at different times of the year to compensate for the changing ambient temperature of the room.
Note that if you do buy an enclosure kit, unless it's a super fancy model with built-in temperature controls you may need to adjust how much you leave the enclosure propped open at different times of the year. Your machine will naturally run hotter in summer months, so take that into account if you suddenly start getting pre-melted filament clogging up your extruder.
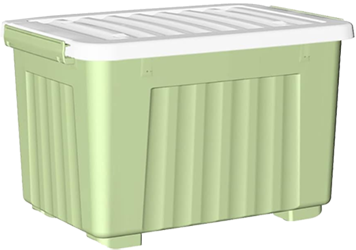 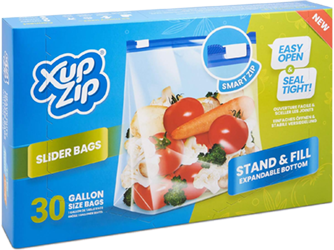
- An airtight storage tote and some extra-large ziplock bags - When you swap out the filament on your machine, get in the habit of putting the partially-used roll into a large ziplock bag with one of those silica gel packs that originally came packaged with it, and storing this inside of an airtight storage tote which should be kept in a cool dry place.
The two worst things you can do to filament are expose it to moisture (which will cause it to expand and jam in your extruder) or high temperatures (which may cause it to deform or stick to itself, and then jam in your extruder.) Store your filament safely, and it should last almost indefinitely.
What brands of filament do you recommend?

I can't stress this enough.... always print with PLA+ (which is sometimes called PLA Pro, Soft PLA, or Flex PLA, which as far as I can tell, are all the same thing) even if it costs a little bit extra.
PLA+ is a composite material made from mixing standard PLA with the more flexible TPU filament. This results in a product that has greatly improved strength, surface detail, layer adhesion, bend and impact-resistance, less obvious layer lines, fewer misprints, and just better print quality all around. Simply put. There's no reason to print with regular PLA if PLA+ is an available option.
While it will never look as nice as something printed out of resin, PLA+ will let you squeeze out every last drop of detail that your filament printer is physically capable of and is much better at handling small thin parts like fingers, antenna, and control levers that would otherwise turn into a blobby mess or self-destruct completely if printed out of standard PLA. It is fractionally more expensive (typically about £5 more a roll) but well worth the extra cost, especially given that it is less likely to ruin an entire print job that wastes half a roll.
I typically purchase PLA+ from Elegoo, eSUN, or Paramount (who may list it as Flex PLA). One of the nice things about the Paramount brand is that they give you the exact Pantone color the filament is supposed to match (ex: British Racing Car Green 3435c) so you can be reasonably certain that the color is what they say it is, and if you purchase a second roll months later, it'll match up with whatever you printed previously. But Elegoo and eSun are two of the bigger names in 3D printing and their product may be easier to obtain outside the U.S.
One problem with filament printing is that there is very little quality control, and sometimes you'll get a bad batch from a company you've never had any problems with previously. This can be down to a wide variety of issues, ranging from the manufacturer changing their formula or selling product that they know was mixed improperly (I suspect this is what happened to Inland, who used to produce great filament, until suddenly, every single roll with their name on it was unusable garbage) or because the material was stored/transported improperly and exposed to moisture or extreme heat which caused it to deform or expand.
There is usually no visual cue to tell whether a roll of filament is bad or not, but if you see one that appears powdery, pockmarked, gritty or rough textured with visible specs, lighter colored in places, or of an uneven thickness, this is a good sign that they mixed it wrong at the factory.
If buying from Amazon or other online retailers, keep an eye on recent reviews to see if there's a trend in people reporting printing issues with your preferred brand. If this is the case, you might want to switch to an alternate manufacturer for a while to see if the complaints continue or subside.
If you aren't sure if your printer problems are due to bad filament or one of several possible parts going out on your printer, it's a good idea to try printing from an old roll that you know you've printed successfully with before and see if you get the same issues. There's nothing more frustrating than ripping your machine apart and swapping out £50 worth of parts, only to find out you were using a £15 roll of filament that got a little damp while sitting in the distributor's warehouse.
What other tips will give me better print results?
I don't have a lot to add for PLA printing because a lot of the fine-tuning tips are printer or print specific. Be sure to watch plenty of YouTube videos for pro tips on how to get the best results from your given printer. In general, though....
- Don't skimp on wall thickness and infill percentage. A thicker part may take longer to print but will be sturdier and more forgiving if you have to sand it down later.
- Don't overfill your build plate. These figures contain lots of small parts, and since they take so long to print, the instinct is often to try printing the entire figure all in one go. However, print failures are most likely to occur when the nozzle is passing from one object to the next, and thin vertical parts (like arms and legs) are especially vulnerable to getting bumped by the nozzle or popping loose off the build plate. Additionally, while your nozzle is off printing other components, the one you were just working on is cooling down, and may start to shrink or list to one side. You'll get better results if you print every single piece separately, but as that is extremely time consuming endeavor, just use caution when printing "risky" parts.
These usually include arms and other shapes that are taller than they are wide with fingers/spikes/hooks sticking out that are more likely to collapse snag the nozzle, large flat items with angular corners which are more likely to curl and pop loose from the build plate, and large items in general, which are more likely to fail simply due to their large surface area and the large quantity of filament they require.
- As mentioned at the beginning of this section, orientation during slicing is often the key to a better print. The top of any surface will look better and retain more surface detail than the sides, which will look better than any parts that are hanging out into open space and which will need ugly crisscrossing supports added.
If you have an object that has a high level of surface detail or deep overhangs on four or more sides, consider splitting the object in half, and then printing it in two pieces flat on the buildplate with no raft which can then be glued together when you are done. This technique works much better if you have a glass plate, which will give you
cleaner edges and a smooth glass-like undersurface which is much easier to glue flat using a thin layer of crazy glue.
My prints are failing, how do I correct this?
As previously stated, this is an incredibly tricky thing to diagnose on filament printers, and often there is no clear answer. Sometimes you just have to try changing things or replacing parts until it starts working again.
My usual process for checking and replacing parts is in order of how expensive/big a pain in the ass they are to complete. But in general, if a print fails and you have no indication why:
- Run a nozzle check. This should be a standard feature on most printers, where it'll heat up to target temperature and then begin shooting out filament. You'll want to watch it to make sure it's coming out normally in a continuous downward stream and not shooting off to the side, curling upward, or not coming out at all, which are usually signs of a jammed or damaged nozzle.
- Relevel/zero the bed. Do this after every step below. Seriously. Any time you replace a part or make an adjustment you need to relevel.
A properly leveled bed will have just enough room to pass a single piece of paper under the nozzle and still move it around with just a tiny bit of resistance. When testing this, make sure that you are testing it diagonally from three different points (usually your printer will have a test feature that will move the nozzle for you.)
- Clean the nozzle and replace the teflon tubing (if your printer uses it.)
- Replace the nozzle. This is the cheapest part to replace, and nozzles do wear out eventually, so you should always have a few spares on hand.You can always swap it back later if it turns out to be not the source of your problem.
- Try printing something else you've printed successfully before. Usually, the best object to print is the calibration model that came with your printer, or the good ol' 3DBenchy boat.
- Try printing the same thing with a different roll of filament. Especially if you've been using a new roll of filament that could just be from a bad batch.
- Verify that no print settings have changed on your printer or in the slicer software.
Some printers (especially ones that require a wifi connection) have print profiles set up on the printer that take precedence over the settings you may have set in the slicer software. If your machine has this "feature" it can be worth checking to make sure that the default profile didn't get set to something weird you don't want.
In the slicer software, it is a good idea to take snips of all your print profile settings during a time when you are printing successfully. Not only will this give you something to refer back to in case something gets changed or you have to reinstall the software clean, if you ask for help online, anybody helping you will usually want to see this info to verify your settings are good and to recommend potential adjustments.
- Get an actual level tool and make sure your printer itself and the work surface it's sitting on are level, both side-to-side and front-to-back. (While it seems like this isn't something that would change, if the work surface is sitting on carpet or made out of cheap fiberboard, it may sink or warp with time. Even if the bed itself is flat in relation to the rest of the printer.)
- Adjust your print enclosure (if using one) to let more/less heat out, especially if printing during extremely hot or cold weather. If you aren't using one, try building one out of foamcore or a large cardboard box, just to see if it makes a difference.
- Replace the thermocouple/thermistor. Usually this just screws into the heater block on one end and attached to a circuit board via a wire harness on the other. Undo the wire harness first (make note of the correct jumper location if there are multiple available) and then unscrew the thermocouple. Then reverse the process to screw in the replacement and reattach the wire harness when done. Occasionally, the thermocouple and heating element will be part of a single unit, and must be replaced together.
- Replace the heating element. Similar to above, except this is usually a larger round tube that must be slotted into the heater block and is usually held in place by a small hex screw. Don't overtighten when replacing this or you might crack/damage it.
- Disassemble and clean the extruder unit. Look for melted filament stuck in awkward places and replace the brushes if they are worn or have fused plastic stuck to them.
- Ask for advice from the 3D Printing Doctor Who Facebook group or the reddit or discord of your choosing... but make sure you explain what it is you're trying to accomplish, provide pictures of how it went wrong, mention what you've already tried doing to fix it, and include what equipment/software you're using. The more info you can provide, the more likely somebody is going to be able to propose a solution you haven't already tried.
Beyond this, you start getting into far more expensive hail-Mary solutions like replacing motors, inspecting circuit boards for evidence of burning or shorts, or even setting up a security camera to watch your machine print so you can attempt to spot what is happening at the point it all goes wrong.
That said, if your print is failing is certain very specific ways, it may be easier to diagnose your problem and point you towards a specific solution.
If your print is curling up around the edges: This is due to the outer edges of the print cooling faster than the inner areas, which causes those outer edges to curl upward. The good news is, there's nothing wrong with your printer and there are a couple of extremely low-tech solutions for this problem:
First, build an enclosure around your printer to help maintain a constant temperature within the build area. This can literally just be a cardboard box with a 2" vent hole at the top, or five pieces of Dollar Store foamcore that you've taped together with a little bit of a gap at the corners. You may need to make a few adjustments to control how much hot air you allow to escape out the top. If you let too much heat escape, it won't fix the curling issue. If you let it get too hot inside, your filament may pre-melt in the extruder causing a jam. (This will usually happen several hours into the print-job because it takes a considerable amount of time for the heat to build up).
Second, add sacrificial heat barriers to the design if it doesn't already have them. This is best accomplished by importing the pieces into TinkerCAD and then adding in some 5mm thick walls that are about 4mm away from the corners of the object. These don't need to be very tall. About 6mm or so is usually enough to do the job. Basically, these pieces retain just enough heat that they prevent what's directly behind them from losing heat too quickly. And if curling does occur, these pieces will pop off first, giving your object a fighting chance to avoid significant damage.

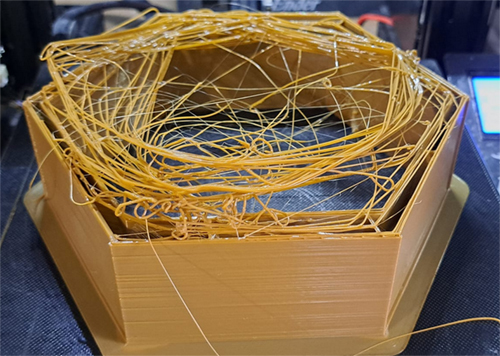
If pieces of your print are being knocked off the build plate mid print: If you're printing multiple pieces simultaneously, try switching to printing one at a time. Tall and skinny pieces are especially vulnerable to being knocked over, and having a bunch of pieces on the build plate at once is more likely to cause a cascade failure where one piece gets knocked over, but the nozzle continues to spew filament out into open air, which then create a blob that gets stuck on the next object on the travel path, until eventually the entire print job is destroyed.
If the trouble is that prints just aren't sticking to the bed, no matter what you do, consider buying a borosilicate plate (assuming you have a heated bed) which will help distribute heat more evenly across the entire print surface, and/or spray on some cheap non-aerosol hairspray as it is laying down the first layer.
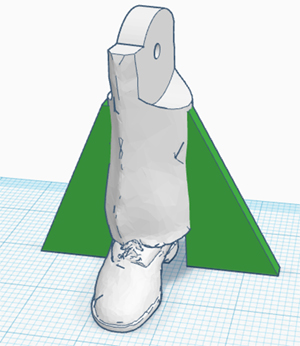
Failing that, if you're having trouble with a specific part, especially if it is tall and
skinny with a small amount of surface contact with the build plate (see leg example below), you can import the file into TinkerCAD and then add some thin 2 to 3mm wide triangular supports like rocket fins to help hold the object in place. These will need to be cut off manually with an xacto blade when you have finished printing, but shouldn't be too obvious if they intersect a smooth flat area of the design.
If your printer is coming back with a temperature error (i.e. it's overheating so it shuts down) or never reaches target temperature: This is usually down to one of two components. Your thermocouple/thermistor or your heating element. Basically, either the thermometer in the heater block isn't reading the temperature correctly, or the heater is broken so it's not heating or not shutting off like it's supposed to once it reaches target temperature.
Both of these are usually fairly simple components to replace, just annoying because spare parts can cost £10-£20 each, depending on your model of printer.
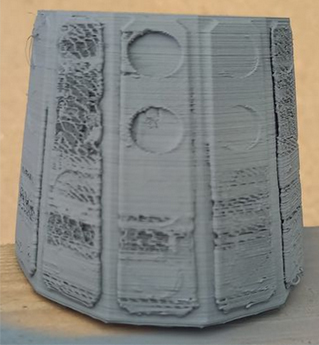
If your prints are coming out with collapsed walls or sunken tops, especially if there is a "waffling" pattern where you can see the infill supports behind/beneath the surface: This is usually a slicer setting where your shell/wall thickness, bottom/top thickness, or fill density is too low. In most cases, you want to use a shell thickness of about 1.6mm, a bottom/top thickness of about 1.2mm, and a fill density of at least 40%, though 65% is better.
Usually, this is caused because the walls are too thin, and they just collapse because they don't have sufficient support.
However, if you're getting these results and your slicer settings are fine, you could be having problems with your nozzle or extruder where you're getting insufficient flow (so the walls are being laid down too thin because only a whisp of filament is coming out of the nozzle. Check your setting first, and after that, replace the nozzle, then proceed to all the other troubleshooting steps if needed.
You consistently get print failures after several hours of printing, regardless of what object you're printing:
This is still hard to diagnose as there may be multiple culprits, but it could be signs of a temperature control issue, as those tend to occur late into a print job as it takes a considerable amount of time for the temperature to build to a level where it starts pre-melting the filament in the extruder.
Assuming you're using a print enclosure, try opening it up a little so more heat is allowed to escape. These sorts of failures may be more of a problem in summertime especially if you live in the UK in a house that doesn't have air conditioning and you're suddenly dealing with
summer heatwaves that you never used to have before global warming.
Also, if you have air conditioning or a fan running, or even an open window, make sure that it is not blowing directly onto the print area, as cold air can solidify the filament as it's leaving the nozzle before it has a chance to adhere to the object.
 |