What software do you use to make these figures?
All my figures are built through a combination of TinkerCAD (for geometric shapes, articulation, and precision measurement) and Meshmixer or SculptGL (for sculpting organic shapes and general free-form mesh manipulation.)
All three are completely free, though there are multiple tools out there that do several of the same things, these are just the ones I managed to figure out how to use on my own without having to take any classes or study a ton of online YouTube tutorials.
I also sometimes use 3D Builder (a free Windows app that is useful for viewing and quick fixing of non-manifold meshes), ChituBox (which is the best free slicer for resin printing, but also really good at resizing and hollowing models), and MeshLab, (which is not particularly user-friendly but has some fancy mesh repair and remeshing utilities that you can't find anywhere else.)
Recently, I have also started using MakerWorld's Image-To-3D and Make-My-Statue apps to create starting heads and bodies for humanoid figures based off photos of the original actors/costumes. (see the photogrammetry section below for more information.)
What other tools or resources do you use to make these figures?
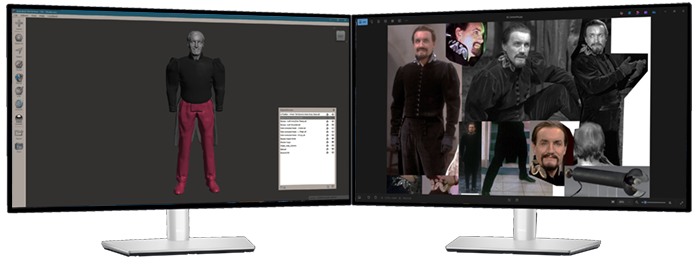
While most of the other resources I use are electronic, the two absolutely indispensable pieces of hardware I can't live without are a nice sturdy pair of stainless steel digital calipers, and a second monitor for my PC, so I can have my sculpting program open on one monitor and composite images of the actor/costume I'm trying to recreate on the other.
If you don't have room for a second monitor, you can possibly make do with physically printing out a bunch of reference photos and then taping them to the wall or attaching them to an easel or clipboard, but a second monitor is so much more useful because you can resize the images until they are the same size on your screen as a Character Options figure, and then take precise measurements off of them using the digital calipers.
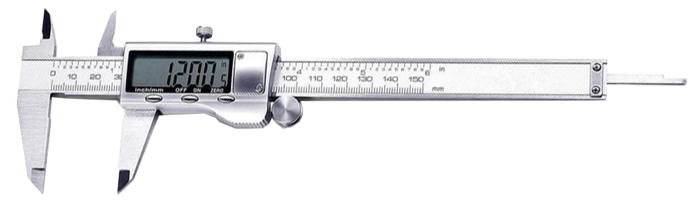
I will discuss the uses of calipers in more detail in the "how to make a figure" section below, but there is no better tool to have in your arsenal for dialing in correct scale on your figures, and if you ever delve into working on humanoid figures, understanding the parts of the face and measuring the distances between them to get the proportions just right is absolutely essential for producing a figure that actually looks like the person you're trying to recreate. Calipers combined with dual monitors are your best shortcut for quickly comparing your work in progress on screen A to your reference photos on screen B to try to figure out where you've gone wrong and why things look ever so slightly off. And if you're a figure-detail perfectionist like me, it is also quite satisfying to know that the spikes on that Quark or helmet ridge on that Sontaran are *exactly* in scale with their on-screen counterpart, and you got it right, even if the Eaglemoss figure got it wrong.
Additional useful tools may include a vertical mouse with adjustable DPI levels (i.e. click a button on the mouse to adjust how fast/far the mouse cursor moves for improved accuracy while free-sculpting) or some variety of Wacom Tablet, though while I know several artists who swear by them, I still haven't found one that works any better for me than just using a regular mouse.
How does 3D scanning work and can it be used to create figures?
Currently, 3D scanning is a useful figure-making tool, but a very expensive one if you want results that are noticeably better than cheaper photogrammetry options.
If you're looking for a 3D scanner with enough accuracy to scan existing toys that are about the same size or smaller than a Character Options figure, there is currently only one option that fits the bill: The RevoPoint Mini 2 blue light scanner -- which has an incredibly high surface scanning accuracy of 0.02mm (the smaller the number the better here), which is also the maximum printing resolution of a resin printer. It can therefore reproduce scanned objects at nearly 1:1 accuracy with minimal detail loss. The bad news is that one of these scanners will cost you around £800 to £1,300, which is still more affordable than a £2,000 to £50,000 professional rig like most universities and production studios use.
Most other cheaper 3D scanners on the
market have surface accuracy levels of around 0.08mm to 0.20mm which means they are around 4 to 10 times less accurate than the 0.02mm Revopoint Mini scanner. To create a mesh with approximately the same level of surface detail for 3D printing, that means that the object you want to scan would need to be 4 to 10 times larger than the object you want to print.
Since Character Options figures are approximately 1:12 scale, you can see how this quickly snowballs into a massive loss of surface detail. To get roughly Character Options level of detail with a mid-range £400 to £500 3D scanner that is only capable of 0.08mm accuracy, the object would need to be 1:3 scale or larger (approximately 2 ft. tall for a humanoid figure), and for a £200 to £300 entry level scanner with 0.20mm accuracy, it would need to be 7.2ft tall, or approximately 20% larger than real life. (or just accept that you'd only be able to scan full-sized objects, and the level of surface detail on your mesh would be about 20% worse than standard Character Options surface detail.)
That is not to say that lower quality scans can't be useful. I have one of the first-generation POP 2 scanners that I've used myself to create the framework for a few figures. It's usefulness all depends on how much work you're willing to put into cleaning up the final model. A Revopoint Mini is currently the closest you can get to reproducing an existing object 1:1 and having it be nearly printer-ready without any additional manipulation or sculpting talent.
A lower-quality 3D scan will typically give you a rough blobby outline of the source object that is fine for getting basic body proportions, but lacks nearly all of the fine surface detail. I generally refer to this as a "cottage cheese" or "butter sculpture" scan. It's still a better starting position for a model than having to free-sculpt
the entire thing from scratch, but you ARE going to have to put serious work into the surface clean-up if you want it to look professional.
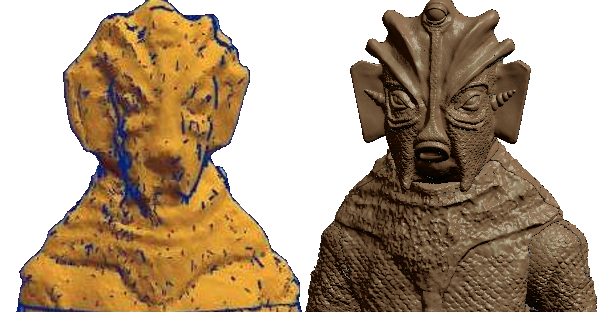
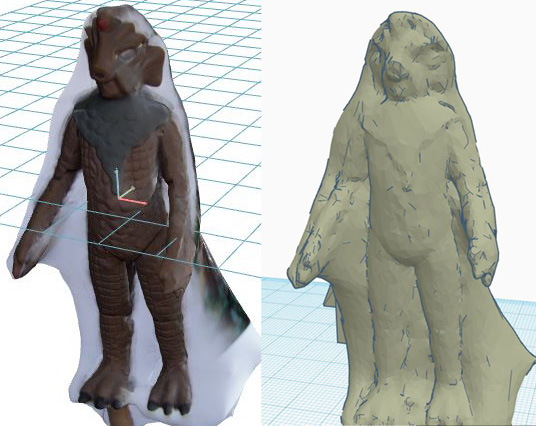
Below is a scan I took of an Eaglemoss Silurian with my 0.05mm resolution first-generation POP 2 scanner, compared to the finished figure I eventually ended up with after a month of resculpting in Meshmixer:
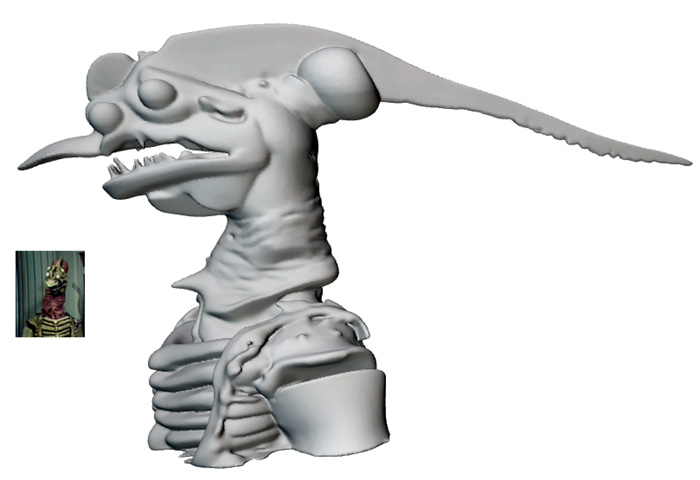
And below are scans of a Character Options Cyberman and Eaglemoss Marshman, both taken with a 0.02mm resolution RevoPoint Mini 2 scanner. You can see that the Character Options figure came out very nearly 1:1, because it's the same size we want to print at and has more surface detail to begin with.
The Eaglemoss Marshman figure also came out pretty close to 1:1, but because it's about half the size of a Character Options figure and doesn't have anywhere near the same level of surface detail, it looks much rougher when blown up to approximately the same scale. Still, you can see that the scan is about twice as detailed as my crappy 0.05mm accuracy Silurian scan above, and the face and torso are much cleaner with sharper, more distinct edges, but still not up to par with what you'd expect from a commercially released Character Options figure.
On the far right is Leighton Humphrey's amazing finished Marshman figure, which was resculpted using this 3D scan as a base.

3D scanning tool are still evolving, and it's rather frustrating that most modern iPhones (12 or later) come with a built-in LiDAR scanner on the front of the phone, which is used for facial recognition, which should have approximately the same scanning resolution as a RevoPoint Mini scanner... but no apps have ever been released that make use of this hardware because Apple keeps this part of their technology locked down and inaccessible to app developers.
I keep hoping that they or one of their competitors will release a phone that has a LiDAR scanner on the back of the phone that could be used for scanning 3D objects, but five versions later, nobody has ever thought to commercially exploit this.
If you do plan on purchasing a 3D scanner for the purposes of figure making, here are some other helpful scanning tips.
- 3D scanners judge distances by measuring reflected light; therefore they work best when scanning light-colored (preferably matte white) objects. Black or other dark-colored objects will not only not scan properly, the scanner is programmed to deliberately ignore them as part of the background.
- Since most 3D scanners use a laser-based scanner, you will get the best results scanning in near darkness where the only light is coming from the beam of the scanner itself.
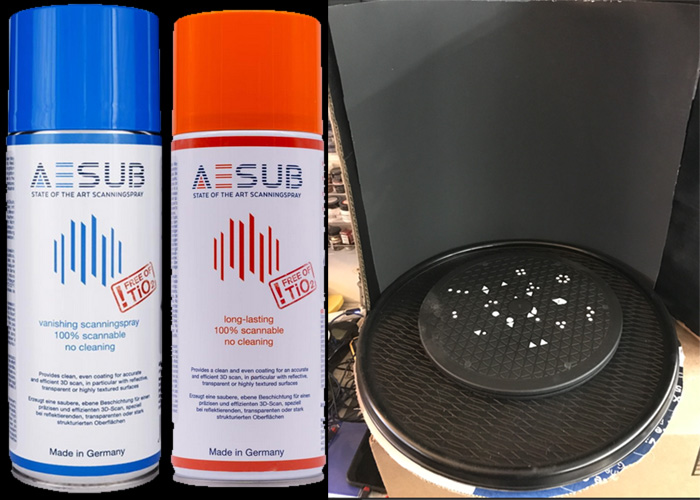
- Unless the entire object you are scanning is extremely light-colored to begin with or you don't mind sacrificing it by giving it a light airbrushing of flat white paint, you will probably need to invest in a couple of cans of 3D Scanning spray. While quite expensive, this spray will temporarily turn any solid object white without reducing the level of surface detail and then fade back to transparency after approximately 10 to 15 minutes (for the blue can) or 3 to 12 hours (orange can.) I can attest that the blue spray never lasts as long as you want it to, so it is worth paying a few extra £ for the Orange can because you wont have to reapply it if the first scan doesn't work out.
- A lot of 3D scanners come with small motorized turntables, but these often move too quickly, and it's easy for your scan to get off track. You are better off purchasing a cheap black plastic Lazy Susan and building a curved black cyclorama to go around it using spray-painted cardboard and/or black posterboard. Wear black rubber gloves and slowly rotate the turntable manually, keeping an eye on the screen to make sure that the tracker is not getting off. Slow and steady will always produce the best results.
- You will want to mark the surface of your Lazy Susan with several distinctive high-contrast dot patterns. These are marker points that the scanner will need to use to recognize it's position if it gets lost. Try not to repeat the position of any dot clusters. The Lazy Susan example I've linked to has a built-in triangular grid pattern, which is very convenient because you can paint in the triangles with white model paint to make multiple unique patterns. Try mixing and matching these with the circular dot stickers that inevitably came with your 3D scanner.
- You will get the best results if you combine multiple scans from multiple angles. It is often nearly impossible to get all sides of an object in a single go.
- If your object is a poseable figure, your main scan should be in the "A" position with arms out at approimately 45°. But you might want to do some follow-up scans in the "T" and "X" positions where it is easier to scan the insides of armpit and crotch areas which are often semi-obscured in shadows.
- If possible, you may want to partially disassemble the figure to make harder-to-see areas more visible. Cloaks, hoods, robes, and other voluminous clothing that creates dark shadowy areas always makes accurate 3D scanning extremely difficult. If removable, it is recommended to do these separately, and if you don't mind sacrificing them, you might even want to consider cutting them apart with a utility knife so both inside and outside are scannable.
how does photogrammetry work and can it be used to create figures?
Photogrammetry is a broad term for any software that uses still images or videos to generate a 3D model, but most apps fall into one of two separate subcategories, both of which have their own unique advantages and disadvantages:
Single-Source
Photogrammetry takes a single photo (or sometimes two or three if it's a face-sculpting app) and then uses a lot of AI guesswork to fill in the rest. This is an incredibly powerful tool that only grows stronger as machine learning improves, with the added benefit of allowing you to work from existing photos and screencaps without needing to photograph the object yourself. But it isn't always the most accurate method of model creation, and will often make wild and inaccurate guesses for whatever parts of the image it can't see. It also can't recreate anything outside the frame, so you will usually have to stitch together multiple meshes in order to create a complete figure using this method.
Multi-Source Photogrammetry allows for better overall coverage of an object, but requires a special photo session where you slowly circle around the person or object, taking hundreds of photos from a multitude of different angles. The software then attempts to overlap these images to form one continuous wrap-around image map which infers surface depth based on variations in color and shadow.
For this method to work properly, it is essential to have the highest resolution camera possible (ideally one that is good at focusing at short distances if you plan to use it on smaller objects like action figures) and both the object and all light sources must remain perfectly still for the duration of the photo shoot. You must also be very careful not to cross the object with your own shadow while taking the photos, and do not use a flash or ring light that will alter the position of shadows on the object as you move the camera.
While multi-source Photogrammetry allows you to capture all sides of an object and requires significantly less processing power, this method tends to produce lower quality scans compared to true 3D scanning, and is highly reliant upon there being clear visible contrast between the light and shadowy areas of the source model. If the object is too dark to begin with or overlit to the point that surface shadows are mostly washed out, you're not going to get good scan results beyond the most basic rough outline. Even if the rest of your lighting conditions are perfect, naturally shadowy areas (like under the armpits or between the legs) will usually come out looking webbed and fused together, which requires a lot of additional cleanup after the wireframe has been exported into your sculpting app.
That said, despite its obvious limitations, photogrammetry is currently one of the most affordable methods of creating complex 3D models on a budget since the only equipment it requires is a computer and a camera phone, which most people own already. (And single-source photogrametry doesn't even require the phone.) But the majority of the software that's out there is geared towards 3D animation or creating skins for video games, rather than 3D printing, so the meshes tend to be a bit simplistic because the majority of the detail comes from the photographic "skin" that has been wrapped around them.
This is changing however, as some 3D printer manufacturers like BambuLabs have started developing their own software geared specifically towards the 3D printing market.
Advice for working with Single-Source Photogrammetry: This technology is pretty new, so most of the apps are still undergoing beta testing, making it hard to predict which one of them will eventually come out on top. But so far MakerWorld's Image-To-3D (which is pretty good at generating bodies and non-humanoid aliens) and Make My Statue (which is only good for making human heads) apps appear to be ahead of the curve, and several creators on our Facebook group have already put them to use creating a wide range of new figures. HunYuan3D is another app that some people have reported had success with, though it tends to work best with simpler "cartoony" robots and aliens (like Cybermen or Alpha Centauri) rather than photorealistic monsters and human beings. The website that runs the app is also only available in Chinese, so you will need to use a translation browser plug-in to be able to navigate it.
Like most AI generation websites, these sites run off cloud-based servers and require you to spend virtual credits for model generation, which may or may not regenerate over time, and extra credits can usually be purchased for real money from an online storefront if you run out. On the plus side, the two Maker World apps allow you an infinite number of generation attempts and only charge you credits if you decide you want to export a finished STL or OBJ file... so you are only charged for successful meshes that you want to keep and not for any failed attempts.
Under perfect light and shadow conditions on an extremely high-resolution image, the software will sometimes nail the generation flawlessly on the very first try...

But more often than not, they'll get some or all of the model hilariously wrong, especially whichever parts of the image were hidden from view and needed to be guessed at.
The more complex and asymmetrical the source object is, the less likely it is the AI will be able to figure out how all the pieces are supposed to fit together.
Since the technology is still in its infancy and not wholly reliable, you may find yourself clicking the "retry" button several times in a row, hoping the AI will do something differently and the next attempt will turn out better. While this is a valid tactic, and nobody likes wasting credits on a model that isn't perfect, once you've rolled the dice and created a few meshes this way, it's a good idea to export and download any version of the model that you think got it "mostly right", especially in key areas. (ex: The jacket on this one is pretty good, even though the face is rubbish. Or this iteration is the only one that managed to get the collar or belt right, even if it got some other parts completely wrong.) You are almost always going to have to overlap multiple meshes together in your sculpting app, and then manually trim off whatever parts don't work and Frankenstein the rest into a solid object that keeps all the best elements.
You can save yourself a lot of time and energy by making sure you're feeding the AI with the best possible source images, and eliminating factor that might confuse/distract it or result in a model that's going to be really hard to clean up or articulate later. Here are several tricks you can implement to try to stack the deck in your favor and work with the AI to create higher quality models:
- Always try to find the higest resolution source photos possible. The Doctor Who Photo Research Facebook Group is an indispensable resource when looking for high quality production photos, but if you're Google Image searching, try clicking on Tools > Size > Large to filter out lower resolution photos that aren't as much use. Publicity or behind-the-scenes photos of actors/costumes taken by a professional photographer are almost always going to be higher quality than screenshots captured from the episodes themselves, even counting the newly restored BluRay editions.
- You will often get the better results if your photo was taken from a 3/4 view that shows the front and a bit of the sides, against a solid white background under medium lighting where the only shadows are those caused by the folds of the costume itself.
- You will also get better results if your source image has your subject standing up straight in a relaxes posture with their head up and their arms relaxed and at their side, or even better, slightly outstretched in the "A" position. Avoid action poses or photos that show the actor with their arms crossed, behind their back, or reaching out towards the camera. You can sometimes cheat a bit if one side of the photo has the arm in a normal posture and the other is a bit off by going in and creating a mirror version in your 3D sculpting tool later.
- If you have access to Photoshop, it is usually in your best interest to manually trim out the background from any photo you upload unless it is very light and mostly one color to begin with (ex: standing against a cloudy blue sky or a painted brick wall that doesn't have a lot of busy surface texturing.)
- You may also want to manually go in adjust brightness and contrast levels until darker areas of the photo are dark, but not completely black, and you can still see some slight color variation in the shaded sections that shows their texture and how they curve.
- If you manage to come up with a model that's mostly correct, but has some surface damage (like the example with The Rani above) you can try taking a snip or screengrab of the model preview in the Photogrammetry app, or exported it into to your sculpting App and taking a snip from there if the contrast is better, then import that image into Photoshop, where you can perform cleanup (smooth over rough or incomplete areas, cut off overlapping limbs, or inserting parts from other ), and then re-import, that image back into the Photogrammetry app, where it will often produce better results... mostly keeping what it created previously with the addition of the new changes you added.
Advice for working with Multi-Source Photogrammetry:
If you are trying to create an accurate 3D model of an existing figure, a friend's cosplay costume, an original or replica prop,... or perhaps something you've free-sculpted out of clay or kit-bashed using more traditional model-making techniques, you might want to consider using software like AutoDesk ReCap Photo, that will let you stitch together a large number of photos taken from multiple angles into a single mesh. To get the best results with multi-photo software, here is some useful advice:
- If using a newer model iPhone, go to Settings > Camera and make sure “most compatible” is enabled so it will save photos as a JPEG rather than HEIF. Be sure to disable your FLASH and NIGHT MODE and especially LIVE MODE, which records images as short videos which are useless to everyone! While some photogrammetry software will allow you to import videos, the imported frames will be blurrier and lower quality than any photo you take manually, and as most software has an upper limit on how many frames you can input, taking photos manually will usually give you better control all around.
- Find an open space with neutral diffused lighting so shadows are minimized. Outdoors at noon under partly cloudy skies when it isn't too windy out is ideal, but if you're stuck indoors, any place directly underneath a skylight or diffused overhead lighting is best. Don’t use a ring light or any other mobile light-sources as this will completely disrupt the effectiveness of the scan, which requires light/shadow levels to be consistent. Any lighting sources coming from the side will almost always end up casting your own shadow against the person as you pass in front of them, which will also mess up your scan.
- Before you take a single photo, it is best to familiarize yourself with your photogrammetry software and whether it has an upper limit on how many photos you can import to create a point-map model. Most free software will limit you to somewhere between 200 and 500 images per model. Since there are 7 areas of the body we need to photograph (see below) but the head usually contains more detail than anything else and will require twice as many photos, divide this upper photo limit by 8 to get a rough idea of the maximum number of photos you should be taking per area. Generally, around 25 to 30 photos per body section is usually sufficient to capture enough surface detail to get as accurate as scan as you're going to get.
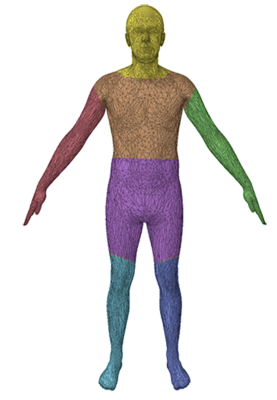
- If you're photographing an action figure rather than a person, you may need to adjust macro settings on your camera because you'll have to get in closer than you normally would with a full-sized subject. If it's an articulated figure, position it in the A position shown below to begin with. You may want to do a second photogrammetry scan later in the "T" or "X" position, but you'll want those photos in a completely separate folder so they don't get mixed in with the first batch.
If shooting outdoors, consider gluing or taping the legs to a block of wood so it won't fall over and ruin the session if a stiff breeze happens to whip up.
- If your subject is a full-sized person or prop, make sure you have enough space to walk around them while taking photos from roughly 2 to 2.5 feet away. Photogrammetry relies on having enough duplicate surface markers detail in each shot to recognize where multiple photos overlap, so if you get too close, many of your photos may end up being useless. This is especially true if the costume is all one solid color (ex: The Master or Nyssa’s velvet jacket) or contains a complex repeating pattern over a large surface area (Jamie’s tartan kilt.) If the outfit comes with a removable accessory or especially detailed costume piece (like a brooch or other jewelry), it is best if you scan these items separately.
- If the costume is uniform in color and/or all black, you might want to consider sticking small removable 3D scanning marker stickers in small uniquely shaped clusters to the flat parts of the costume where surface detail may be hard to distinguish.
- Objects on the ground in your scan area (like rocks, grass, flower pots, etc.) aren’t usually a problem for photogrammetry unless they can be accidentally kicked and repositioned. Standing on a rug or carpet with a unique non-repeating pattern can actually help the software orient your scan. And if you happen to be standing on concrete or blacktop, try drawing a 9-square grid with chalk and labeling each square 1-9 or A-I to aid the software in orienting your photos.
- Body orientation is VERY important if you plan on articulating your figure later. You want to avoid creating shadow areas around the armpits and crotch (which will come out looking webbed) or areas
where parts of the arms or legs end up fused to the body, which will require massive amounts of effort to separate later.
The best way to go about this is to have the subject stand in the “A” position staring straight ahead (see example below). It’s not as exciting as striking a cool action pose, but WAY EASIER to articulate. Arms should be partially raised so there’s a bit of a gap around the armpit. For especially dangly sleeves or robes, you may need to go up to an almost “T” position, but you still want the arms pointed slightly downward. Otherwise the shoulders rise up and end up looking weird. Posture should be as straight as possible with feet flat on the floor and the toes pointing slightly outward for added stability. Unless the costume includes a dress or skirt, there should be a visible gap between the thighs. If you want cool action figure hands, try forming at least one hand into a “C” shape as if gripping an imaginary 2" to 3" wide energy drink.
- Begin by taking several photos of the person’s face and head from every angle. If you’re tall enough or have a selfie stick, try to get some good top-down photos, as well as some from under the chin and above the ears. Once the head area is fully photographed, let your subject know you are done with their face and they can relax and no longer have to worry about keeping their eyes open or holding their expression. You’ll want to work your way from the top-down, slowly circling the body taking a new photo at roughly 10 to 15 degree intervals (usually a small 1 to 1.5 foot step for you as the photographer). Resist the urge to bounce around and backtrack to different areas of the body. Depending on point/polygon/source photo limits, it may be easier to do the head or upper torso as a separate model, and it’s easier to do that if the photos from that area are all sequential at the beginning of the photo session so you don’t have to go manually sorting through the entire folder to find all the ‘head’ ones later.
- After focusing on the head area, proceed to the shoulders/upper torso next (be sure to get some photos of the underarm area), followed by both arms and hands (making sure to get both top and bottom), lower-torso/crotch area (as much as decency will allow) and then both legs. You obviously won’t be able to get the underside of the person’s feet, but if the shoes have an important tread or unusual shape, these can be scanned separately and then merged with the rest of the model later. Just try to make sure they’re in the same relative position as they were when the person was standing.
how can I learn to design my own figures?
The best place to start, if you've never done any 3D design before, is with TinkerCAD.
Start simple with a boxy robot, Sonic Screwdriver, costume piece, or something else that contains a lot of simple geometric shapes.
My first eleven figures (minus the Servo Robot) were built entirely in TinkerCAD with no other external software or imported shapes.
Focus on getting the fundamentals down before you deep dive into using a free-sculpting tool, which tends to be a much steeper and more intimidating learning curve.
Next, learn how to use the Import tool in TinkerCAD to import basic prefabricated
shapes and textures from free models you've found on Thingiverse, MyMiniFactory, and other similar sites into your design. For example, the original version of my Yeti figure was made by building up several layers of fur textures from a gaming miniature of a rat, and most of my humanoid scuplts use this generic "A" position male body model as a base.
If you want to try sculpting organic structures, I recommend using MeshMixer (it's free and easier to use than most other sculpting software) or SculptGL, and start by importing a pre-made model from Thingiverse that you intend to modify, or one that you've generated from a photograph rather than starting completely from scratch. Both of these programs are intuitive enough that you can figure out most of the features without watching any YouTube tutorials, but once you're familiar with the basics, it's a good idea to do so anyways so you understand more complex tools like using masking/surface stencils, or how to repair surface damage or eliminate hollow areas.
Practise is the key to developing any new talent, so start with something basic (even if it isn't your ultimate end goal) and build up from there.
In seven or eight years, you might even feel like you know what you're doing.
I've decided to make a [BLANK] figure. Where do I begin?
When setting out to make a figure, I begin by trying to track down as many high-quality photos as I can, from as many different angles as I can. My first stop is usually the Doctor Who Photo Research Facebook Group, since they've got loads of amazing behind-the-scenes photos and publicity stills, often in the higest quality you can find anywhere digitally. They also have several albums deditcated to special events and exhibitions, which sometimes contain unique glimpes of the classic series costumes and props you can't get anywhere else. Remarkably, a number of aliens from the Hartnell and Troughton era were quite literally paraded around England in the 60's, which is one of the only ways to see what they looked like in color.
I also try to go back and watch the episode on DVD (or Loose Cannon recon for the missing ones) if I can.
Other than picking up the finer details of the costume itself, I'm also looking for information on how the monster moves so I can plan out my points of articulation accordingly. Is the neck fused to the body? Can it pivot at the waist? In the case of bulkier monsters/robots, is the actor wearing arm/leg extensions and/or had the head been built up so they're actually seeing out through a hole in the mouth or neck?
Is there a particular iconic "action pose" that people are going to want to reproduce when they display this toy on their shelf? Does it need to come with any accessories? Does any part of it light up? Is it big enough to accommodate a LED brick, string lights, or a pull-back Lego motor?
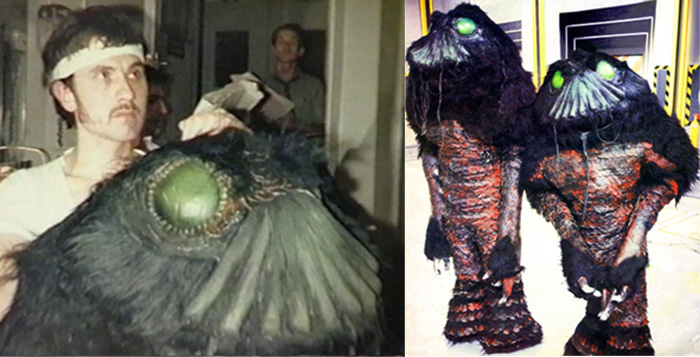
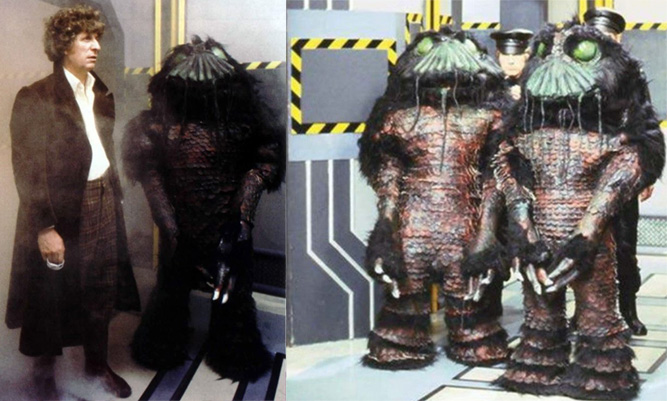
Figuring out the monster or actor's height is another important bit of detective work, and if we're dealing with multiple monsters, are the costumes all the same size or are some taller or more detailed than others? (as an example, see the Mandrels above, which were all over the map)
If there's a "hero" costume that gets used more than others, is there an easy way to tell it apart from the others? And if the costumes differ significantly, is there anything I can do on my end to create multiple variants without having to redo the entire figure multiple times?
I'm also always on the look-out for at least one shot where the monster is standing level with The Doctor or a companion that already exists in the official toy line so that I can use them for scaling purposes. Since I have 5.5" scale action figures for all the classic Doctors, and I know each of the actors' heights, I can extrapolate how tall the monster should be based on how much taller/shorter they are in photos or screengrabs.
For stories where this isn't possible, I'll try to base my measurements off other actors or bits of the set. So back to the Mandrels again... if there hadn't been a photo of one of them standing next to The Doctor, I could figure out how tall they were by comparing them to the height of another actor (who shared a scene with The Doctor where they stood level), or by comparing their height to some static bit of scenery like one of the horizontal panels on the wall, a computer bank, or the top of a doorframe, and then see where the Doctor lines up when standing in the same position against that wall, computer bank, or doorframe.

Once I have all my reference photos and a nice page of notes, the first thing I'm going to do is import a stock 144mm tall generic humanoid figure into whatever sculpting program I'm starting from. 144mm is the same height as a Character Options figure based on an actor who is 6 feet tall. If I know the actor or monster needs to be taller or shorter than this, I will then duplicate the mesh and create a copy that's the correct size. This is my scale stand-in buddy, and I'll keep him around until the figure is most of the way completed.
If I'm using a photogrammetry or 3D scanned model as a base, I'll import that starting mesh and scale it to the appropriate height, and use that as my starting point for sculpting. If I'm creating a humanoid figure entirely from scratch, I may start building up layers over the top of my scale stand-in like a skeleton, as it's always helpful to remember that an actor needed to be able to fit inside of any costume.
For complex surface details like fur, stone, and scales I may use a texture tool or stencil if it's a fairly uniform texture. If it's too complex a shape for me to do freehand, I will often kitbash in elements from other free models found on Thingiverse or other STL-sharing sites.
I'll then usually spend the next couple of weeks bouncing back and forth between TinkerCAD (for uniform geometric or mechanical shapes) and MeshMixer (for organic shapes) until I have a solid unarticulated statue that matches the same "A" position posture as my stand-in (seen above).
Unless the figure is deliberately supposed to be hunched or deformed, the shoulders should be relaxed and the arms straight out at the side down as far as they can go without directly pressing up against the side of the torso. Likewise, you usually want the legs very slightly spread apart so there's a visible gap between the thights.
Note that switching between two different pieces of software for organic and inorganic shapes can be tricky, especially because TinkerCAD has such a low polygon count that it can't import complex meshes and anything you export out of it is also going to be fairly low polygon. If the mesh you're trying to import gives you a "too many polygons" error, you will need to manually reduce the quality. The easiest way to do that is open it up in 3D Builder which has a nice automatic "simplify" tool that will let you use a slider to automatically reduce the polygon count of the model. Remember to save the reduced version as a separate file so you don't lose the higher quality version that you may want to go back to later.
Assuming the figure I'm working on has a mixture of mechanical and organic components (like an alien cyborg or astronaut that has a mostly humanoid body shape but mechanical elements like tubing, chest armor, and/or a helmet) I'll try to work on the general body shape in Meshmixer, and then export a temporary STL copy when the time comes to add the inorganic components. The STL file I import will look pretty rough and will have lost most of the fine detail, but it's only purpose is as a stand-in to give me something to work off of for scale and positioning of the new parts I want to add. I'll assemble my bits and pieces around this model, but I won't merge them to it. Once they're positioned, I'll merge together only those parts I created in TinkerCAD, and then export them as a STL file that I'll re-import into Meshmixer and then line up and merge with my higher quality organic scuplt. I can then smooth out rough edges or make any organic free-sculpting changes needed to complete the basic unarticulated version of the figure.
Then comes the bane of my existence; adding articulation. (Which I will go into in more detail in the articulation section below.) Since articulation usually requires precision hole placement and making sure that you have an exactly 0.20mm to 0.25mm gap separating all movable parts that need to slot together, TinkerCAD is the best bit of software I've ever found for this sort of precise down to 0.05mm movement and hole creation. As previously discussed, if I've been building the figure in Meshmixer, I'll export a copy into TinkerCAD where I'll create the negative hole space shapes to carve out both sides of the articulation for each arm, leg, torso, etc. and then save that negative hole shape as a solid shape.... which I'll import back into Meshmixer to cut my holes on the higher quailty model there. (IMPORTANT: Always save an unarticulated version of your figure as a backup in case you discover something doesn't work as intended or you want to go back and improve upon the design later once you've had more practice.)
Even though I've created a number of premade templates for knees/elbow and shoulder/hip joints, getting everything to work exactly as intended often takes several rounds of prototyping, especially if I'm trying something new. Articulation elements need to be done in precisely the right manner so that they move in the correct direction without being too tight, too loose, or too fragile, where limbs can easily snap off during assembly or play. This is the least fun part of the process, and why when I show off a brand new figure design, it usually stays in the Beta state for a couple of weeks until I'm absolutely positive I got everything right and there are no structural defects.
What techniques will save me time?
Coming Soon.
how do I add articulation?
Coming Soon.
I'm stuck, can you help?
If you have specific questions about a design you're working on, don't hesitate to ask the 3D Printing Doctor Who facebook group for assistance. There are over 1000 of us on there, many with varying degrees of sculpting/customizing knowledge. Depending on what software you're using, I may not be able to help you, but somebody else will.
|