How do you print using a 3D printer (in general)?
You can find more specifics in both the PLA (filament) and SLA (resin) printing FAQ section, but assuming you know nothing about 3D printing at all, here is the basic process....
- Step 1 - Download the STL or OBJ files you want to print from the link handily provided on the My Designs, Guest Designs, or Remixes page. These will typically be grouped together in a convenient zip file if the figure comes in more than one piece.
In terms of printing, there is no significant difference between whether the files come in STL or OBJ format. They simply store information in a slightly different format, and OBJ files do have the capability to store color information about the object, which has little benefit for 3D printing unless you happen to be using a very expensive multi-color filament printer.
- Step 2 - Read the instructions. Some designs may ONLY be intended for use on resin or filament printers or come with alternate versions of files depending on which style of printer you own. Some may require special kinds of resin or filament to print properly (ex: the design may call for flexible resin or TPU filament.) Some may need you to print multiple copies of some of the files (ex: print two copies of the leg file because the right and left are identical) or come with optional extras/alternate parts that are not essential to print the main figure. Some designs may also require you to purchase additional non-printed parts, like metal craft rods, springs, Lego pieces, or LEDs, in order to produce a completely functional figure.
- Step 3 - Once you've read the instructions and have selected which files need to be printed, you will need to import the files in your slicer software. The slicer is what converts a 3-dimensional wireframe object into a series of thin layers that your printer can use to slowly build up the object, one layer at a time. Some printers may come with their own proprietary slicer software, but most will allow you to use free open-source 3rd party software that is more universally compatible and comes with more features.
For PLA (filament) printing, the standard recommended slicer is usually CURA.
For SLA (resin) printing, the standard recommended slicer is usually Chitubox.
Both of these are usually pretty good about opening both STL and OBJ files, but if you happen to have a slicer program that will accept one format but not the other, or that tells you a wireframe you've downloaded is non-manifold or otherwise damaged, you may need to open the file in a STL viewer like 3D Builder first in order to convert or repair it. 3D Builder can also be used to "plane cut" a large object up into smaller pieces if it happens to be too big for your print area.
- Step 4 - In your slicer software, orient how you want the object(s) placed in relation to the build surface, what sort of support structures or infill to use, and what the print settings will be for this print job. This includes things like setting the layer height, infill percentage, exposure time, or nozzle temperature. See the PLA (filament) or SLA (resin) FAQs for additional details. Often these settings will be influenced by the size or shape of the objects being printed or the brand of filament or resin you're using. When printing multiple objects at the same time, you may need to take print settings into account, and print pieces with special requirements separate from all the rest.
- Step 5 - Once your print parameters are set, your slicer will then "slice" the wireframe model into layers per your instructions and save these in a file format specific to your printer. (ex: most filament printers take GCODE files, though these might have a file extension unique to your brand of printer. Some resin printers output a zip file which contains a series of numbered PNG files that correspond to each of the layers it needs to print.) These will then need to be transferred over to the printer itself. Depending on your model of printer, these might be transferred across wi-fi or via a SD card or USB thumb drive.
- Step 6 - Load your printer with filament/resin and perform necessary pre-printing preparations. Again, this will vary depending on your brand of printer. This usually involves things like leveling your build plate, performing a nozzle check, clamping down the FEP vat, or stirring up your resin if it's been sitting a while. Some printers may also require you to set some print characteristics (like exposure time or layer height) on the printer itself before you hit the print button. See the PLA (filament) and SLA (resin) sections for more details.
- Step 7 - Wait for the object to print and cross your fingers that you did everything correctly. 3D printing is a very slow and time-consuming process that takes longer the larger the object you're printing. There are a lot of tricks to getting a 3D printed object to turn out correctly, and sometimes despite your best effort a print will still fail. We cover things you can do to try to prevent this in the PLA (filament) and SLA (resin) sections.
In most cases, once you remove the print from the printer you will need to take some time to trim off support structures and possibly sand down rough surface or fill in holes. For SLA resin there is usually an additional wash and cure step that needs to be done to remove excess resin and fully cure the finished print to full hardness. After that, follow whatever paint and assembly instructions came with the figure.
What are the differences between filament and resin printing? Which is better?
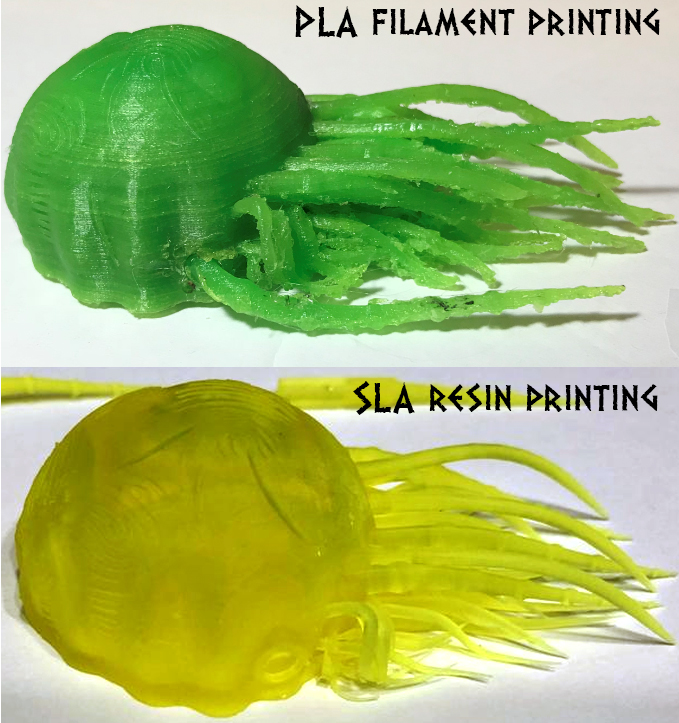
There are advantages and disadvantages to both types of printers, and there may be times where it's convenient to own both, but overall, resin printers are superior in almost every aspect other than total print size. Their print quality is light years ahead of filament. They're also much faster, more reliable, and require less maintenance. The trade-off is that they have much smaller print areas and require you to handle liquid chemicals in a responsible manner.
In terms of how they work:
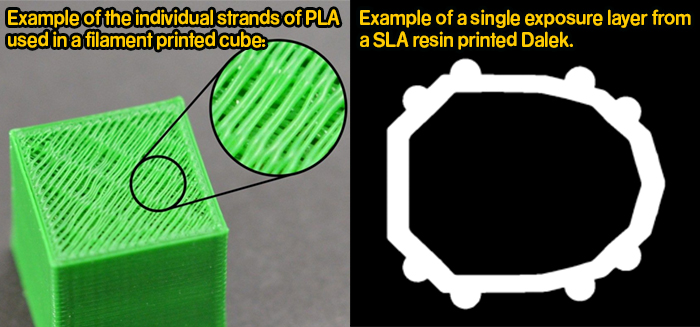
- A filament printer is basically a fancy hot glue gun on an X-Y-Z axis track that squirts out thin strands of melted plastic from a spool to slowly build up a solid shape. To do this, the nozzle must repeatedly pass over every part of the model several times while laying down filament in crisscrossing directions to "weave" the shape one layer at a time. This means that print time is dependent on the total volume and surface area of the print.
- A
resin printer works more like a MRI machine that builds up each layer of the print all in one go. It does this by taking a vat full of UV-sensitive liquid resin and lowering a flat build plate into it. The bottom of the vat is clear plastic and below it is a high-powered UV light and a LCD screen that acts as a filter to block out any areas of the print that you do not want exposed. To print each layer, the UV light turns on for a few seconds, only exposing the areas of the print that are not blocked off by the LCD screen, then the build plate lifts up a fraction of a mm and the LCD screen advances to the next slide to cure the next print layer. Prints are then slowly pulled up out of the liquid, and total print time depends entirely on the total number of layers in the print, rather than the volume.
Here's a side-by-side breakdown of the advantages and disadvantages of both styles of printer.
| PLA Filament |
SLA Resin |
Printer Cost: You can get a quality PLA printer that does everything you need it to do for around £200 to £300.
|
Printer Cost: You can get an entry level SLA printer for around £180 to £250. Note that you will also have to shell out another £50 to £100 or so for a UV cure light for post-print curing and various other supplies for the safe handling and storage of chemicals.
|
Material Cost: Filament typically comes in 450g or 1kg spools and costs about £15 to £25 a spool for standard PLA, and an extra £5 to £15 more for filament with unusual properties like flexible TPU, transparent PETG, or color changing thermoplastic (though these also tend to come on the smaller 450g spools).
One standard 1kg sized spool will usually get you about 3 to 5 regular-sized figures, depending on how many print failures you have along the way.
One downside to filament printing is that you can't join two spools together, and it's almost impossible to switch to a different spool mid-print,
so once you start getting down towards the bottom 20% or so of the roll, it becomes useless for anything besides small calibration tests or very thin drink coasters. |
Material Cost: Resin typically comes in 500ml or 1000ml bottles ranging from about £20 to £30 a bottle for regular ABS-like, to £65 to £80 for the fancier flexible or color-changing stuff. (Clear and transparent resins cost the exact same as opaque.)
One 500ml bottle will get you about 3 to 5 regular-sized figures depending on whether you hollow out the thicker areas of the model, and whatever resin you don't use can be poured back into the bottle or simply topped up with more of the same, so you don't end up wasting 20% of your material like you do with filament.
It is highly recommended that you keep at least one bottle of flexible resin
like 3D Materials Superflex or Siraya Tech's Tenacious on hand to use as a strengthening additive for your prints to prevent small parts from snapping or breaking if accidentally dropped. While it costs a packet, you only have to use a small amount (usually about 20-25% by volume) to get the desired strengthening effect.
|
| Print Area: Varies from model to model, but most PLA printers have a fairly large print volume of around 7" x 7" x 7". More expensive models may give you a little bit more room, but often in the vertical axis which is the least useful. |
Print Area: Varies from model to model, but most entry level SLA printers have a comparatively tiny print area of about 2.5" x 4.5" x 6" which is not big enough to accommodate larger figures without slicing them into smaller pieces first.
Higher priced machines will give you increasingly larger print areas, but to get something around the same size as a PLA printer, you're usually looking at a printer that costs £2000 rather than £200. |
Print Quality: PLA printers have terrible print quality compared to resin printers. Most PLA printers print at a standard resolution of about 0.10mm per layer, but resolution alone doesn't provide the full picture because each layer of a filament print must be built up strand by strand from a single print nozzle, so it's always going to be somewhat stringy and lumpy.
PLA prints also have extremely visible horizontal layer lines
that make the finished print difficult to paint as these layer lines act as canals to whisk paint out horizontally from wherever you actually intended to place it.
Note that while a really high-end filament printer can go down to layer heights of 0.02mm, you will never get the same level of surface detail as a resin printer printing at the same resolution.
Filament printers tend to have major problems with overhangs (any piece hanging out unsupported without something below it) and any parts thinner than about 5mm in diameter, which will usually come out looking blobby and half-melted if they don't self-destruct entirely. |
Print Quality: Even the cheapest SLA resin printers have incredible surface detail and will produce better results than the most expensive PLA printer. In fact, in terms of overall print quality, there usually isn't a huge difference between a £200 machine and a £20,000 machine. (Usually what you're paying for is print volume.)
SLA resin prints do not have visible layer lines, and the overall print surface is as smooth and precise as glass. (Unfortunately, it also tends to be as
brittle, unless you use flexible resin as an additive)
Higher end machines tend to come with 2K, 4K, or even 6K resolution screens for infinitesimally precise improvements in print quality, but since most figures need to be painted after printing, that tiny increase in surface quality won't be all that noticeable after the first few layers of paint have gone on. |
| Print Speed: Incredibly slow. Total time dependent on the total volume of your print job as well as the layer height. Print time is usually measured in days to weeks. |
Print Speed: Lightning fast compared to PLA, because each layer prints simultaneously and only takes a couple of seconds. Total print time is dependent on the total number of layers (i.e.: the single highest point of the tallest object on the build plate)
Print time is usually measured in hours, though because your print area is typically smaller, you may have to run more print
jobs back-to-back to equal the same total surface volume of what you can print in a single go on a PLA printer. |
Reliability: This varies from printer to printer, but filament printers tend to be extremely fragile high-maintenance machines that are extremely susceptible to mechanical failures.
The nozzle, PTFE tubing, heating element, thermo sensors, and filament extruder must all be working flawlessly in unison to keep the filament flowing within a precise temperature range. If any one of these components has a problem, the filament will overheat/cool and cause a jam somewhere in the system, which means your print will fail, and you will have to wait for the printer to cool completely before you partially disassemble the extruder to clear out the lump of fused plastic trapped inside.
Unfortunately, when you get a failed print, it is often very difficult to track down the source of the problem. All of the parts listed above wear out over time and will need to be replaced for about £10 to £40 each, but since the end result is usually identical, you are usually left with the frustrating task of replacing them one at a time until you eventually get a successful print.
You can also get print failures from bad or tangled filament, moisture exposure, or even the ambient temperature of the room. There is usually no way to resume a failed print, so if it fails 30 hours into a 40 hour print job, you're out time, money, and filament.
Expect a lot of down-time and trial-and-error testing while trying to diagnose any malfunctions beyond a simple clogged nozzle. |
Reliability: Resin printers are comparatively indestructible and low maintenance compared to filament.
You will still have print failures, though it will almost always be down to human error or suction force due to the shape or orientation of the object you are attempting to print rather than any mechanical failure of the machine itself.
Resin printers do not have any thermosensors, heating elements, or extruders, and the only motor is the one that controls the Z-axis.
There only part you will need to replace with any regularity is the FEP liner (the clear plastic that goes across the bottom of the resin vat) and only because one of your prints failed or had a sharp point that tore a hole in it. Once you learn what you're doing, a single liner can last you 6 months to a year if you're careful.
The LCD screen is another part that will eventually need replacing, but like the FEP liner, you will immediately know when you do. The newer 2K, 4K, and 6K screens last for ages, and you may be able to go a couple of years or several hundred print jobs before you need to replace them. Older cheaper screens require replacing more often, but are still usually good for 100-200 prints before they start getting dead pixels or flickering, which will cause extremely noticeable holes or columns to appear on your prints, or random single layer thick patches of "kelp" to appear floating in your vat or attached to the sides of your prints. In both situations, you will immediately know what the problem is, and what you need to do to resolve it.
|
Color Options: There are dozens of base colors to choose from, and several fancier filaments out there that will let you do fun stuff like PETG (almost see-through like frosted glass) TPU (highly flexible), thermoplastic (changes color with temperature), plus others that look like metal or are speckled, like stone.
The downside is that you cannot mix colors and you are stuck using whatever color comes directly off the roll.
Some extremely fancy (and expensive) printers like the
bambulab X1 will allow you to print with up to 4 different colors of filament of at once, or contain built in inkjet coloring systems like the XYZ da Vinci Color, though usually it's much more affordable to just print a figure out of cheap white filament and then paint it by hand once you're done. |
Color Options: Resin tends to come in only a few base colors, but these colors can be mixed together or have small quantities of resin dye added to them to create nearly any color you desire. (Though matching mixed colors between individual print jobs is a massive pain.)
Since most figures are going to be painted anyways, I generally don't care about resin color and print in the absolute cheapest Elegoo or Anycubic White or Grey ABS-like resin I can find.
This saves me the hassle of having to empty out the FEP vat between prints, and I can buy the larger 1000ml bottles of resin and save a bit of cash and shelf space.
That said, I do recommend you pick up a bottle of Clear (for printing any parts that have to be completely transparent like glass) Flesh Color (if you're going to do any human heads, it means a few less layers of paint, which is going to increase overall detail, Black (for those rare occasions where you need to try to block as much light as possible from seeping through) and most importantly, a bottle of 3DMaterials SuperFlex or SirayaTech Tenacious flexible resin, which is invaluable as a strengthening agent and also essential for some figures that need to be able to bend. |
Durability/Flexibility: Basic filament is slightly flexible and good at springing back from compression, enough that you can use it to create snap-in-place parts very easily.
Thin parts will break if dropped on a hard surface, and prints have a tendency to break apart along layer lines if submitted to too much sideways/twisting force, but in general, filament printed figures are pretty durable and can usually survive a tumble off your toy shelf without shattering the way basic unstrengthened resin will.
Filament printers do not print overhangs (i.e. the underside of a sphere or ledge) very well, and these parts come out very rough and misshapen even on the best printers. (The one exception to this rule is if you get a very expensive dual-nozzle filament printer that uses the second nozzle to print temporary support structures that can later be dissolved in acetate)
Any parts smaller than about 5mm in diameter tend to self-destruct unless they are printed flat against a borosilicate glass plate.
If they do print, they are liable to be very ugly and misshapen. (see the Rutan example above)
Printing small parts is always a gamble because they can not only destroy themselves, but break free and stick to the nozzle damaging the rest of your print job at the same time.
You also cannot print anything truly transparent with PLA or even PETG. There will always be some cloudiness or frosting due to the way the print nozzle has to lay down each filament strand individually. |
Durability/Flexibility: Basic resin is extremely hard and brittle with properties very similar to glass. Because of it's rigidity, any sufficient impact or twisting force will cause it to chip or shatter, and you cannot use it to build snap-in-place joints because they will break before they bend.
On the plus side, the hardness of resin gives it amazingly crisp clear resolution, even on overhangs, though you will still have to print support structures. (Placement of these is often a very important part of the print process.) You must also be conscious that you are printing with a liquid, and that any cup-like cavities without drainage holes can collect resin and result in a solid part that was supposed to be hollow, or act as a suction cup which could rip your print off the build plate or stretch out eventually tear your FEP liner.
Resin can print extremely tiny parts down to 1mm thickness, but if you aren't using a flexible resin like 3DMaterials SuperFlex or SirayaTech Tenacious as a strengthening agent (usually 20 to 25% by volume is sufficient), they will probably snap like a twig the moment you try to take them off the build plate. You must also be conscious of their orientation, as sharp edges and points can pierce the FEP liner just like a knife.
The smaller a part is, the more flexibility it will retain when using flexible resin, so thin pieces 1.5mm around will bend with almost as much flexibility as a Character Options figure's hands, but anything over 3mm wide will remain completely rigid. The downside of using flexible resin is that it's ungodly expensive and does make smaller parts semi-transparent. |
Safety, Storage, and Clean-up: Filament has a clear advantage here as it's very easy to store and (mostly) non-toxic. The offgasses from the plastic as it is being melted inside the machine aren't particularly good for you to be inhaling on a long-term basis, but in it's solid unmelted state, you can pick it up and handle it bare-handed, it won't stain, and once you take it off the machine, it's perfectly fine.
The most dangerous thing about filament printing is that the nozzle gets extremely hot, so just like a hot glue gun, wait for it to cool down completely before you touch it.
Storage is comparatively simple. The most important thing with filament is to keep it away from moisture, as this can cause it to expand and cause nozzle jams and print failures. Don't put your printer right next to a drafty old window or out in the garage if your washer and drier are in there making things humid. When you are done printing, put your partially used spools in a ziplock freezer bag with a silica gel pack (most spools come with them), and store in a cool dry place out of direct sunlight, moisture, and extreme heat, and it should last almost indefinitely.
While it is always advisable to print in a well-ventilated area, the fumes from filament printing are comparatively minor, and can usually be contained by a basic enclosure. (even one you build yourself out of foamcore or cardboard) |
Safety, Storage, and Clean-up: WARNING: Resin is toxic and should only be handled when wearing gloves. Contact won't kill you, but it is a skin irritant, and you definitely don't want to ingest it or stick your hand under a UV light with any in contact with your flesh. It is oily and will stain clothing and carpets like motor oil, and you will need to handle it quite a bit as you take the print jobs (still covered in liquid resin) off the build plate and transfer them to a bath of Isopropyl Alcohol or mineral spirits to rinse off the excess.
You can also buy enclosed wash stations or an ultrasonic cleaner (the latter is especially useful if the part is hollow and may have liquid resin trapped inside.) The cleaned part will then require additional curing under a special UV cure light.
Liquid resin has a limited shelf life, but like paint, it will last longer if you give the bottle a good shake every couple of months.
Resin left in your machine will start to cure on its own after a couple of days if that machine is left out in the open exposed to UV, but if you keep your printer in a dark room or cabinet, you can leave resin in the machine for weeks or months at a time without any problems... just stir it up real good in the vat with your plastic scraper before you try printing again, because it will separate and the pigment tends to stick to the FEP liner.
Uncured resin should be stored in its original bottle at room temperature in a dark place when not in use. Keep resin, as well as all your tools that have touched resin, well away from children and pets.
Leftover resin as well as the resin-infused alcohol must be disposed of responsibly. It is an environmentally hazardous chemical, so do not flush it down the toilet or pour it into the gutter. If the resin hasn't been exposed to too much UV light, you can usually strain it right back into the bottle, but if you do need to dispose of resin, the best method is to pour it into a ziplock freezer bag, then put the bag outside overnight to slow-cure gradually as the sun comes up. Once it's a solid block, it can go in the trash. Resin tainted alcohol should likewise be left outside in the sun in an open container like an old pie tin or cookie sheet to evaporate until you're left with a powder or sludge. This should be disposed of carefully because it is a microplastic, and you do not want to breath or ingest it.
Again, if you have pets or small children, be careful where you do this, and keep an eye on the weather, since you don't want it accidentally getting rained on and going out the next day to find a disgusting sticky film of resin all over whatever surface you had it sitting out on.
Don't place your bag of leftover resin under your UV cure light, as this is far more intense than regular sunlight, and resin gives off heat when cured, which can easily melt the bag and spill resin everywhere. You can pour it into a disused metal pie tin though, and just toss the pie tin once it starts getting full of resin chunks.
Ventilation is also important. If printing indoors in an area where you will potentially be breathing fumes, it is highly recommended that you wear a mask when handling liquid resin and build an exhaust system that will pump fumes out a window, rather than into the room itself. (Depending on your printer, you may also be able to attach a hose or charcoal filter to the exhaust port on the back, even if you have to 3D print the attachment yourself.)
Resin dust can also be dangerous (it's extremely fine and doesn't break down in the human body) so you should always wear a mask, goggles, and gloves if you have to sand down a resin printed piece. Once finished, make sure all dust is vacuumed up afterwards.
You will also need enough table space to accommodate your alcohol/water baths, your UV cure light, plenty of paper towels for laying our parts and resin covered parts, and a large vinyl chair mat to cover the floor in front of your work area to make cleaning up any accidental drips easier. |
Is it possible to print these figures and props in a different scale?
Sort of. If you know the scale you're starting with and the scale you're going to, the math is pretty simple: just divide the scale you want to print in (1:6) by the scale the model is in now (1:9) which gives you the amount all three dimensions of your model need to be increased by (6 ÷ 9 = 1.5 or 150%) In fact, here's a handy chart that takes care of just that:
multiply dimensions of all pieces by....
|
to 12” scale |
To 8” scale |
To: 5.5” scale |
To 3.75” scale |
| From 12” Big Chief/Product Enterprise scale (1:6) |
n/a |
0.6667 |
0.4583 |
0.3125 |
| From 8” Mego scale (1:9) |
1.5 |
n/a |
0.6875 |
0.4688 |
| From 5.5” Character Options Scale (approx 1:13) |
2.1818 |
1.4545 |
n/a |
0.6818 |
| From 3.75” Character Options/Eaglemoss scale (approx (1:21) |
3.3 |
2.1333 |
1.4667 |
n/a |
It is usually easiest to do this in your slicer program, and Chitubox in particular makes it quite simple to rescale the entire figure all at once. All you need to do is drag and drop all the STL files into the program, make sure the "Select All" box is checked, and then hit the "Scale" button on the left to automatically adjust them to their new scale. You can even hit the File>Save As button to re-save the STL files at their new scale for later printing or editing.

Realistically, however, you run into a whole bunch of problems when you try to size a small model up or a large model down.
A small model sized up will typically print just fine, but may have loose articulation or blocky angular surface details because the polygon count is the same, but it is now spread out over a much larger surface area.
A large model scaled down will have the opposite effect, and may not print at all, because small thin parts or articulation holes are now too small to function properly.
Are there ways to have items printed if I don't own a 3D printer?
If you do not have a 3D printer of your own, you
have a few options...
You
can use an online print-to-order services like Craftcloud, Xometry or Shapeways. But this tends to be very expensive (usually 10x or more than what you'd pay in material costs printing for yourself) especially for the larger and more intricate figures and play sets. These sites can also be tricky to navigate, and you have to be very careful in requesting exactly what you want, otherwise you could end up with a figure that cost a small fortune but looks awful, doesn't fit together properly, and/or is missing pieces. Most of these places also won't allow you to mix materials, which can be absolutely essential if you want a figure that looks as professional as an official Character Options release, but won't shatter like glass the first time it falls off a shelf.
Before you pay a bunch of money to a stranger online, it is definitely worth checking around to see if your friends, library, college, or maker's club own a printer that you can use. Even if they charge you a nominal fee to cover print time and material costs, it is almost certain going to be less expensive and more reliable than going through a print-to-order service, with the added benefit that they will often help you out with some of the more technical stuff like figuring out how to orientation parts during printing and set infill percentages to get the best quality results.
Many hardware, copy, and office supply stores are also hopping on the 3D printing bandwagon, so always google search "3D Printing Services Near Me" to see what's available locally before you resign yourself to using an overseas print farm. I can't speak to what thigs are like in the U.K. and Australia, but here in the United States, most Staples, UPS, and FedEx stores now provide basic PLA filament 3D printing services.
You're always going to get better results if you can talk to a real human and explain what it is you're after, especially if the job has any special printing requirements. In most cases it'll be on you to provide them with copies of the files via an upload page, email, or flash drive and clear instructions for how each of the parts should be printed. This will include things like what material/color to use, infill percentage, layer height, and whether some parts need to be printed multiple times. You can read more specific advice for how to navigate 3D printing services in the sections below.
Unless you have a very tolerant friend who is okay with you monopolizing their machine for weeks at a time, if you plan on printing more than one or two of these figures, I highly recommend sitting down and at least considering purchasing a machine of your own. Considering the massive mark-up on most print-to-order services, you'll quickly find it's more cost effective to just buy your own printer for around £200 and then only have to pay £5 to £10 per figure in raw materials than paying £100 or more for a single figure that you commissioned somebody else to print.
How expensive is it to use a 3D printing service?
Pricing is all over the map, but typically ranges from "very" (usually over 10x what you'd pay in material costs to print the same item yourself) to "oh my god, you people have got to be insane!" (Thousands of dollars to print a single figure.) Currently, Craftcloud seems to be the more affordable and user friendly of the online options, followed by Xometry, but how many arms and legs you can expect to relinquish in exchange for a single figure will depend on a few different variables:
- Material - Even though resin printers print much faster and the raw materials are only fractionally more expensive, most print to order services are still geared towards filament printing and will charge you twice as much (that's 20x the material cost instead of 10) to print something out of resin. If you want to print something out of fancy flexible resins or metal, the option is available, you'd better be prepared to sell a kidney or your car.
Note that Xometry and Shapeways no longer offer regular PLA printing anymore. Their cheapest option is MJF Nylon PA12, which is a reinforced nylon filament designed for internal machine parts, which is going to be nice and durable, but significantly more expensive.
- Size/Volume - This is the big one, no pun intended. No matter what material you're printing from, size dictates total print time... and time = (your) money. Mostly, what you're paying for with a print-to-order service is how many hours/days/weeks your print job is going to be monopolizing one of their printers.
- Total number of parts - This is the next biggest factor. Most print-to-order services are geared towards printing you a single item like a statue or machine part, rather than a lot of little action figure pieces, and pad their numbers per piece accordingly.
- Infill/layer height - Since time is money, most 3D printing companies have their machines tweaked to print objects as fast as possible, which means increasing the layer height thickness and only using the thinnest infill percentage by default. What this means is that your prints are going to come out extremely rough looking with very noticeable stepped edges on any sort of diagonal surface (a TARDIS console would look more like a step pyramid) and paper thin outer walls that may collapse if you attempt to sand them and are going to be impossible to glue back together if your print breaks along one of the layer lines. Some services will allow you to adjust these settings to more realistic values, but as always, this will cost you.
If you are going to use one of the online services, I highly recommend submitting files to multiple providers, and see which one comes back with the most reasonable quote. You are under no obligation to buy at this stage, but may find yourself added to a mailing list because most services require you to provide an email address when signing up for an account.
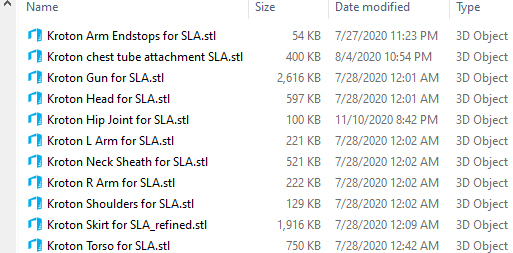
If you're looking for actual dollar amounts... Using my Kroton as an example of what I'd consider a "normal-sized" figure that prints fairly well out of both PLA and SLA without any unusual printing requirements:
| Print Method |
Price Breakdown |
| Self printed Kroton - PLA |
If I were to print this figure myself out of PLA filament, or use a free library printer that required me to purchase my own filament, it'd cost somewhere between $5 to $25.
That is to say, I'd have to purchase a single roll of filament for around $15 to $25 if I didn't have one already, and depending on what I used for infill percentage, supports, and whether I had any unexpected print failures along the way, I'd expect to use about 1/4 of that roll to produce my Kroton, with enough left over material to print roughly 2 to 4 additional figures of the same size. |
| Self-printed Kroton - SLA |
If I were to print this figure myself out of SLA resin, it'd cost around $6 to $60 worth of raw materials.
If I didn't have anything already laying around, I'd have to buy a bottle of standard ABS-like resin for about $30, and ideally a $30 bottle of Superflex flexible resin to use as an additive to make sure the pincers had enough flex that they wouldn't snap off during play. but I'd only have to use about 1/5 of the bottle of standard resin, and a few tablespoons worth of Superflex as an additive to make the Kroton. I could easily print 2 to 4 more using the resin I had left over, and still have most of a bottle of Superflex left over for many more prints. |
| Print-to-order Kroton through Shapeways |
Plugging all the pieces into Shapeways and using their cheapest default option (which is the MJF Nylon PA12) the total cost before tax and shipping came to $222.87.
Note that PA12 is a different kind of plastic than either PLA or SLA. It's fused from tiny granules so it will have a slightly grainy sandpapery texture, which you may need to sand down or lacquer over if you want something perfectly smooth. Some of the fine surface details will be lost this way, but detail-wise it's about midway between PLA and SLA. (You don't have ugly layer lines or overhangs, but the entire surface will be rough.)
|
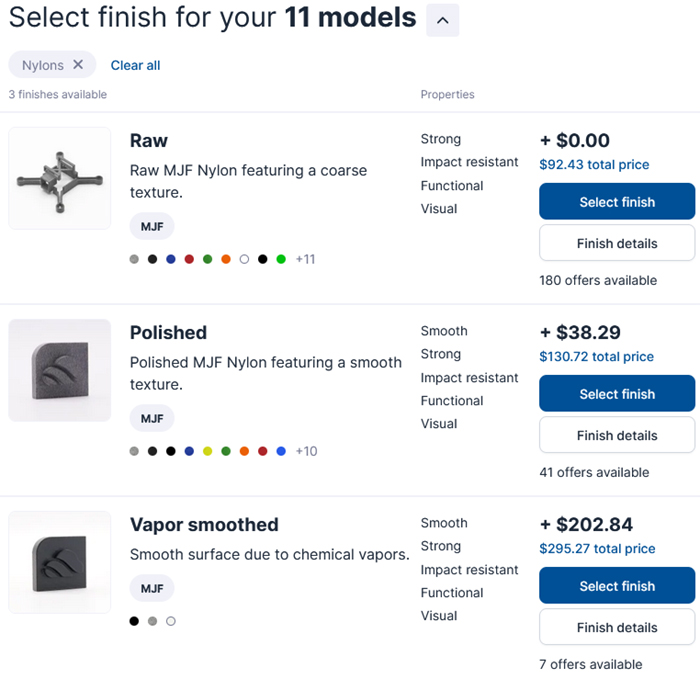
| Print-to-order Kroton through Xometry |
Plugging all the pieces into Xometry, and using their cheapest default option (which is the same MJF Nylon PA12 pictured above) the total cost before tax and shipping came to $155.54. |
Print-to-order Kroton through Craftcloud * |
Plugging all the pieces into Craftcloud, and using their cheapest default filament option (which is regular PLA) the total price (including shipping) came to $52.91.
For the sake of equal comparisons, you could also have the same figure printed out of MJF Nylon PA12 for $92.43, which is still cheaper than the other two vendors.
* Note that Craftcloud attempts to obtain multiple price quotes from several smaller vendors located within your country, and then automatically returns the lowest one. As I happen to be located in the United States, we have a lot more vendors to choose from, and therefore pricing is probably more competitive than it is in other countries.
|
How do I navigate using a 3D Printing service?
If you do not have a 3D printer of your own, you can use services like Craftcloud, Xometry or Shapeways, but the website layout may be a little different from vendor to vendor.
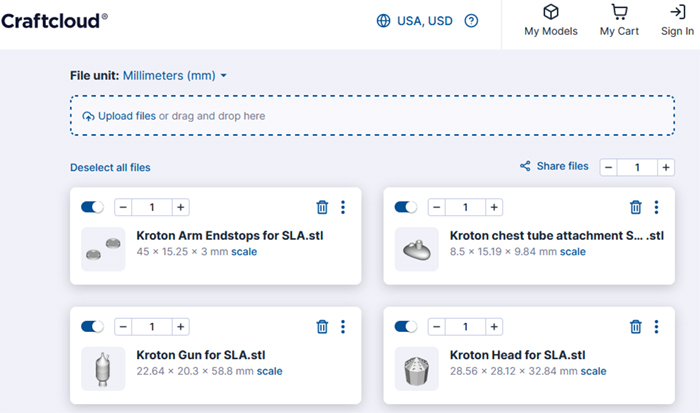
- Step 1 - Sort all your files into a single folder. Read any printing instructions. Regardless of who is doing the printing for you, your first step will always be to download the files you want printed into a single folder and then read any instructions that came with them to determine if there are any special printing instructions, parts than need to be printed multiple times, or alternate pieces that can be eliminated so you aren't wasting money. (For example, if printing a Kroton, you might want to consider losing the chest tube attachment and gun accessory.)
If your design requires you to print multiple copies of the same part (ex: right and left leg are identical), I recommend copying and pasting however many copies of the file you need into your project folder. Most 3D print services will give you the option of printing multiple copies of items, but they may only do so at the check-out process, so it can throw off the pricing when trying to obtain a rough estimate.
Even if you don't have a printer, it is usually helpful to download a free slicer program like Chitubox or STL viewer like 3D Builder for Windows, just so you can see what the parts look like ahead of time, and spot if there are any unexpected surprises the artist failed to mention in their print instructions or README file.
This will also let you confirm that the pieces are in the correct scale that you want to print at.
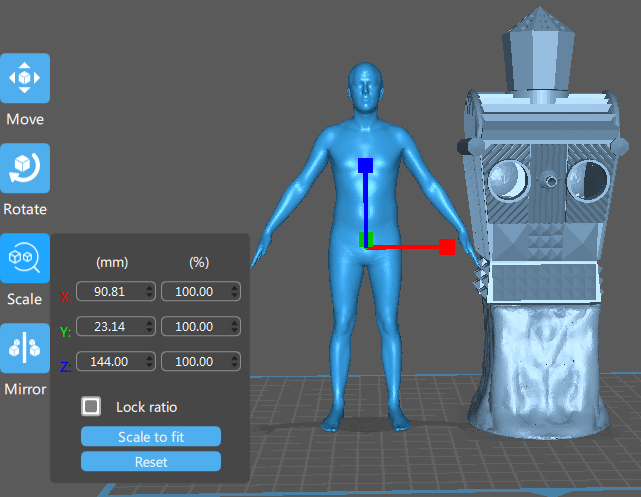
If you aren't sure. Most Character Options figures for actors that are around 6ft tall
are about 144mm tall. Here is an example file that you can download and use in a slicer for scaling purposes. All of my files are automatically pre-scaled to fit the Character Options 5.5" toy range, but other artists may not be quite as exact. See the scaling FAQ section above if you have questions about how to adjust the scale of your prints.
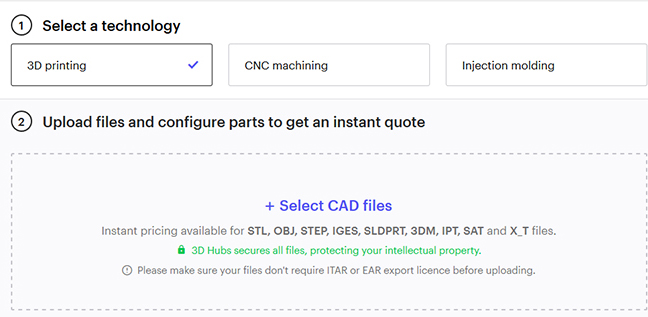
- Step 2 - Upload the files to the print service. Depending on the vendor, they may ask you to specify what type of printing technology or material you want to use up front. See Step 4 below for more information about materials. For example, we want to use 3D printing (which covers both filament and resin printing) rather than CNC (which is using a router or laser cutter) or injection molding (which is squirting plastic into a mold to create solid or rotocast parts).
Most print services will let you drag and drop multiple files, so just drag over everything from your project folder with a STL or OBJ extension. You may have to wait a few minutes while the website performs some automatic checks to verify that the files are print-ready. If they find something they don't like, they may ask you to fix the file, or tell you that a person will need to manually inspect the part manually before they can provide you with a quote.
You may also be asked to check a box to confirm that your items aren't subject to ITAR or EAR export licenses... which mostly means you aren't trying to 3D print guns, knives, bombs, or any other product that are considered illegal to sell in most countries.
- Step 3 - Specify the unit of measurement. This should always be mm unless the artist manually set some very weird scaling. Most print services will let you set this
variable once and apply it to all the files you just uploaded, but others may require you to go through and set the parameter for each file manually. The webpage will also usually list the individual sizes of each object in mm once this has been done. Eyeball this, and if something seems off, you may need to open the file in Chitubox and confirm whether it needs to be rescaled to the appropriate size.
- Step 4 - Specify the material(s) you want to print out of. This is usually the trickiest bit because a lot of companies just give you a pulldown list with zero explanation for what any of the materials are. Craftcloud is the most user friendly (and usually cheapest) of the lot, so I recommend going through them first if you can.
If you're lucky, the print service may give you a few checkboxes with which to narrow your options:
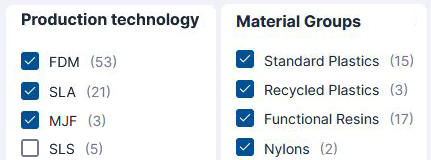
Given a choice between types of printing/production technology, you'll usually want to specify:
FDM - Which is another name for filament printing, including PLA and a number of other plastics.
SLA, DLP, and/or LCD - All of which are different forms of resin printing (the only difference is the light source), though SLA is the most common, and liable to be the cheapest of the resin options.
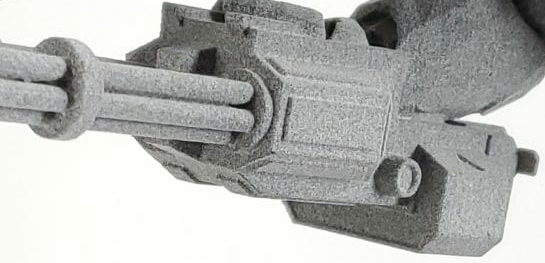
MJF or sometimes just Nylon - Is a third method of 3D printing using powdered nylon granules, most commonly PA12. The print quality is about midway between PLA and SLA, but the texture is going to be rough and pitted like sandpaper, so it may require a bit of effort to smooth out and finish. PA12 is currently the cheapest printing option available from Xometry and Shapeways. Note that SLS Nylon, although a bit cheaper than MJF, doesn't retain as much surface detail and is harder to paint, so if it's a choice between MJF and SLS, go with MJF.
This may still leave you with a wide variety of choices, so here's a quick breakdown of some of the more common printing materials you may see listed.
| Material |
Type |
Function/Benefits |
Print Quality |
Price |
| PLA |
(FDM)
Filament |
Usually the lowest cost option, if the vendor offers it. Parts tend to be fairly durable but can still break along layer lines. Small parts under about 5mm may come out blobby or not print at all, and layer lines are quite obvious. |
Low |
Low |
rPLA/
recycled
PLA |
(FDM)
Filament |
If offered, this is just PLA that has been made from recycled plastics.
There should be no noticeable difference print quality-wise from regular PLA. Though occasionally you will find more interesting transparent color options in rPLA. |
Low |
Low |
| PLA+ |
(FDM)
Filament |
PLA+ is a mix of PLA and TPU that prints cleaner than either of them, with better surface detail, it can handle parts as small as 3mm without deforming. While not as flexible as TPU, it can take a small amount of bending and is very sturdy reliable stuff. This will usually give you the nicest looking results of all the filament options. |
Med |
Lowish |
| ABS |
(FDM)
Filament |
Not to be confused with ABS-like resin. ABS filament is not particularly useful stuff for figure or prop making. It's quite prone to splitting along layer lines and it's main features are that it's chemical resistant and waterproof, which simply makes it harder to paint.
Avoid if possible. |
Low |
Low |
| PETG |
(FDM)
Filament |
Stronger than PLA but no better when it comes to surface detail. Typically the only reason to use it is because it comes in semi-transparent colors, that can be useful if you want to print something that will let light through and looks a bit like frosted shower glass. I've previously used it for the fog layer on the Hand of Omega and dome lights for the Dalek Transmat. If you're looking for something truly transparent, you'll want to go with resin. |
Low |
Lowish |
TPE/
TPU/
PCTPE
Soft PLA |
(FDM)
Filament |
All names for bendy flexible filament. May be necessary for printing some figures like the Zarbi, Rutan, Wirrn, Meglos, and Mire Beast if you want them to have functional leg/antenna/tentacle parts. These won't have the same level of surface detail as printing with flexible resin, but it's not any worse than printing with standard PLA. Pricing is all over the board, depending on availability, but if it's not too much more expensive than regular filament, I'd consider it for hands and other parts that you want to bend or at least not break.
Note that there is also a TPU SLS and MJF powder which is similarly flexible, but usually much more expensive. |
Low |
Med |
| HIPS |
(FDM)
Filament |
High impact plastic. This is a bit more rubbery and springy than regular filament, and may be available in a semi-transparent form similar to PETG. However, TPU tends to have more flexibility, so it's generally not worth your time. |
Low |
Med |
Wood
PLA |
(FDM)
Filament |
Novelty PLA that has bits of wood added to it, which will give your print the color and feel of fiberboard. Theoretically this means that the 3D print is easier to sand, and can be stained or painted just like real wood, but it's generally not worth the extra cost. The finished product will also be as flimsy as fiberboard, and may expand and separate if you get it wet. |
Low |
High |
Stone
PLA |
(FDM)
Filament |
Novelty PLA that has little dark speckles in it that makes your print look a bit more like sandstone. Since it's very easy to purchase sandstone texture spray paint, there's not much sense in wasting your money. |
Low |
Med |
Metal-
infused
PLA |
(FDM)
Filament |
Novelty PLA that has brass, bronze, or copper embedded in it. Will give your print added weight, and look roughly like a metal object that has been cast from a mold. But as metallic paint is cheap, you'd be better off just printing normally, and painting it whatever color it needs to be. |
Low |
High |
| Color Changing PLA |
(FDM)
Filament |
Novelty thermoplastic PLA that changes color in response to heat.
Generally useless for our purposes, though I might theoretically use it for a Krarg figure at some point in the future. But since it only switches between two colors (ex: black and yellow) the applications are quite limited and the cost is high. |
Low |
High |
SLS PA12 &
MJF PA12
|
Nylon
Powder |
PA12 is a type of nylon powder-based 3D printing that is midway between filament and resin printing in quality. It doesn't show layer lines and is better at overhangs than PLA, but the entire surface is rough and pitted like sandpaper. You can get smoothing finishes, but this will eliminate even more fine surface details, so I'd usually recommend getting a raw print and finishing it yourself.
This is the cheapest printing option that Xometry and Shapeways
offer.
SLS PA12's only advantage is that it costs a little less than MJF PA12, and comes in a wider variety of colors because it can be dyed. But it's also waterproof, which makes it harder to paint.
MJF PA12 is more expensive, but has slightly better surface detail and is easier to paint.
Given a choice, between the two, I'd go with the MJF PA12.
|
Med |
High |
SLS TPU
&
MJF TPU |
TPU Powder |
Pretty much a flexible version of PA12 that uses powdered TPU granules instead. As with the PA12, this will have a rough sandpapery finish, but print-quality is about midway between PLA and Resin.
The MJF is going to be slightly more expensive than the SLS, but it will have better surface detail and be better to paint. Shapeways offers this as a print option, but it's nearly as expensive as printing out of resin. |
Med |
Higher |
Standard, ABS-like,
or Tough Resin |
(SLA)
Resin |
There are a few minor variations here and there, but in general, SLA resin tends to be nearly identical in terms of print quality. If you're given a choice between Standard, ABS-Like, or Tough resin, I recommend Tough if you can get it, since it's least likely to break, followed by ABS-like, which has a tiny bit more flexibility than standard.
Resin will usually cost you twice as much as any filament printing, if the vendor offers it, but the print quality will be significantly better. Though since most print-to-order companies pad out their layer heights for faster printing, it won't look nearly as good as if you'd printed it yourself at home.
|
High |
Higher |
| Transparent Resin |
(SLA)
Resin |
Print clear parts like glass. Necessary if you want to print perfectly clear figures like the Incubator Dalek, the Quark's head, or the Keller Machine's dome. Be warned that these parts may arrive lumpy yellowed, or cloudy, depending on how they were cured or supported. |
High |
Even Higher |
| Flexible or Elastic Resin |
(SLA)
Resin |
The stuff used by Craftcloud is the opaque rubbery resin that looks like it has about the same level of flexibility as Lego tires, and as far as I can tell, Xometry and Shapeways use the same.
Several of my figures recommend using flexible resin as a strengthening agent, but the Tenacious and SuperFlex resins I use are both transparent.
If you are going to pay a crazy amount for flexible parts for a figure (which will cost you pretty much the same amount as buying a resin printer of your own) at least look at the parts and only print the ones that absolutely need to be flexible out of the stuff. (ex: the Zarbi's legs or the Mire Beast's tentacles.) |
High |
Insane! |
| Rigid, Castable, Nylon-like, Surgical, or Accura Resins |
(SLA)
Resin |
Don't bother with any of these.
Just like filament, there are lots of specialty resins out there with weird properties you don't really need that drive the already insane price up even higher. Unless you plan on surgically implanting a figure inside you, there's no point in paying any more than you have to. |
High |
Insane!
|
| Silicone Rubber |
Inkjet |
You can technically 3D print out of silicone rubber, which will give you maximum flexibility if you want a realistically floppy Mire Beast, collapsable Meglos, or Alpha Centauri cape. But it will cost you upwards of $1000. |
Med |
Don't
even ask!!! |
- Step 5 - Selecting the finish/infill/layer height/color. This will vary depending on what material you're printing out of.
For the finish, the simple answer is always go for the standard/unaltered/raw option. If you pay for sanding, smoothing, polishing, or painting, it will invariably destroy whatever fine surface detail survived the printing process. It is much better to take care of any finishing of the model yourself after you have the parts in hand. You can see more advice on how to do that in the Painting and Assembly section.
Infill is extremely important for any PLA/filament printed parts. And you may need to set separate values for individual pieces, which can be tricky if it wants to group all your parts together under a single quote. Always read the print recommendations that come with the figure if there are any. If there aren't, then general rule of thumb is always go for 60% infill or higher if you want to be safe. And ideally, you want 95 or 100% infill on all arms, legs, or other parts that need to be pulled on or rotated to move. Higher infill usually means better print quality, no worries about them setting the wall thickness too low, and resistance to snapping. If you're printing a transparent part out of PETG, then you absolutely want to print at 100% infill, otherwise you will be able to see the crisscrossing infill pattern when you look through it.

Layer height is one of those things that they may or may not allow you to adjust. If they do allow you to adjust it, it will likely make your figure significantly more expensive.
All my figures are designed to be printed at standard 0.1mm (100 micron) layer height on regular PLA filament printers or at 0.02mm layer height (20 micron) on resin printers unless otherwise noted, but most 3D printing services cut corners and save themselves valuable printing time by setting their machines at a much higher layer height than you would normally use at home. This allows them to print significantly faster, but causes all slopes and curves to have a very noticeable and ugly looking ziggurat-like step pattern.
Color should usually be the least of your worries because you'll normally be sanding down and painting the figure anyways. Some print services will allow you to select "next available" or "surprise me" which means they'll use whatever filament is already on the machine, which is usually the cheapest option. However, it might be worth paying a tiny bit more for "natural" or "white" filament or resin, especially if your print has any white or lightly colored surfaces where a darker color might show through.
As a final word of warning, figures that are listed as Beta on my designs page have not been thoroughly tested and may have articulation elements that need to be revised. If you're going to spend over £100 for a figure still in Beta, make sure you have seen someone else successfully print it first. Otherwise you may find yourself out a lot of money for a figure that will have a better version released in a few week's time.
My 3D printing service says I need to [Blank] the figure before they can print it. How do I do that?
Depending on how you downloaded the files and how finicky your print service is going to be about printing them, they may ask you to modify them in certain ways. If you ever get stuck, the best place to ask for advice is on the project's Facebook page, but here are some common ones I've come across.
- Separate the files (i.e. "floating" parts) -- Most files are already saved as individual pieces, but some smaller joint connectors that require multiple copies may have all the pieces saved into a single STL file, and large parts designed for PLA printing may have built-in heat barriers around the corners to prevent curling (The TARDIS Console is a good example of this.)
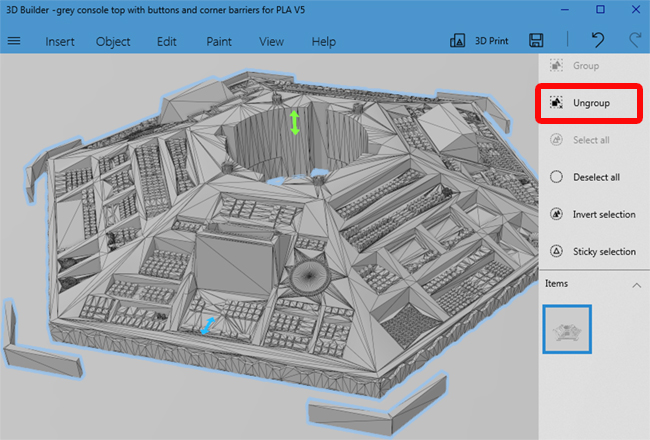
Usually, you can just tell them to go ahead and print as is, but if they insist you "fix" the problem 3D Builder in Windows has an "ungroup" tool that can be used to separate any part of a mesh that isn't directly touching another. You would then simply have to save each piece individually as a new file, or delete it if it's not important.
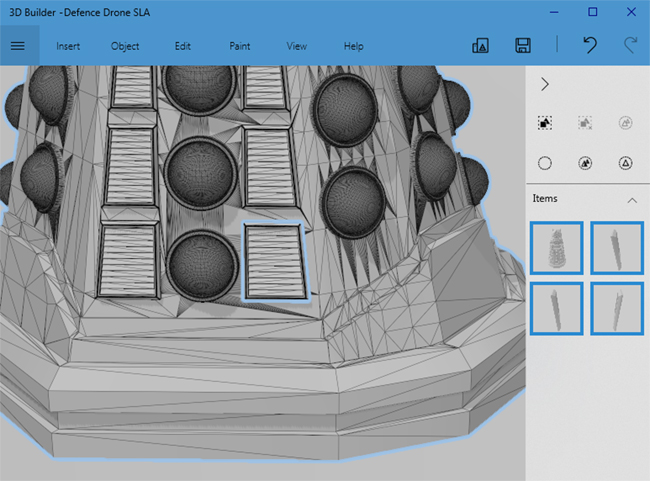
Note that occasionally, some of our guest templates may have "floating" parts that you absolutely need to keep in place. The Dalek Defense Drone is a good example of this, where a few of the side slats aren't quite touching the surface of the skirt. They'd still print perfectly fine because the gap is incredibly small, but an automatic model scanner may not know that.
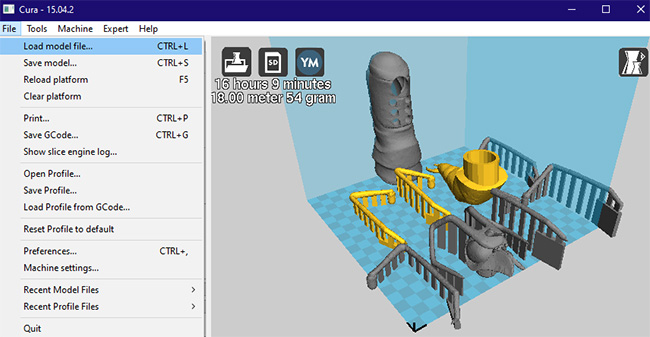
- Merge the files -- This is a bit tricky, especially if the print service doesn't tell you what size print area they have. In this case, they're being lazy and want you to put all the parts together so that they can be run as a single print job. This may cause problems as certain pieces should be printed at different infill percentages, and must be printed separately. You might be better off just looking for a different print service, but if you want to comply with their request, you'll need to use a free slicer program like CURA to load all the STL files (or as many as will fit in their printer's print area) and then position them in a wat that they all fit on the build plate.
When you're done, click "Save Model" to resave the merged body parts as a single STL file.
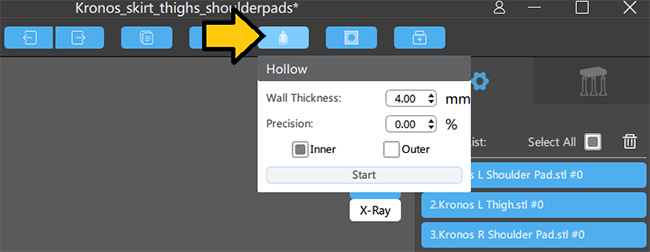
- Hollow a model -- This is most commonly needed for resin printing as it saves resin and reduces suction force as long as you also add some drainage holes. Typically, the person doing the printing would do this themselves at the slicing stage, but if they want you to do it beforehand, you'll need to download Chitubox and open each STL file individually, use the hollow icon to specify the wall thickness (3 to 4 mm should usually be sufficient) and then click "Start." Once done, you can resave the hollowed out STL file.
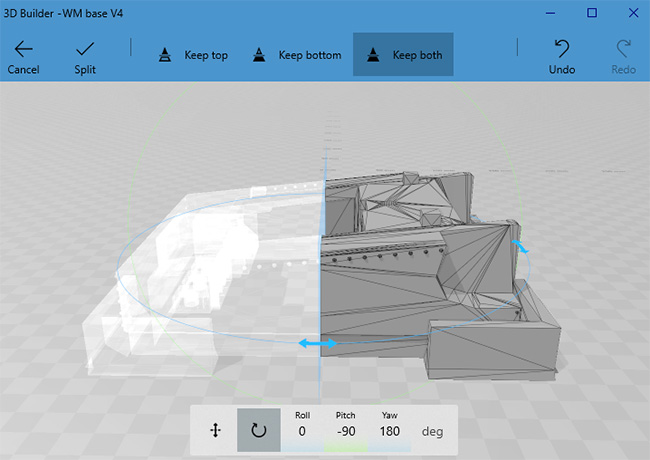
- Cut a model in half -- Sometimes larger models may need to be split to print in smaller print areas. There are several tools for doing this, but one of the easiest is the 3D Builder program that comes with Windows 10. After you import the model, select "Edit" and "Split" to open up a plane cut window. Make sure you select "Keep Both" then click "Split." This will give you two shapes on the right-hand side Items bar.
Click one of those objects and delete it, then go up to the file menu and click "Save As" to save the left (or right) hand shape as its own file. Once it's saved, hit undo to get both pieces back, then delete the other object, and "Save As" the other part.
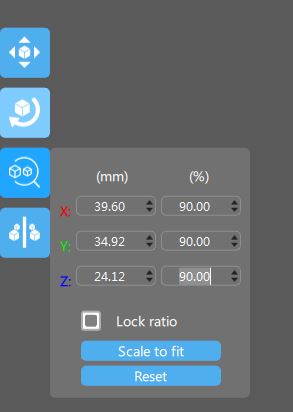
- Resize a model -- Sometimes, the person will recommend shrinking a model slightly so that it fits better on their build plate (or will be cheaper because it'll use less plastic). While this will make it slightly less than true 5.5" scale the biggest concern here is articulation and room for specially sized components. For example, the TARDIS Console is a figure that people sometimes want to shrink by 5-10% so it'll fit on their build plate better, however, if you plan on inserting LEDs or a motor, those holes will now also be 5-10% smaller and will no longer fit those parts, and neither will the recommended size acrylic tubing for the central column.
If you want to go ahead and shrink anyways (or try blowing a 5.5" figure up to 1:6 scale) the easiest way to do that is through Chitubox, which has a very easy grow/shrink button that will let you specify the percentage that the item should be changed by. Make sure you resave the STL file when done.
- Add or remove supports or heat barriers -- Most PLA filament printing versions of figures will have special supports or heat barriers (to prevent curling) pre-added for your convenience, which are touching the original model, so you won't be able to use the "ungroup" tool listed above. If your print service wants you to remove or modify these for some reason, you're probably going to have to import the files back into TinkerCAD and edit them out manually, or just use the SLA versions which don't usually come with supports.
- Make a part thicker -- This is not usually something that can be done. Typically the printer person is worried about overall print quality and concerned that thin parts won't print properly. You can always ask the Facebook Group for advice, but usually you just have to tell the printer to go ahead, and let them know that you understand that part of the model may not print very well.
I'm thinking of buying a 3D printer. What models do you recommend?
You're somewhat in luck here because the cheapest models on the market also happen to be among the best.
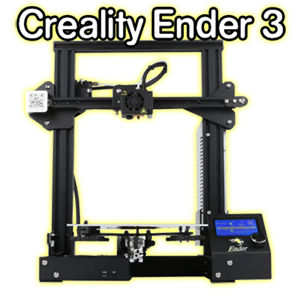
For standard filament printing, the vast majority of my 3D Printing group use the Creality Ender 3.
It's cheap, effective, has a nice large build area, and does pretty much everything that the more expensive models can do for a fraction of the cost. It also breaks down slightly less often than other filament printers and is also comparatively easy to get ahold of in the UK.
If you want to jump straight into resin printing, your three basic "starter" machines
are the Anycubic Photon, Elegoo Mars, or Creality Halot One. Different people will tell you one is better than the other but they're all pretty close in terms of price, print area, and resolution.
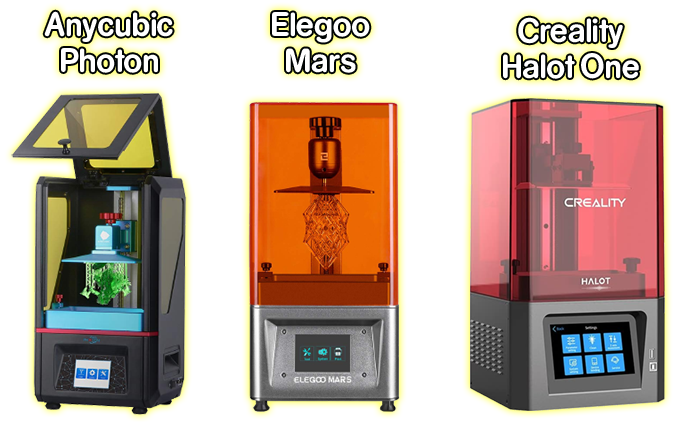
The Anycubic Photon comes with a lift-up flap door which makes accessing it a lot more convenient if you plan on putting your printer inside a cabinet. It comes with a starter bottle of slime green transparent resin, which is amusing but not particularly useful unless you want to print an entire army of Rutans. The build area is only 115mm by 65.02mm by 154.94mm, so it's pretty tiny. You should be able to print humanoid figures on this, but Daleks, TARDISes, and other large figures would need to be carved up into smaller pieces first.
The Elegoo Mars has a lift-off lid and typically runs £30 cheaper than the Photon, but doesn't come bundled with any resin, so they effectively come out to be the exact same starting price. The build areas is identical (both devices use the same replacement screen) but I've heard the Elegoo is slightly easier to use... probably because it comes bundled with Chitubox. Mind you, Chitubox is a free download and works with all three printers, so there's absolutely no reason not to use it if you happen to buy a Photon or Halot One.
The Creality Halot One is a newer model from the same company who released the popular Ender 3 filament printer.
This one comes with a slightly larger build area of 127mm by 80mm by 160mm, and a 2K mono screen, which gives it a definite edge over the two older models. But because it's the new kid on the block, it doesn't have quite the same level of community support as the other two. It also didn't have Chitubox compatibility at first, which you might see some people complained about online, but it's been fully supported since about 2022, so that's no longer an issue.
It does have a somewhat quirky interface where it requires an active wi-fi connection to change some of the print settings, like layer height and exposure time, which can be a pain if you plan on running it in a workshop or shed without internet connectivity. On the plus side, usually these settings don't need to be altered once they are set, so after your first couple of test prints, you should be fine. The designers also put the USB port (and a printer cable port) on the front of the printer rather than the side or the back, so it's much less annoying to load your print files, especially if you normally keep your printer in a dark cabinet.
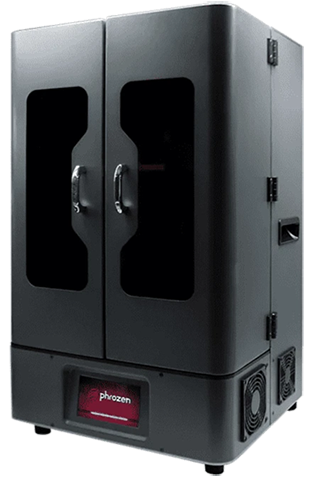
Finally, if you want to go BIG there's a whole new generation of larger scale resin printers that rival FDM printers in terms of size. I happen to own a Phrozen Transform, the biggest home printer currently on the market with a build area of 290mm x 160mm x 400mm. That's large enough to print an entire 5.5" scale Bessie or Whomobile in one chunk if I wanted to. One downside is that it'll cost you over €2200.
There are several other models on the market that fit between the two extremes. Mostly what you're paying for with the more advanced models is a larger print area and upgraded "dual rail"
Z-axis, which helps eliminate the twisting force caused by suction, which can damage your prints and build plate.
If you're looking for something in a middle, here are some shopping tips on things to look out for when choosing the model that is right for you:
What Specs should I look for in a filament printer?
For filament printers, here are some of the more essential specs to consider when comparing various models:
- The printer should use standard 1.75mm filament, a 0.4mm or smaller nozzle, and have a maximum extruder temperature of 260°C (500°F) or higher. This will allow you to print PLA (the most common type of filament) but also TPU, PETG, and other more exotic filament types when the design requires it.
- A large build area that's at least 7" x 7" x 7". The bigger the better here. The vast majority of our figures will fit on a 7" x 7" build area, but it's always safer to have more room to print extra brims and heat barriers.
- The smallest minimum layer height you can find. Most filament printers print at a standard minimum layer height of 0.1mm (100 microns) which is... okay.
Do not buy anything with a minimum layer height greater than 0.1mm, because your prints will look like garbage.
But if you can find a higher quality 0.05mm (50 micron) or 0.02mm (20 micron) printer in your price range, go for it. Layer height is the single most important factor in determining the overall quality of your prints, and the lower this number is, the smoother your diagonal/curved surfaces will look, and the easier the figure will be to paint once you're done.
- A heated build plate that you can attach a borosilicate glass plate to if your printer doesn't come preloaded with one. (These typically cost about £20, but make sure you can find one that's the same size as your print area.) This will help prevent curling on large pieces and give you a nice smooth finish on your bottom surfaces.
- Compatibility with CURA. It may or may not say this on the box or product details, but it's nice if it mentions it. If it says "works with standard GCODE editors" that's basically the same thing. Most printers are CURA compatible, but if it lists some other slicer software instead, you might want to ask some follow-up questions. The last thing you want to do is get stuck with proprietary in-house software that suddenly stops working when you upgrade computers or the company goes under and stop updating their product to work with the latest operating system changes.
- If you can, try to find a printer with a nice sturdy exterior frame that you can build an enclosure around (it doesn't need to be fancy, literally building a box out of foam core works pretty well). This will help regulate temperature and prevent curling on large designs, as well as keep out unwanted hair, dust, small hands or paws, and anything else you don't want to interfere with the print.
- Some newer printers will automatically sense when you're running low on filament and pause the print. I don't have a printer that does this, and I don't know how well it works, but it sounds like an incredibly useful feature to have, as it's often hard to judge how much filament is left on a roll, and there's nothing more frustrating that getting 4 days into a 5 day print job, and realizing you're going to be short by a couple of meters.
What Specs should I look for in a resin printer?
For resin printers, here are some of the more essential specs to consider when comparing various models:
- The largest build area you can afford. This is the biggest shortcoming of resin printers, so you don't want to shortchange yourself anymore than absolutely necessary.
At minimum, you should ensure your build area is at least as big as the Anycubic Photon or Elegoo Mars, which have a fairly standard build area of 115mm by 65.02mm by 154.94mm. The Creality Halot One has a larger build area of 127mm by 80mm by 160mm, which is better, but still tiny compared to filament printers.
- A minimum layer height of 0.02mm (20 microns) or lower. Most resin printers on the market will go down to 0.02mm as standard, but some larger models are not designed for fine detail work and have minimum layer heights of 0.10mm or 0.50mm, which is actually worse than you'll get off a filament printer. Layer height is the single most important factor in determining the overall quality of your prints, and the lower this number is, the smoother your diagonal/curved surfaces will look, and the easier the figure will be to paint.
Note that some high-end printers can go down as low as 0.01mm per layer, which is impressive, but anything lower than
0.02mm is going to be largely superfluous unless you like gazing at your figures through a magnifying glass, and never intend to paint them.
- Does it come with it's own slicer software that allows you to import STL/OBJ files, and/or is the printer compatible with Chitubox? Different printers come with different tools, in general, most slicer software should accept STL files, but it's nice if it also allows you to import the commonly used OBJ format without having to convert in another program first. Chitubox is a free independent slicer software similar to CURA that works better than the proprietary software that comes with the AnyCubic Photon, and gives you more flexibility when it comes to adding/removing supports and setting print parameters.
- Does it come with dual Z-axis rails? This is a very useful upgrade that comes standard on most of the larger printers but not all. Dual Z rails means there are two tracks supporting the build plate in the back of the printer. This adds a lot of stability and means your build plate can't twist sideways if it encounters a strong suction force. Cheaper entry level printers tend to use a simple ball joint for the build plate which is easily broken or pulled out of alignment with the LCD screen.
- Does it come with a LCD screen protector? This usually isn't a deal-breaker since you can usually purchase after-market screen protectors that fit between the glass screen and the bottom of the FEP vat. These protect your screen from scratches or damage if something happens to pierce the FEP liner.
Are filament printers safe?
This is a hard question to answer, since 3D printers are new enough that few long-term health studies have been done on them. Safety is mostly a matter of perspective, and your personal comfort level regarding chemicals with hard to spell names.
Filament printers are mostly considered non-toxic, and the filament itself is perfectly safe to handle both before and after printing. But there is evidence that suggests the gasses given off during the melting part of the print process releases CFCs which are carcinogenic. (Note that this does not mean it will give you cancer. Merely that prolonged exposure to it statistically increases your risk for cancer, just like any other offgassing plastic you might be in the vicinity of.)
If you have a filament printer, the safest way to operate it is by placing the printer in a well ventilated room away from where you eat or sleep, or put it in a garage or spare room that you aren't going to be spending a lot of time im, where the fumes can safely dissipate before you go in to retrieve the finished prints. You can also invest in an enclosure that surrounds your printer which will help contain smelly fumes, as well as maintain a steady temperature inside the print area which will help prevent curling damage.
Are resin printers safe?
Again, "safety" is a matter of perspective and comfort level. The short answer is "No. They can be hazardous to your health and you should absolutely be responsible and use protection when operating them."
Resin printers are "dangerous" in the same way that operating a home dark room or
using model paints and an airbrush are "dangerous." And the level of protection you should be using for all three are about the same: wear gloves and a mask to protect your skin and lungs when handling raw chemicals, and don't hang out in the vicinity of the fumes any longer than is strictly necessary. As long as you follow basic safety precautions, you're about as safe as you can be handing chemicals, and the risk to your health is comparatively low (but not non-existent).
Here's a few basic safety warnings you should know about resin going in.
In liquid form:
- It gives off carcinogenic fumes that you want to limit your exposure to as much as possible.
- It is a skin irritant, and can cause serious burns if you happen to have some on your skin and then walk outside or put your hand under a UV cure light.
- It is flammable.
- It generates considerable heat as it cures.
- It is toxic, so don't drink it.
- Do not get it in your eyes.
- It will stain most things it touches, so do your best to keep it off of your clothes and carpets. (Putting down a plastic chair mat is a wise move)
- It is most dangerous to pets and small children who aren't aware of the dangers and might be tempted to taste and/or knock over the funny looking liquid.
While being cured (Both in the printer and under the UV cure light):
- It gives off even more carcinogenic fumes that you want to limit your exposure to as much as possible.
- It generates considerable heat as it cures.
- Exposure to UV light increases your risk of skin cancer.
- Don't do anything stupid like reach into your cure box to flip over a piece while the cure light is still on.
In its solid form (after curing):
- It will continue to off-gas for a while. I prefer to cure my prints on a metal baking tray and leave them to sit out in the garage for a day or two before I start painting them.
- The little bits of supports you trim off can be as sharp as broken glass, and have a tendency to fly off into the corner of the room when you snip them. It's a good idea to sweep up and vacuum, or at the very least, make sure you aren't walking around barefoot.
- If you sand down a piece, the dust is a microplastic with the consistency of powdered glass that is very very bad for your lungs, and most other parts of your body too. Always wear a mask and eye protection, and vacuum up the dust immediately.
- If your use a belt sander, disc grinder, or any other power tool to sand your prints, be warned that no matter how well you vacuum up the resin powder, it will probably kick up a big cloud of the stuff the next time you turn it on. If you work with resin, or tools that have interacted with resin, it is a good idea to always wear a filter mask when operating them.
- After a little while, your alcohol bath will start looking pretty scudgy with half-cured resin. The best way to deal with this is to use a resin filter to strain the liquid into a gallon freezer bag, then leave the pulpy sludge in an old pie tin to cure in the sun. (Then throw away the pie tin.) Just keep an eye on the weather. Rain can carry the chemicals away where they are super toxic to fish and wildlife, and wind can knock the pie tin over or blow the powdered residue all over your garden where it is likewise a danger to yourself, wildlife, and your pets.
|